
Discovering the simplicity of how to import a text file using Excel is an essential skill for anyone dealing with data. You don’t need costly add-ons or advanced programming knowledge in Excel VBA.
This step-by-step guide is designed for everyone, especially beginners, making the process of importing text files into Excel straightforward and efficient.
Table of Contents
Introduction
In the realm of big data, text files are ubiquitous due to their efficiency in storing and transporting vast amounts of data. These files, typically recognized by their “.txt” extension, can be easily opened using basic applications like Notepad, although large files might take some time to load.
Here’s a glimpse of what a typical text file looks like when opened in Notepad:
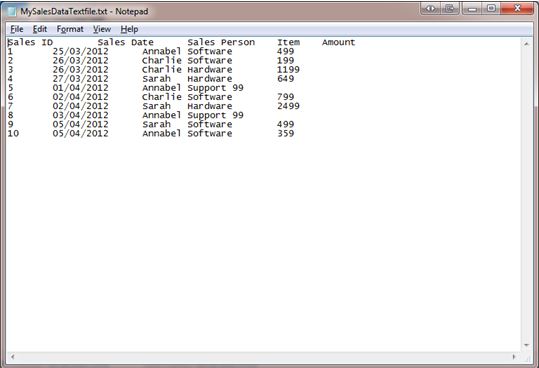
Text files are precisely what their name suggests: collections of plain text.
Within these files, you might find numbers and dates. However, in their raw form, they’re somewhat rigid – akin to attempting calculations within Microsoft Word. Our focus here is to unlock the potential of these text elements by learning how to import a text file using Excel, transforming static text into dynamic, workable data within the versatile environment of Excel.
Why is Data Stored in a Text file?
Understanding why data is often stored in a text file is crucial when you delve into how to import a text file using Excel. At first glance, storing data in a format that doesn’t support direct calculations or data manipulation might seem limiting. However, there are significant advantages to this approach:
Efficient Memory Usage
One primary benefit of using text files is their efficiency in memory space utilization. When data is saved in a text file format, it consumes considerably less storage compared to an Excel spreadsheet or other sophisticated data processing software. The reason lies in the simplicity of text files – they do not store complex elements like calculations, formulas, or diverse data formats, resulting in a more compact and less memory-intensive file.
Versatility for Diverse User Applications
Another significant advantage of text files lies in their universal compatibility. When you import a text file using Excel, you’re tapping into a universally recognized format. Text files can be seamlessly imported into virtually any database or spreadsheet application available in the market. This universal compatibility is particularly advantageous when creating data files intended for use by multiple stakeholders. By using a text file, you ensure that everyone, irrespective of the application they use for data analysis, can access and utilize the data effectively.
How to Import a Text File Using Excel
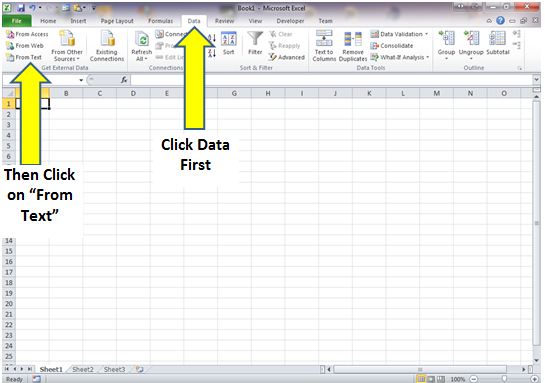
The first step is to open up your copy of Excel and in a new workbook select the ‘Data’ tab from the Excel Ribbon across the top. In the left corner of the ribbon you will have an icon that says ‘From Text‘, click that icon to start the import process.
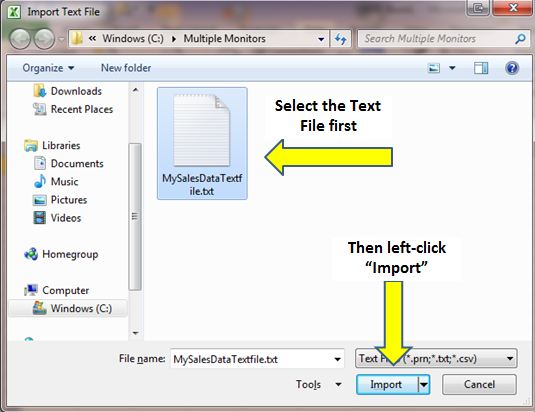
Next a window will open asking you to locate the text file to import. Navigate to the text file and select it by clicking on the file icon and then select ‘Import‘.
The next stage to import a text file using Excel is to complete the ‘Text Import Wizard‘.
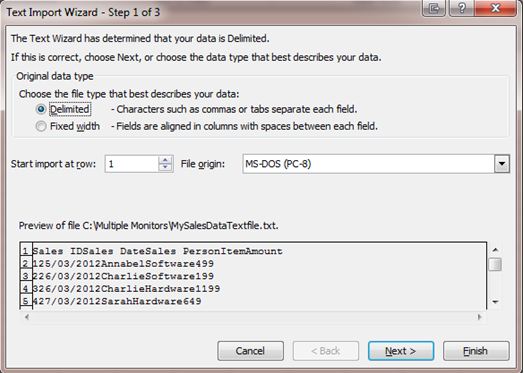
Text Import Wizard – Step 1 of 3
The ‘Text Import Wizard‘ does a good job of interpreting the format of the text file. This means step one of the wizard is usually just a case of double-checking everything looks ok.
If you know you need to change something about your text file then do it at this stage, otherwise select ‘Next’ and move onto Step Two. For information the options in step one are:
- Delimited or Fixed Width: This option determines how Excel will interpret the structure of your text file. If you choose ‘Delimited‘, Excel will look for specific characters (like commas or tabs) to separate each field. This is common in CSV files where commas are used to separate values. On the other hand, ‘Fixed Width‘ means that Excel will expect each field to be a set number of characters wide, a format often used in text files where columns are aligned by spaces.
- Start Import at Row: This setting allows you to specify the starting point of the data import. By adjusting the ‘Start Import at Row’ number, you can skip over any preliminary data or headers in the text file that are not part of the actual data you wish to import. This is particularly useful if your text file contains titles, descriptions, or any non-data text at the beginning.
- File Origin: This option is about the encoding of the text file. ‘File Origin‘ lets you select the character encoding used in the text file, ensuring that text is correctly displayed when imported into Excel. This is crucial for files containing special characters or when dealing with text files created in different languages or on different computer systems, as it affects how characters are interpreted and displayed.
Text Import Wizard – Step 2 of 3
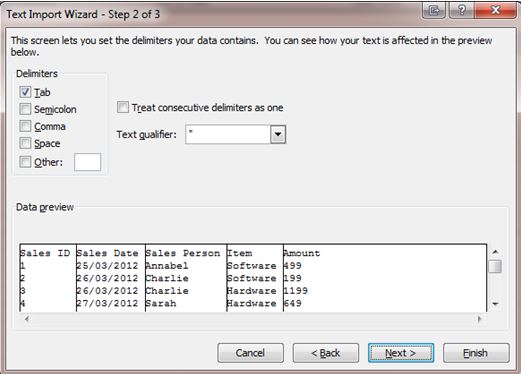
Moving onto Step 2 of the ‘Text Import Wizard‘ this section allows you to alter the Delimiter settings if needed. As with Step 1 Excel usually does a good job of interpreting the text file so you probably can double-check and click ‘Next‘. However, if the data in the ‘Data Preview‘ window does not look quite right then you need to change the options first:
- Delimiters: This setting allows you to specify the characters that Excel should use to separate individual fields within your data. Common delimiters include commas, tabs, semicolons, spaces, or other special characters. In this step, you can select one or more delimiters based on the format of your text file. For example, in a CSV (Comma-Separated Values) file, you would typically choose the comma as your delimiter.
- Treat Consecutive Delimiters as One: When this option is selected, Excel will treat a sequence of two or more delimiters as a single delimiter. This is particularly useful for files where spaces or other characters might be used inconsistently between fields. For instance, if there are varying numbers of spaces between words in a space-delimited file, enabling this option ensures that Excel correctly identifies each field without creating empty columns for extra spaces.
- Text Qualifier: This setting allows you to define a character that encloses the text in each field. The most common text qualifiers are quotation marks. When a text qualifier is set, Excel treats everything inside the pair of qualifiers as a single field, even if it contains delimiter characters. This is particularly useful when field data includes delimiters as part of the text, like a comma in an address or a quotation within a sentence.
Text Import Wizard – Step 3 of 3
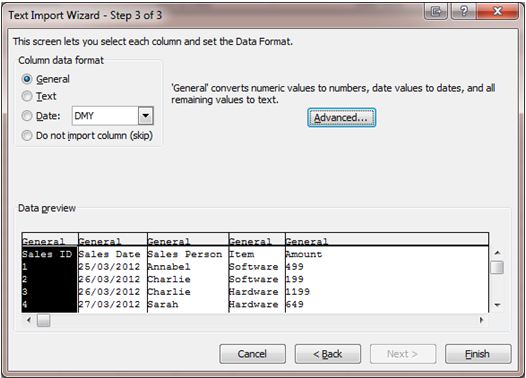
In Step 3 of the ‘Text Import Wizard‘ you can choose the data types for individual fields in the import file. As with before there is a ‘Data Preview‘ window, however this time it shows what format Excel intends to apply to each column of data.
- The default data type applied is ‘General‘ and in 99% of occasions that will suffice. This format will convert numbers to numbers, dates to dates and leave text and text so unless there is an unusual data types in the file there is usually no need to change this section.
- If you do need to change the type then select the column you want to alter in the ‘Data Preview‘ window and then select the type from the ‘Column Data Format‘ options on the top left.
- For even more advanced options, such as including decimal places, click on the ‘Advanced…’ button with the column is still highlighted in the Data Preview. From there set you options as required.
Click on ‘Finish‘ and then in the ‘Import Data’ options box that appears choose where you want the Imported text file to start, then click ‘OK‘ and this will import a text file using Excel.


Tips for Importing a Text File Using Excel
Importing a text file into Excel can streamline your data analysis and organization. However, to make the most out of this feature, it’s important to follow some best practices. Here are tips to ensure a smooth import process:
- Preview Your Data: Before initiating the import, preview your text file in a text editor like Notepad or TextEdit. This helps you understand the data structure, including delimiters and text qualifiers, enabling you to make informed choices during the import process.
- Choose the Right Delimiter: When you import a text file using Excel, selecting the appropriate delimiter is crucial. If your text file is comma-separated, select ‘comma’; for tab-separated files, choose ‘tab’. The correct delimiter ensures that your data is accurately divided into columns.
- Check for Extra Spaces: If your data includes extra spaces, particularly in a fixed-width file, make sure to use the ‘Treat Consecutive Delimiters as One’ option. This prevents unnecessary empty columns and keeps your data clean.
- Set the Correct Data Type for Each Column: During the import, Excel will attempt to automatically determine the data type for each column (e.g., text, date, number). However, it’s wise to manually verify and set the correct data type, especially for columns with mixed data formats.
- Use Text Qualifiers When Necessary: If your data contains delimiters within fields, such as commas in an address field, ensure you set the appropriate text qualifier (usually double quotes) to prevent the data from being split incorrectly.
- Consider Large Files: For extremely large text files, Excel might not be able to load the entire file due to row and column limits. In such cases, consider splitting the file into smaller parts or using a more robust data processing tool.
- Save Your Import Settings: If you regularly import text files with similar formats, save your import settings as a reusable template. This can save you time and ensure consistency in future imports.
Summary
The ability to import a text file using Excel is an invaluable skill, particularly in the business arena where data is frequently encountered in various formats. This technique is not only useful but also essential for efficient data management.
Excel’s user-friendly interface makes the process of importing text files remarkably straightforward. Often, Excel’s intuitive design handles much of the import process automatically once you’ve selected the text file. However, it’s always wise to familiarize yourself with the import options, especially when dealing with a new text file format.
A key aspect of this process involves carefully reviewing the Data Preview in the Import Wizard. Ensuring the data appears correctly here is often indicative of a successful import. Remember, the accuracy of your initial setup in Excel can significantly impact the effectiveness of the data import. With a little practice, you’ll find that importing a text file using Excel becomes a seamless and error-free part of your data analysis routine.
Keep Excelling,

Now that you’ve mastered how to import a text file using Excel, it’s time to elevate your data management skills further. Dive into our next guide, “Excel Filters for Beginners“, and discover the power of Excel filters. Learn how to sift through and analyse your newly imported data with ease, making your Excel experience more efficient and insightful. Whether you’re sorting sales data or organizing customer information, our beginner-friendly guide will transform the way you view and handle data in Excel. Join us on this journey to become an Excel pro!