
Many Excel developers grapple with handling data in various formats. In this post, we delve into a common challenge: learning to separate a text field into parts. This skill is crucial for splitting naming salutations or addresses, especially when importing data from other sources. Our guide offers straightforward steps to master this task, enhancing your data management capabilities in Excel.
In this post we will look at:
- Introduction
- Scenario
- Background Function Knowledge
- Separating using the LEFT and SEARCH functions
- Separating using the RIGHT, SEARCH and LEN functions
- Tips for Separating a Text Field into Parts
- Summary
Introduction
Data arrives in various forms and formats, and experienced analysts often encounter types that range from user-unfriendly to outright unsuitable for analysis.
A frequent issue is text fields crammed with multiple data points. For instance, names and addresses might be merged into a single field when importing from other systems, complicating tasks like sorting by surname. This guide addresses how to separate a text field into parts, turning a jumbled text field into an analysable resource.
Scenario Example of Separating Text into Parts
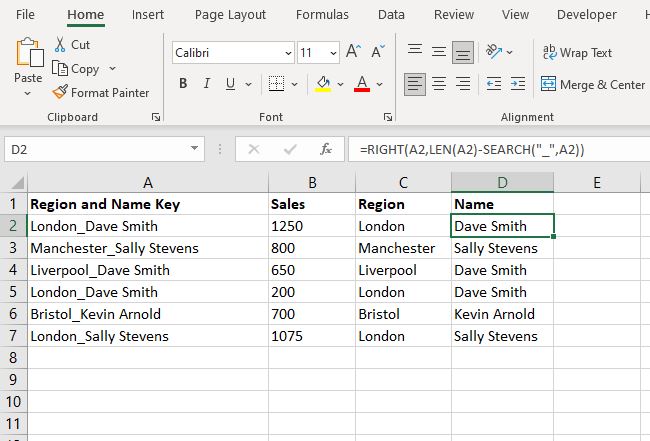
Assume a manager asks for a sales report by ‘Staff Name‘ and by ‘Region’ for one of your company suppliers, “ZZZ Corp”. After contacting ZZZ Corp they provide you with an extract of Excel data:
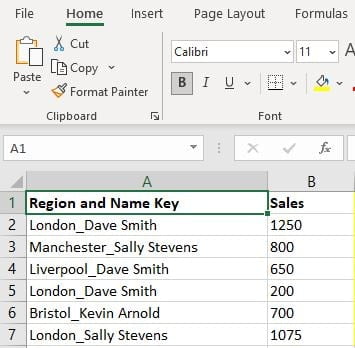
As the data image shows, the ‘Region and Name Key‘ have been combined. The field starts with a region and then an underscore separates the region from the staff name. The challenge is now obvious, we need to separate a text field into parts.
Specifically the task is to split the text in the ‘Region and Name Key‘ into two parts, one for ‘Region‘ and one for ‘Staff Name‘.
Background Knowledge
In order to complete the task we need to familiarize ourselves with some Excel functions:
- LEFT Function: This will read the text cell starting from the left side.
- RIGHT Function: This will read the text cell starting from the right side, or end, of the text.
- MID Function: This will read the text cell from a specified point in the text, i.e. the 4th character. This is mainly useful when your text strings are exactly the same length and format.
In addition a couple of very useful functions for splitting text fields are:
- LEN Function: This will calculate the length of the string, i.e. counting the number of characters in the text.
- SEARCH Function: This will search for a specific character in the text string, for example search for an underscore.
Let’s see how we can utilize these functions to separate a text field into parts in Excel.
Step One – Separate the Region
The first step in the process to separate a text field into parts is to separate the ‘Region‘ from the ‘Region and Name Key‘.
Looking at the data we can see that the region part of the text string is always the first part, which is then separated by an underscore before stating the staff name.
Therefore we can use the LEFT function, which will tell Excel to start from the first character of the string. The LEFT() function takes the format:
- LEFT(text, number of characters)
This is where ‘text’ refers to the cell containing the text string to convert and ‘number of characters‘ refers to how many characters to include, starting from the first character.
This poses a question though, how many characters to include? The region changes in length, for example London has a length of 6 characters whereas Liverpool is 9 characters in length. This is where we need to include another function in the formula.
SEARCH Function
The SEARCH function takes the format:
- SEARCH(find_text, within_text, [start number])
In this example the region and name has an underscore that separates them. By using the SEARCH function to identify the position of that underscore we can then incorporate it into the Left function written above. This will tell Excel how many characters to include from the first one.
Therefore combining everything together the formula to split the ‘Region’ from cell A2 would be:
- =LEFT(A2,SEARCH(“_”,A2))
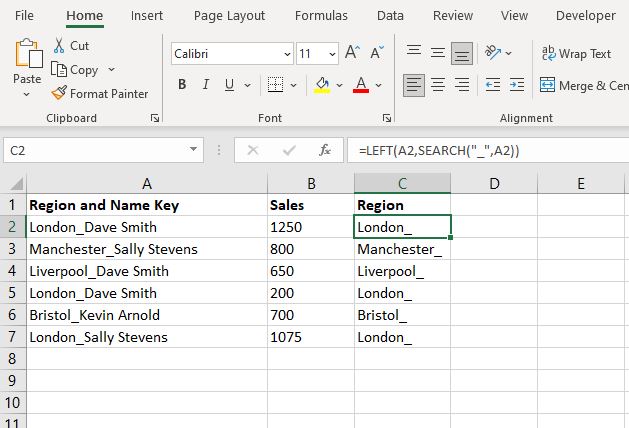
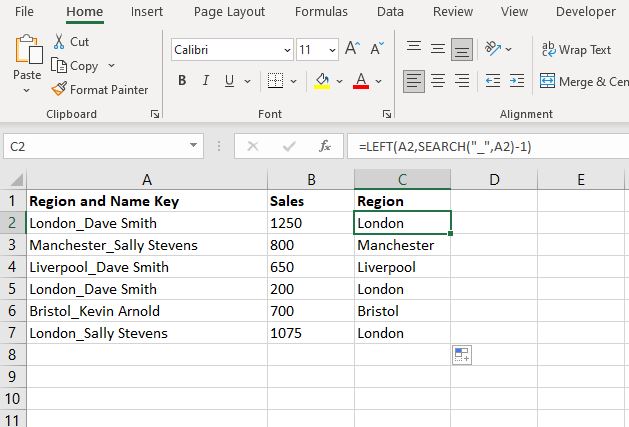
Notice that the result is including the underscore. That is because Excel is counting all the characters from the 1st one all the way up to, and including, the underscore. To mitigate this subtract 1 character position from the result of the SEARCH function so the new formula for region is:
- = LEFT(A2, SEARCH (“_”, A2 ) -1 )
The ‘Region‘ will then have been separated from the text string, making it a easier for further analyses and reporting.
Step Two – Separate the Name
The next step is to separate the name. There are a couple of ways to achieve this but the most efficient way is to combine the RIGHT Function in combination with the SEARCH Function and the LEN() function, which calculates the length of the text string.
To understand why the LEN() function has to be used this time its important to review how the Right function works first. The RIGHT function works in the same manner as the LEFT function used previously but instead of counting from the first character it counts from the last.
The starting point for the name remains consistent, it always begins after the underscore, and as with the Region example the underscore can be identified by the SEARCH Function. But what happens if we just use the RIGHT function combined with the SEARCH function:
- =RIGHT(A2,SEARCH(“_”,A2))
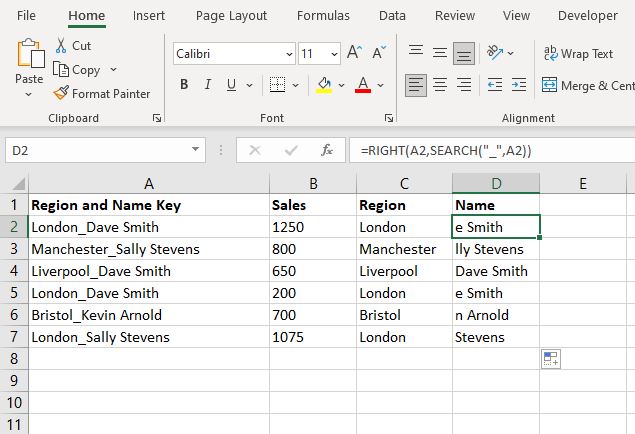
At first this looks like an odd result. From the earlier example we know that the position of the underscore changes depending on the length of the region. For cell A2 Excel is counting back 7 characters because the underscore in located in position 7, for cell A3 the underscore is located in position 11 so it counts back 11 characters from the last. This is something we can fix.
Time for Some Basic Math
We need to understand some basic math here, remember:
- The SEARCH function can be used to find the position of the underscore.
- The LEN() function can be used to find how many characters the entire string contains.
Therefore if we subtract the position of the underscore from the total length of the string the result will be the length of the name.
- =RIGHT(A2,LEN(A2)-SEARCH(“_”,A2))
For example in cell A2, “London_Dave Smith“:
- The length of the text string is 17 characters.
- The position of the underscore is character 7.
- Therefore 17-7 = 10. In other words we tell Excel to count back 10 characters from the Right to capture name.
And with that the problem is resolved and the Excel formula now dynamically adjusts for all name and region lengths.
Additional Tips to Separate a Text Field into Parts
When working with Excel to separate a text field into parts, here are some practical tips to enhance your efficiency and accuracy:
- Use Trim for Clean Data: Before separating text fields, consider using the TRIM function to remove any extra spaces. This ensures that your split is accurate and your data is clean.
- Combine with IF Statements: Sometimes, text fields vary in format. Combine the LEFT, RIGHT, SEARCH, and LEN functions with IF statements to handle different formats within the same column.
- Test with Small Data Sets: Before applying the function to your entire dataset, test it on a small sample. This approach helps you tweak the formula for accuracy without overwhelming your data.
- Document Your Steps: Keep notes on the steps and logic you used to separate a text field into parts. This is especially helpful for complex data or when revisiting the spreadsheet later.
- Leverage Conditional Formatting: Use conditional formatting to highlight anomalies or successes in your separated data. This visual aid can quickly show you if the data is split as expected.
Remember, separating text fields in Excel might seem daunting at first, but with these tips and a bit of practice, it becomes a straightforward and invaluable skill in your data analysis toolkit.
Summary
In summary, this guide on how to separate a text field into parts in Excel has introduced you to the practicality and efficiency of using the LEFT, RIGHT, SEARCH, and LEN functions. These tools are not just functions, but gateways to a world of streamlined data manipulation. By mastering these techniques, you unlock new potentials in data analysis, making your Excel experience more productive and insightful.
As you continue to explore and apply these functions, remember that each dataset presents a unique opportunity to apply these powerful Excel capabilities.
Keep Excelling,

Now that you’ve mastered separating text fields in Excel, why not enhance your Excel skills further? Check out our next post, “How to Create an Excel Chart with a Scroll Bar.” Discover how to add interactive elements to your Excel charts, making your data presentations more dynamic and engaging. Click here to learn this innovative Excel technique!