
Understanding how to protect cells and formulas in Excel is a crucial aspect of spreadsheet management. This capability is vital when you need to safeguard certain cells, formulas, or even entire worksheets from unintended modifications. Excel’s protection feature is particularly beneficial in scenarios like securing sensitive data or preserving the integrity of standardized reports.
Protect the whole Worksheet
When you protect a cell or a range in Excel, it restricts editing, ensuring that the content remains unchanged unless accessed with the correct password. This feature is adaptable; you can protect individual cells, multiple ranges, or entire worksheets based on your needs.
For instance, protecting an entire worksheet is essential for reports intended for external distribution, such as annual performance or financial summaries. To activate this protection, simply right-click on the worksheet tab at the bottom of the Excel interface, and select ‘Protect Sheet‘.
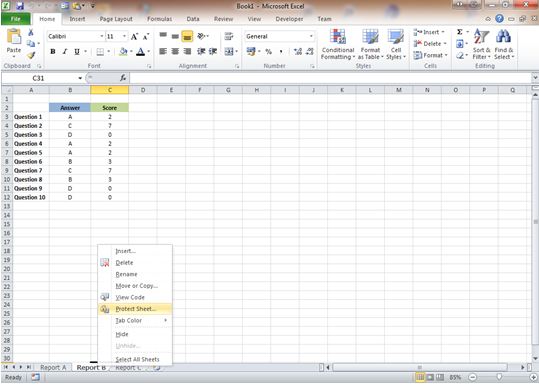
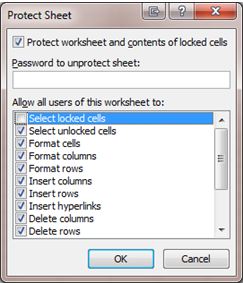
When you have selected ‘Protect Sheet‘ the options box will appear where you can control the protection settings.
By default the top box “Protect worksheet and contents of locked cells” will now be checked, along with the Top 2 options from the list, “Select locked cells” and “Select unlocked cells”:
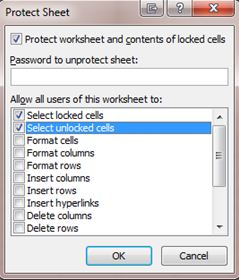
In order to prevent users making any changes to any cell within the worksheet de-select “Select unlocked cells”, notice that by doing so it automatically de-selects “Select locked cells” as well:
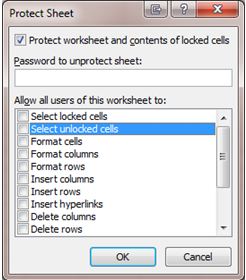
Now it is time to set a password. Standard password logic applies in that you should be creative, especially if the data is of any importance. Remember that you can still protect the worksheet without a password by leaving the password field blank and clicking on OK.
Note: This does mean a user only has to select “Unprotect Sheet” by right clicking the worksheet name tab and they will be able to make changes.
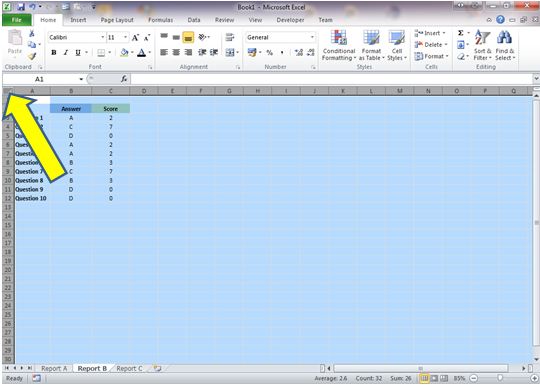
With your password set, left-click OK and your Worksheet is now fully locked. If you test clicking within the worksheet cells you will notice you can’t, the only thing you can do is scroll up and down, or left and right.
Protect certain parts of a worksheet
When working with Excel, there are instances where you need to protect cells and formulas in specific parts of a worksheet while allowing flexibility in others. This is particularly relevant in scenarios like distributing a scoring questionnaire to staff. You may want respondents to input their answers freely but ensure that the formulas calculating scores are safeguarded from alterations.
The best approach to achieve this is to start by unlocking all cells. This initial step ensures that, when you later lock specific cells, only those designated areas are protected, maintaining the integrity of crucial data or formulas
Select the entire worksheet by left-clicking in the top left corner (the square that sits above row number 1 and before column A):
Next right click the mouse and select Format Cells:

Then select the far right tab Protection and uncheck the Locked box:
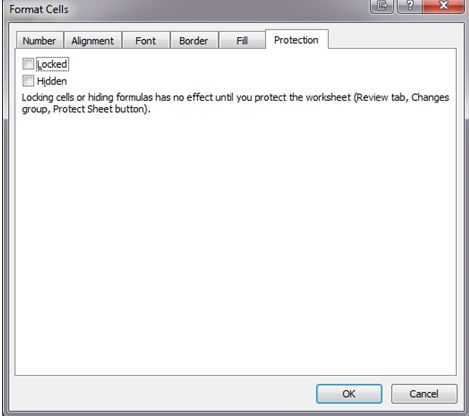
Left-click on OK and that’s the entire worksheet unlocked.
Lock the Worksheet
The last step in the process to protect cells and formulas is to relock the specific cells we want to protect – which is just a reversal of what we have just been through, followed by setting the protection on the worksheet as done in the previous section.
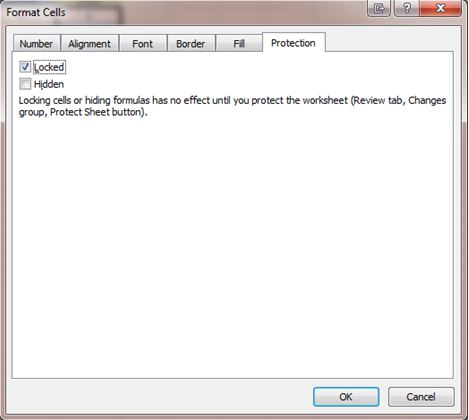
First highlight the cells that you want to protect and right-click, select Format Cells:

Again, go to the Protection tab but this time make sure the Locked box is checked:
Left-click OK. Now check the protection settings on the worksheet by Right-clicking the worksheet name and select Protect Sheet.
In the options box that appears you now need to create your settings, here we make sure that the user is unable to select the locked cells, which will prevent them from altering the specific cells we just locked, but it still allows the user to do everything else:
When you have you completed your settings enter a password, left-lick OK, save the file and you have completed the task.
Summary
In conclusion, employing the ‘Protect Cells and Formulas’ feature in Excel is a strategic decision, largely influenced by the intended users and purpose of the workbook.
For external-facing reports, such as those shared with clients or media, locking down entire sheets or workbooks is paramount to maintain control and data integrity. Conversely, internal reports might require a more flexible approach, yet safeguarding critical cells, especially those containing formulas, is essential to prevent accidental alterations or deletions.
With practice, applying these protections in Excel becomes a swift and intuitive process, offering a robust way to secure your data and enhance your reporting efficiency.
Keep Excelling,

Ready to take your Excel skills to the next level? Dive into our next post, ‘How to Sort Data with Excel‘, and unlock the secrets of efficient data organisation. Don’t miss out on mastering this essential Excel feature.