
In our data-driven world, safeguarding your Excel workbooks is crucial. Whether you’re a business analyst handling sensitive data or an individual organizing personal information, ensuring that your Excel files remain unaltered by unauthorized users is a key concern.
This is where the ability to make your Excel workbook read-only becomes an invaluable skill.
Why Opt for a Read-Only Excel Workbook?
Making your Excel workbook read-only is a straightforward yet effective way to prevent unintended alterations.
When you set a workbook to read-only, anyone opening the file can view its contents but cannot make changes unless they have a password you’ve set. This feature is particularly useful in a business environment where maintaining the integrity of data is paramount.
For instance, when sharing financial reports or project plans via email or within your organization, you’ll want to ensure the information stays as you intended. By choosing to make your Excel workbook read-only, you’re taking a proactive step towards data security and control.
In the following sections, we’ll explore how to easily apply the read-only option to your Excel workbooks, ensuring that your data remains secure and unaltered in the hands of others.
Turn your Excel Workbook into Read-Only
To make your Excel workbook read-only complete the following steps:
With the Excel Workbook open that you want to make Read-Only the first step is to select File > Save As using either the Menu bar at the top of the screen or by pressing the Office button if you are on an older version of Excel.
Alternatively the shortcut command of holding down the ALT key and pressing F2 will take you directly through to the Save As window.
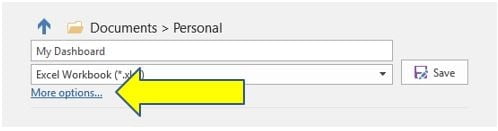
You will see the Save As screen first, select the More Options text to take you through to the Save As Window:
On older versions of Excel, or if you use the shortcut command of ALT+F2 to initiate Save As, you will proceed directly to the Save As Window, at this point select Tools:
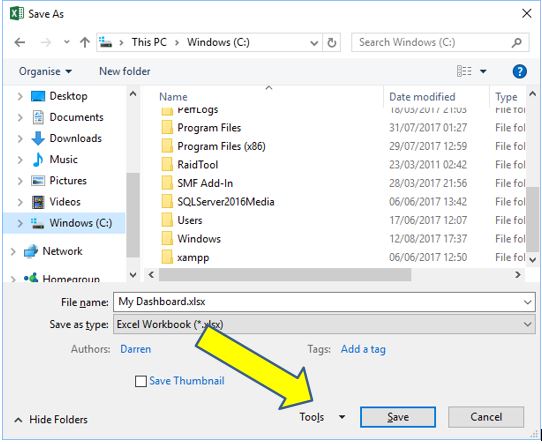
After selecting Tools a small menu pops up with four options, select General Options from this list and the General Options Window will show.
This will allow you to make the Excel workbook Read-Only (by checking the box as shown below) and also you can set a password that will allow you to Modify the Excel Workbook:

After checking Read-Only and setting a Password to Modify the Excel Workbook click on OK.
A Password confirmation box will pop up where you need to re-enter the password just set. This is a safety feature to make sure you really know that password and haven’t made any mistypes in the previous step.
Re-enter the password and select OK:

After clicking OK you are taken back to the Save As Window and all that is left to do is click Save, this will save the Workbook with the new Read-Only setting and Modify Password.
Note that for the changes to take effect the Workbook must be closed and re-opened after you have saved it.
When re-opening your Excel Workbook you will be presented with the following box, this is what everyone who opens the file will now see:
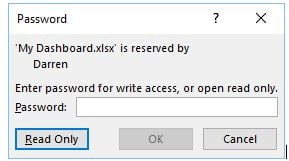
This shows the user that the Excel Workbook has been protected and unless you have the password to gain write-access and modify the Workbook the only option is to open the Excel Workbook as Read Only.
Remove Read-Only from your Excel Workbook
There may come a time when you want to revert your Excel Workbook back to the original state and remove the Read-Only feature.
This is a simple process of following the same steps as above by going via the Save AS method but this time around you will remove the check box that makes the Excel Workbook Read-Only and also delete any Password that has been set.
As with before you would then Save the Workbook with these new settings and they will be applied the next time the Workbook is opened.
Summary
Securing your data is crucial in any professional setting. By understanding how to make your Excel workbook read-only, you safeguard your information against unintended modifications.
This guide has walked you through the various methods to achieve this, ensuring that your workbooks remain pristine and unaltered by unauthorized edits.
Whether you’re sharing financial reports, project plans, or sensitive data, knowing how to make your Excel workbook read-only is an essential skill in your data management toolkit. Implement these steps to maintain the integrity and accuracy of your Excel documents, fostering a more controlled and secure data environment.
Keep Excelling,
Mastered making your Excel workbook read-only? Then it’s time to enhance your data security even further with our guide on how to password protect Excel files.