Printing in Excel might seem straightforward, but it’s an area where many newcomers stumble. If you’re new to Microsoft Excel and struggling to print in Excel effectively, such as by fitting your data cleanly onto a printed page, you’re in the right place. Keep reading to learn the fundamentals of mastering Excel printing.
The Unique Challenges of Excel Printing
Unlike standard document formats like PDFs or Word files, Excel worksheets present unique challenges when it comes to printing. The standard A4 paper size, which is commonly used in homes and offices alike, may not perfectly accommodate your Excel layout.
Excel worksheets can span a much larger area than a traditional A4 sheet. Alternatively, you could end up with an awkward division of your data, where most of your document prints on one page and a small fragment spills onto the next.
Not only does this compromise readability, but it also doesn’t reflect well on your capabilities as an Excel analyst.
To Print in Excel
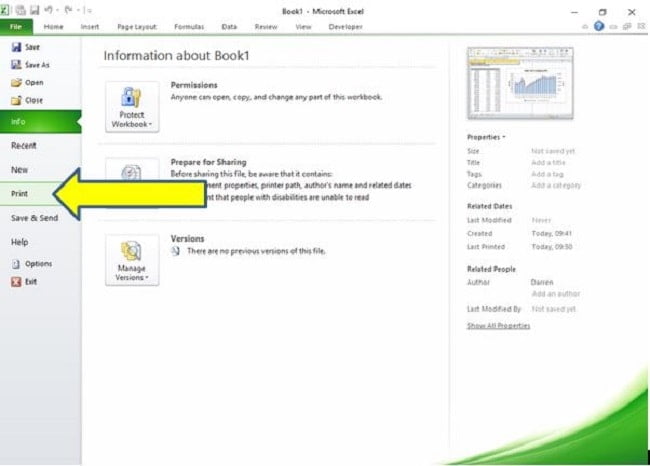
At the very basic level in order to print from Excel click on the File menu tab from the Excel Ribbon. This can be found at the top of the Excel window in the far left corner as shown below:

The next step is to select the Print Menu as shown in the below image:
Once you’ve navigated to the Print menu, you’ll find a prominent ‘Print’ button situated near the top of the window
Under that button, is a designated area labelled ‘Printer‘, this is where the name of your connected printer will appear. Keep in mind that you’ll need a printer connected to your computer for the print command to actually work.
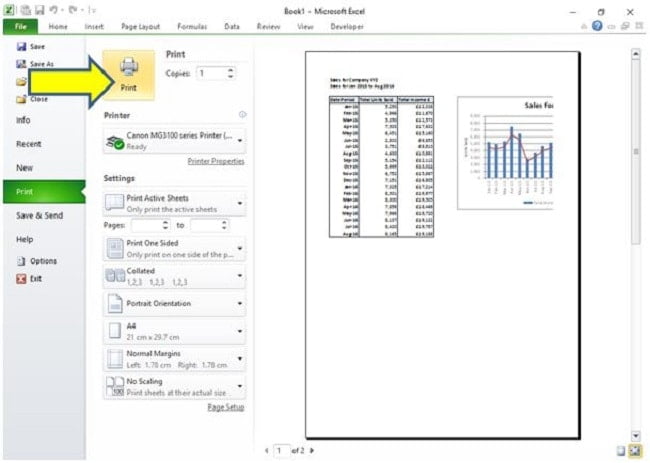
By default the Active Worksheet will be printed, that is the Worksheet you had selected when you began the Print process.
If all of that seems a bit long-winded then you can always set up a custom Print button on the Ribbon or simply get directly to the Print Menu with the shortcut command of CTRL+P.
Mastering Two Crucial Aspects of Excel Printing
One of the key skills every Excel newcomer should acquire is understanding how to set Print Areas. Setting a Print Area not only clarifies which cells you intend to print but also prevents Excel from unnecessarily printing empty spaces. Thankfully, setting a Print Area is a straightforward process.
How to Set a Print Area in Excel
- Select the Target Area: First, navigate to the worksheet where your data resides. Begin by clicking on the top-left cell of the range you want to print.
- Highlight the Range: While holding down the left mouse button, drag your cursor across to cover the entire range you wish to print. You’ll know you’ve done it correctly when the selected cells change to a blue shade.
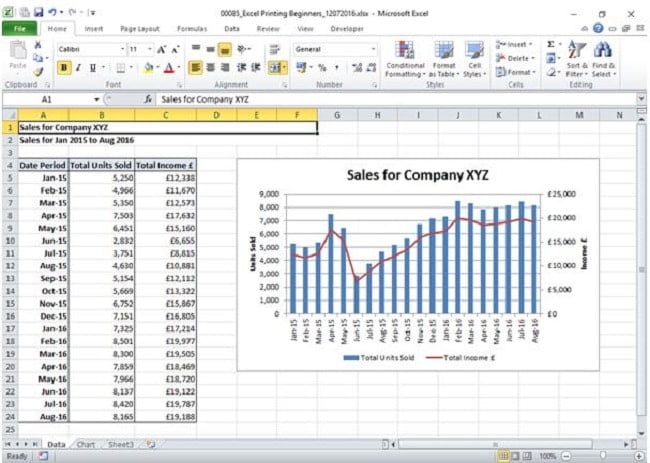
This is the original worksheet:
And now with the Print Area selected it becomes highlighted:
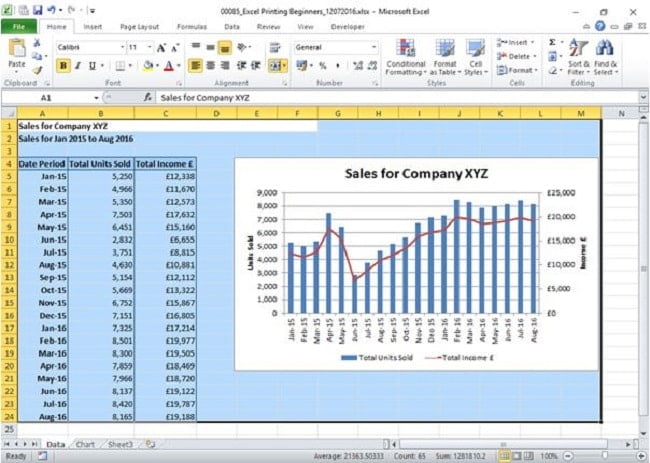
With the Print area selected the next step is to click on ‘Page Layout’ on the Excel Ribbon, followed by ‘Print Area’ and ‘Set Print Area‘.
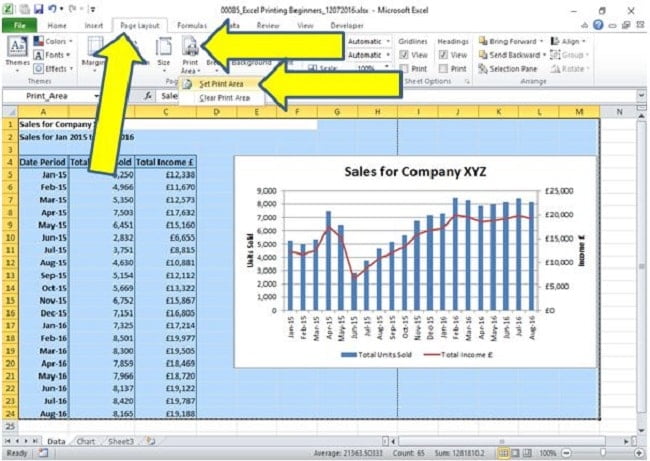
The Print Area is now set!
But wait, I did mention there are two important aspects to learn, let’s look at the other.
How to fit your Excel data to a single page
When you have set your Print Area, you will notice a dotted line appearing on your worksheet. This line represents Excel’s current print margin.
In some instances, as in our example, you may find the margin slicing right through vital data, like a chart.
This would result in your chart being awkwardly divided across two printed pages—a far-from-ideal situation unless you’re a fan of piecing together your reports with sticky tape, don’t print in Excel that way!
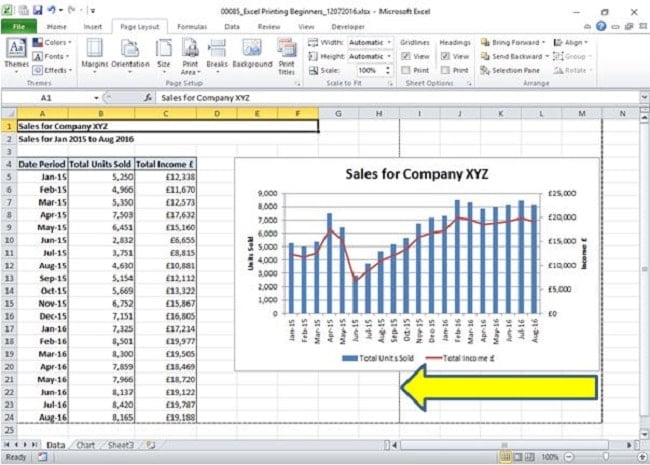
To fix this and ensure all of the range fits onto a single page first click on the arrow within the ‘Page Setup’ box on the Excel Ribbon:
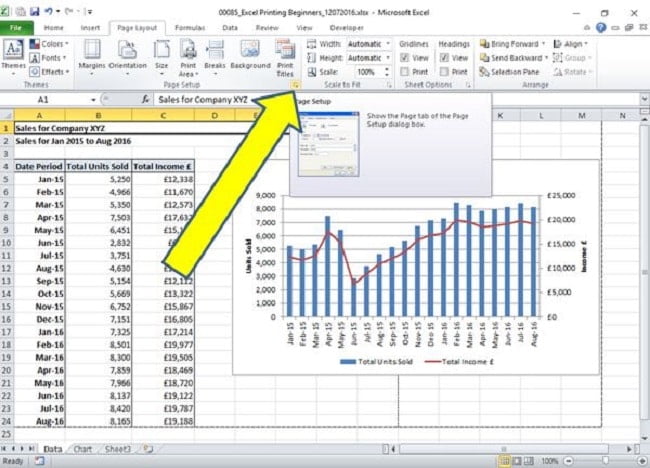
This will open the ‘Page Setup‘ options box and all you need to do is select the Scaling option to fit to 1 page wide by 1 page tall:
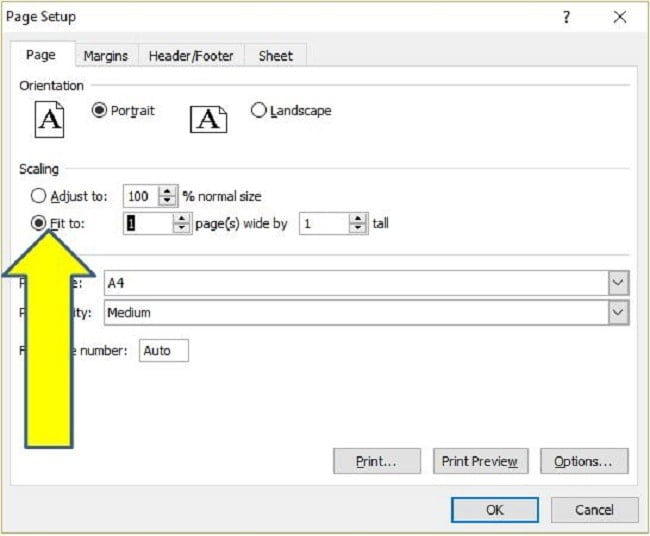
From the Page Setup box you can either click on OK or simply click on Print and your range will now appear on a single page, that’s much better!
Additional Printing Considerations
After you have decided to print in Excel there are several additional features or options you can play around with.
- Changing the page Orientation so your printed page is Landscape (wide) rather than the standard Portrait (tall).
Excel Worksheets often look much better when printed in Landscape format and to change Excel to print that way select Landscape from the Orientation section in the Page Setup Options (the final image shown above). - Sometimes your Excel worksheet is just too big to fit onto one page whether Portrait or Landscape. You may have to adjust the scaling or fit across multiple printed pages but in this case consider the end user, will this make it easy for them to read?
As with the previous consideration you can change the Scaling and number of pages in the Page Setup Options.
Lastly, consider if you really need to print in the first place. Many businesses champion a paperless environment these days. Not only is this cost-effective and arguably more secure it’s better for the overall Environment.
Summary
In conclusion, mastering Excel printing can significantly enhance your data presentation.
Remember, setting a proper Print Area and ensuring your data fits on a single page are key. Don’t forget to consider page orientation and scaling for optimal layout.
Additionally, reflect on the necessity of printing, as digital alternatives can be more cost-effective and environmentally friendly. With these tips, printing in Excel becomes a straightforward, efficient process even for beginners. Keep exploring Excel’s features to further enhance your skills.
Keep Excelling,

Ready to take your Excel skills up a notch after learning all there is about how to print in Excel? Check out our guide on 13 Shortcut Commands to Make Your Life Easier for quick, effective techniques to streamline your Excel tasks.

