
Excel, a powerhouse in the world of data management, offers a nifty feature known as a named range, simplifying your formulas and boosting readability. But what if your dataset isn’t static? Enter the dynamic named range. This guide will walk you through the steps to create dynamic named ranges in Excel, ensuring your spreadsheets remain efficient and adaptable as your data grows.
Introduction
Static solutions often fall short in todays dynamic world. Recognizing this, Excel introduces the concept of dynamic named ranges — a tool every Excel user, from beginners to seasoned pros, should have in their toolkit.
Whether you’re crafting detailed reports or designing interactive dashboards, understanding how to set up a dynamic named range can transform your approach to data handling. In this post, we build upon our previous discussion on named ranges and elevate your Excel skills by guiding you through the creation of dynamic named ranges. These ranges adjust automatically as your data evolves, offering a seamless and efficient way to manage expanding datasets.
Example
Embarking on the journey to create a dynamic named range in Excel, it’s often most effective to start with a practical example.
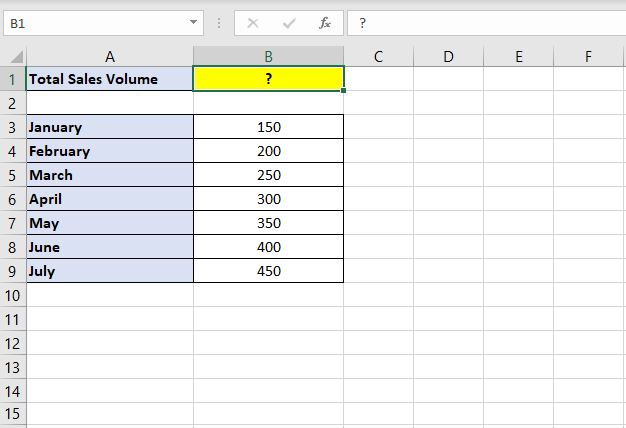
Imagine you’re managing a dataset of monthly sales volumes listed in column B. Your objective is to calculate the ‘Total Sales Volume’ in cell B1. The straightforward approach would be to sum these cells manually each month. However, this method poses a risk: what if you forget to update the range as new data comes in?
To circumvent this issue, let’s employ a dynamic named range for your sales volumes. This technique ensures that your ‘Total Sales Volume‘ in cell B1 updates automatically, eliminating the need for manual adjustments each month.
Follow along as we demonstrate this powerful feature in action, showcasing how a dynamic named range can be a game-changer in your data management.
The OFFSET function
Understanding the OFFSET function is a cornerstone in mastering dynamic named ranges in Excel. This function might initially appear daunting, but it’s essentially Excel’s way of navigating through your data. Let’s break it down:
The basic syntax of the OFFSET function is:
- =OFFSET(Reference, Rows, Cols, [Height], [Width])
Think of it as giving Excel a set of navigation instructions. The ‘Reference‘ is your starting point, a fixed cell from which Excel begins its journey. The ‘Rows‘ and ‘Cols‘ parameters are like directions, telling Excel how many steps to take vertically (rows) and horizontally (columns) from the Reference cell.
Now, the magic for dynamic named ranges happens with the ‘Height‘ and ‘Width‘ parameters. While these are optional in a standard OFFSET function, they’re vital for creating dynamic ranges.
‘Height’ tells Excel the number of rows to include in your dynamic range, and ‘Width‘ specifies the number of columns. By adjusting these parameters dynamically, your named range can expand or contract in response to your data changes.
Feeling a bit overwhelmed? Don’t worry. As we delve into the practical application, these concepts will become clearer and show you the real power of dynamic named ranges with the OFFSET function.
Offset Solution
Let’s refresh our mind with the example so we can build the OFFSET function.
Building the OFFSET Solution
The OFFSET function looks like this:
- =OFFSET(Sheet1!$B$3,0,0,COUNTA(Sheet1!$B$3:$B$9999),1)
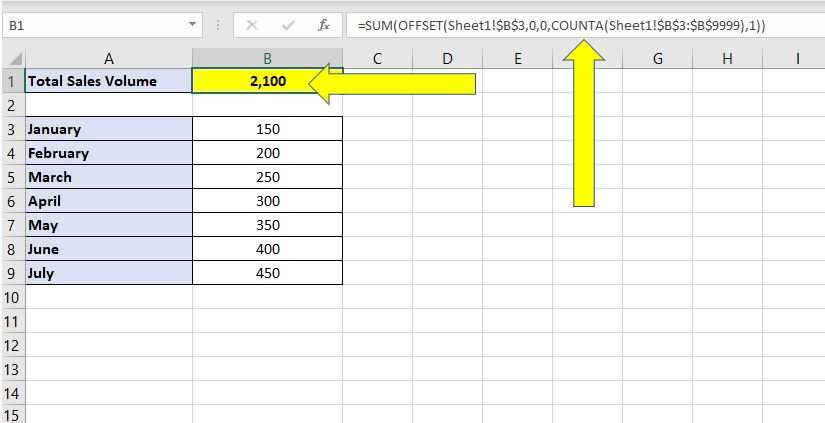
Therefore to SUM the ‘Total Sales Volume‘ with a Dynamic Range we enter the following formula in cell B1:
- =SUM(OFFSET(Sheet1!$B$3,0,0,COUNTA(Sheet1!$B$3:$B$9999),1))
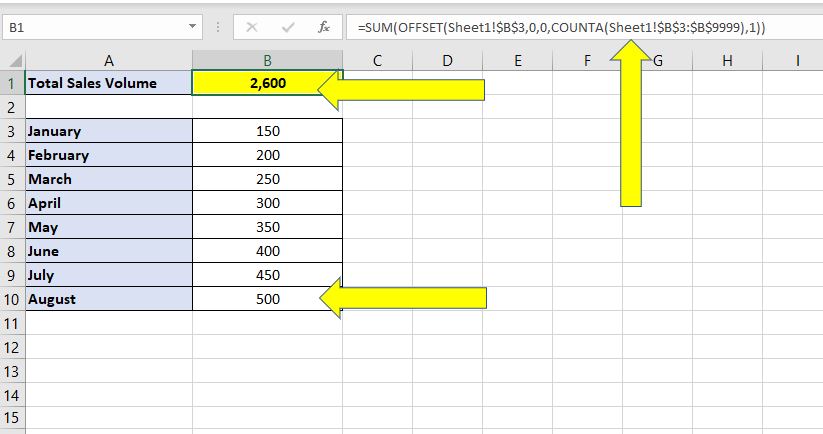
If a value is entered for August sales in cell B10 there is no need to change anything, the total in cell B1 will automatically update:
By understanding the OFFSET function it is easy to change this dynamic formula into a dynamic named range. This will make your worksheet look a lot cleaner and less intimidating to anyone who is not familiar with the OFFSET function (unlike yourself now!)
Creating the Dynamic Named Range
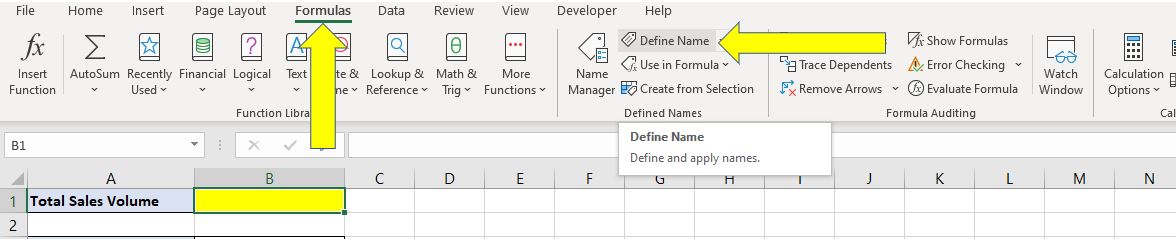
The first step is to select Formulas on the Excel Ribbon, then select Define Name.
This will open the ‘New Name’ options box. In this box the first step is to choose a name, for this example we will choose ‘Total_Sales_Volume‘ (always use underscores as spaces do not work).
The next step is to update the ‘Refers to’ box with our OFFSET function.
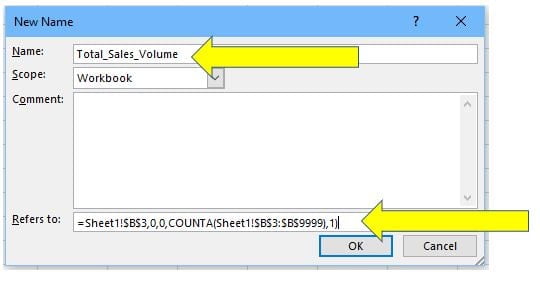
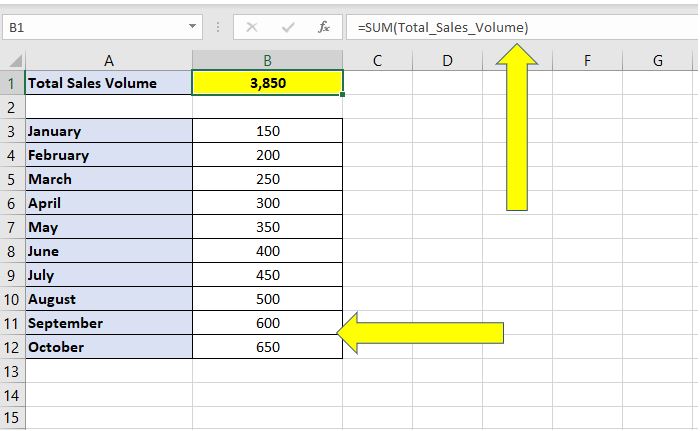
Click OK to create the dynamic named range in Excel. Next, the formula for Total Sales in cell B1 can be updated to the following:
- =SUM(Total_Sales_Volume)

Now in the future there is no need to change the formula in cell B1, it will automatically update:
The process can be tricky at first as the OFFSET function is intimidating to new Excel developers but it is well worth understanding. When you have some confidence in using the OFFSET function it makes creating dynamic ranges or dynamic named ranges easy and that is the secret to developing automated reports and Dashboard with Excel.
Summary
As we wrap up our exploration of dynamic named ranges in Excel, it’s clear that mastering this feature can significantly enhance your efficiency and accuracy in handling data. Dynamic named ranges, powered by functions like OFFSET, provide a flexible and robust way to manage datasets that change over time. Whether you’re working on complex financial models, tracking sales data, or managing any data-intensive project, incorporating dynamic named ranges into your Excel toolkit is a game changer.
By now, you should have a solid understanding of how dynamic named ranges work and how to implement them in your spreadsheets. Remember, the beauty of Excel lies in its versatility and power to adapt to your specific needs. Dynamic named ranges are just one of the many tools Excel offers to make your data work smarter, not harder.
We encourage you to experiment with this feature and see how it can streamline your data management tasks. As always, keep exploring and learning; there’s always something new to discover in Excel!
Keep Excelling,

Mastered dynamic named ranges in Excel? Next, streamline your spreadsheets further by learning How to Remove Blank Rows in Excel. Dive into our guide now!