Are you striving to elevate the professionalism of your Excel documents? A key step in this process is learning how to insert a header and footer in Excel. This not only enhances the presentation of your reports and dashboards but also makes them more user-friendly and less confusing for others. In this guide, we’ll show you the straightforward steps to seamlessly integrate a header and footer in Excel, transforming your spreadsheets into well-organized, professional-looking reports.
Introduction
The use of a header and footer in Excel plays a pivotal role in the overall effectiveness of your document. Headers are ideal for incorporating essential elements such as titles, sub-titles, or even a company logo for branding purposes.
Meanwhile, footers are the go-to section for including practical details like page numbers, creator information, or critical notes such as confidentiality status. By understanding how to skilfully insert and customize these sections in Excel, you can ensure that each worksheet in your document not only looks consistent and professional but also communicates all necessary information clearly.
Let’s dive into the specifics of utilizing headers and footers to maximize the impact and clarity of your Excel spreadsheets.
How to Insert a Header in Excel
The best process is to create a header and footer when you have finished creating your Excel workbook. That way you know the layout and what is required.
The first step is to select the ‘View‘ tab from the Excel ribbon, then select ‘Page Layout‘.
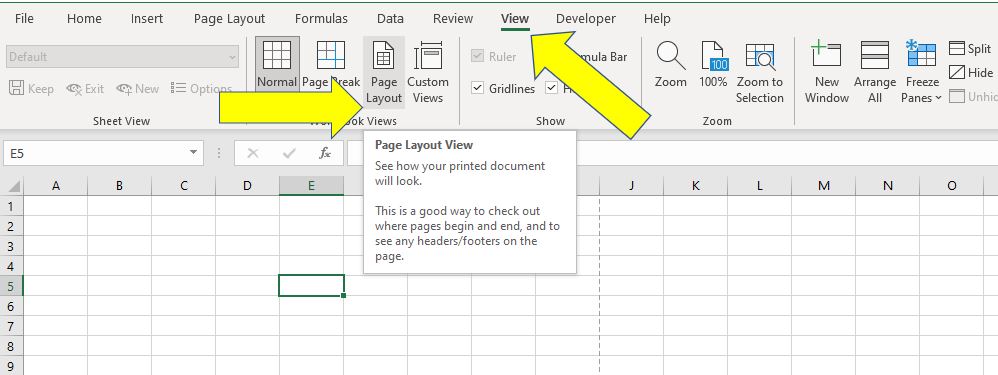
This changes the view in Excel to ‘Page Layout mode’ and from this point you can set a header and footer. To set a header click on the ‘Add header’ text:
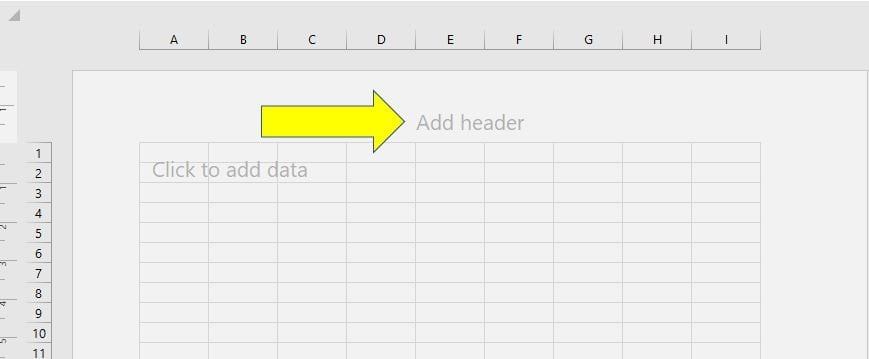
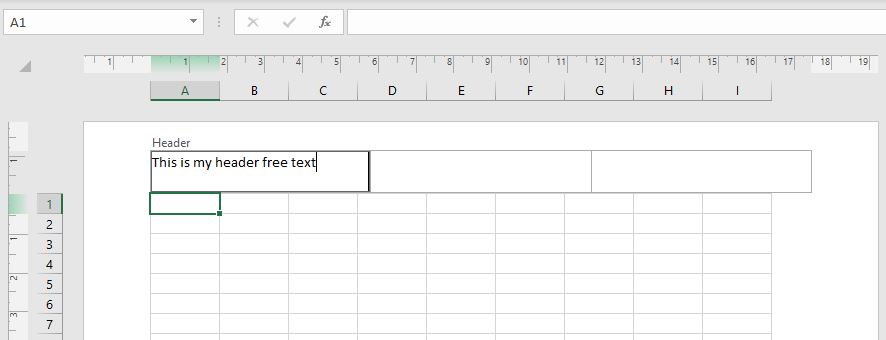
After clicking on ‘Add header’ two things happen. The first is that the header section will show three boxes and those boxes represent the alignment of the header item which can be either left, centre or right-aligned.
You can choose to have items in all three boxes, or just one or two of them depending on what headers are to be included. Selecting the box allows you to manually type in a header of your choice.
Then the Excel ribbon will update to show a ‘Header and Footer’ options menu. Selecting that menu allows you to select an array of options to include in the header.
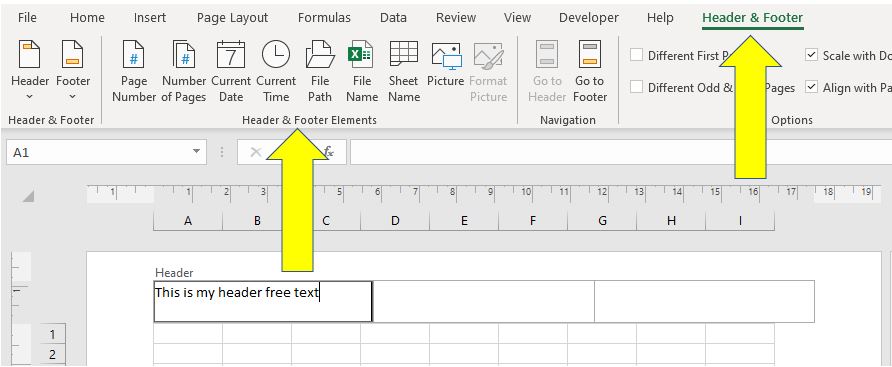
Excel’s header and footer options are a treasure trove for personalizing your spreadsheets, offering automatic inclusion of various useful elements:
- Page Number: Keep track of your document’s length with ease.
- Number of Pages: Pair this with the Page Number to indicate ‘Page X of Y’, providing a clear context for the document’s scope.
- Current Date and Time: Always stay up-to-date! When you insert these, Excel initially displays placeholders (like &[Date] and &[Time]) in the selected header/footer section (left, centre, or right). While this might seem unusual at first, these placeholders are Excel’s way of keeping your document current. Upon printing, they will automatically convert to the actual date and time, ensuring your document is always relevant.
- File Path: Ideal for sharing documents in a networked environment, this feature guides users to the file’s location.
- File Name and Sheet Name: Keep your document’s identity clear and accessible.
- Picture: A versatile tool for branding, perfect for inserting logos to add a professional flair to your spreadsheets.
When you choose any of these options, Excel updates the focused header or footer section to include your selection. The real magic happens with the dynamic elements like Date and Time. Though they appear as placeholders in Excel, rest assured, the actual data reflects when printed.
This dynamic update not only adds a layer of professionalism but also ensures that when you insert a header and footer in Excel your documents are always current and informative.
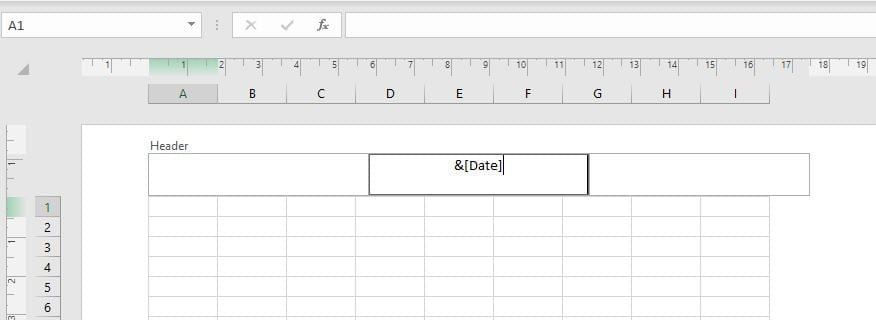
Moreover, Excel’s versatility doesn’t stop there. You can creatively combine these elements within the same header or footer section. Imagine having the Date and Time together, or the File Name next to the Page Number – the combinations are countless. This flexibility is not just about aesthetics; it’s about making your spreadsheets more informative and user-friendly.
How to Insert a Footer in Excel
Now that you have learned how to insert a header in Excel, inserting a footer will be easy!
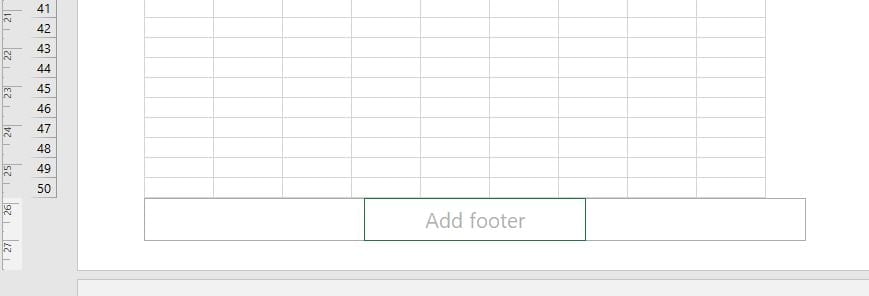
To insert a footer in Excel the process is the same, except you must activate the ‘footer‘ section of the document. To active the ‘footer‘ section either scroll down on the ‘Page Layout‘ view and select ‘Add footer‘, this will bring up the three alignment boxes:
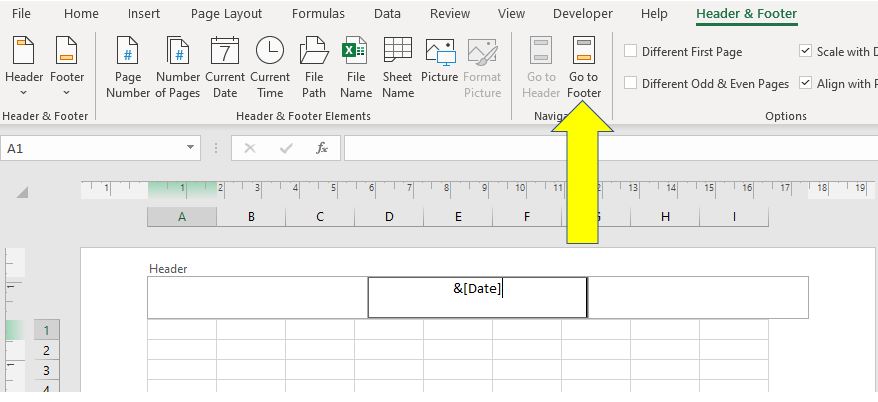
As an alternative method you can also use the ‘Header and Footer‘ options menu to switch the navigation to the footer by selecting ‘Go to Footer‘:
From that point the process is the same as for the header. You are able to manually type in custom footer elements or select pre-set items, like Page Number, from the Header and Footer options menu on the Excel ribbon. The process of inserting a header and footer in Excel is now complete.
Conclusion
Mastering the art of inserting a header and footer in Excel can significantly elevate the professionalism and functionality of your spreadsheets. Whether it’s for personal use, business reports, or academic purposes, these elements offer a personalized touch while ensuring your documents remain organized and informative. From automatically updating dates and page numbers to embedding file paths and custom logos, the versatility of Excel’s header and footer options is a game-changer.
As you’ve seen in this guide, incorporating these features is straightforward and can be adapted to suit your specific needs. Remember, the key to making the most out of headers and footers lies in understanding how dynamic elements like date and page numbers work, especially when it comes to printing your documents.
We encourage you to experiment with these tools in your next Excel project. You might just find a new way to streamline your workflow and enhance your data presentation. And as always, keep exploring Excel’s vast array of features to discover more ways to make your spreadsheets stand out.
Keep Excelling,

Have you ever faced the challenge of dealing with blank rows disrupting the flow of your data? Our next guide, ‘How to Remove Blank Rows in Excel‘, is the perfect follow-up. It will walk you through the simple yet effective steps to tidy up your spreadsheets, ensuring that your data is as sleek and professional as your headers and footers. Let’s keep your Excel skills growing – join us in exploring this crucial aspect of Excel data management.

