Find and Replace in Excel is more than just a feature; it’s a vital skill for efficient data management. Imagine you’re confronted with a sprawling spreadsheet, brimming with various types of data – names, dates, and numbers – and you need to uniformly update a specific element throughout.
This guide will illuminate how to expertly navigate and utilize Find and Replace in Excel, transforming what seems like a formidable task into a straightforward and error-free process.
Whether you’re aiming to correct recurring errors, update figures, or modify formulas, this skill is essential for making quick, accurate adjustments to your worksheets.
Table of Contents
- What is Find and Replace
- How to Access Find and Replace in Excel
- How to Use the Find and Replace Function
- Advanced Options Explained
- Summary
What is Find and Replace
The Find and Replace function in Excel does exactly what it says, it finds a value, text string or formula and replaces it with a different value, text string or formula as specified by you the user.
For example you may have a worksheet that contains raw employee data with one of the fields being the team of each employee.
If one, or more, of those team names suddenly get renamed by the business then using Find and Replace in Excel can save you the hassle of manually amending all the cells individually, you can just get Excel to do the hard work and change all occurrences of Team X to Team Y.
How to Access Find and Replace in Excel
There are 2 ways to access the Find and Replace function in Excel, the first is by means of the Excel ribbon on the top of the screen.
Method One
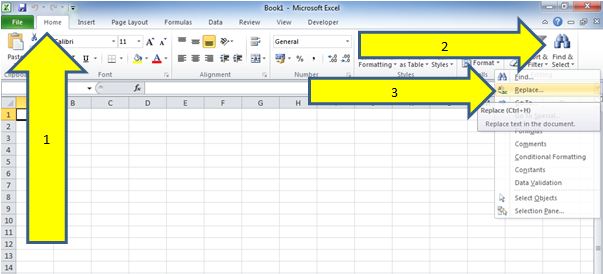
To access the Find and Replace function using the Ribbon:
- Make sure you are on the Home tab
- Left-click on the “Find & Select” option
- Left-click on the “Replace” option
Method Two
The second method on how to use find and replace in Excel is far quicker and utilises Excel’s shortcut commands.
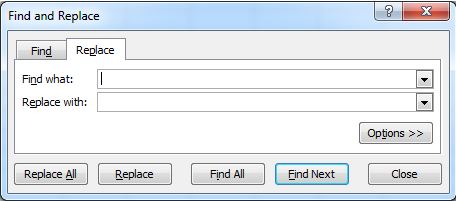
To open the same Find and Replace function as above press and hold the CTRL key and the letter H on your keyboard (CTRL+H).
Tip: This shortcut command also works in Microsoft Word documents to bring up that version of Find and Replace.
How to Use the Find and Replace Function
Now you know how to access the Find and Replace function the next step is to learn how to utilise its power for any changes you might have to make, this can be broken down into basic changes and advanced changes:
Basic Find and Replace Changes
If like in the previously mentioned example you just want to change a team name within a dataset, i.e. change “Marketing” to “Marketing and Advertising”, you can enter the change on the basic view of the Find and Replace Function.
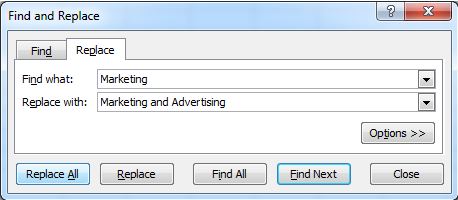
After you have entered the text you can choose to either “Replace All”, which will tell Excel to go through the worksheet and replace all occurrences of “Marketing” with “Marketing and Advertising”, alternatively you can select “Replace” and it will go through each occurrence one by one.
The latter method is much slower if there are lots of changes to make but can be useful if you have a situation where you do not want to change every occurrence as you will have the option to tell Excel to skip changing a particular cell.
Advanced Find and Replace Changes
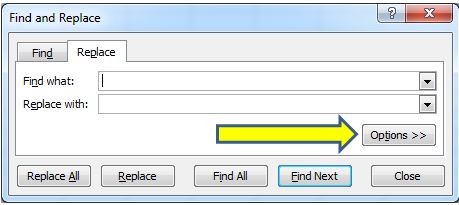
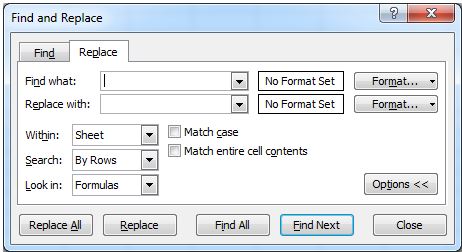
To complete more advanced changes then you need to look into the options part of the Find and Replace function, do so by left-clicking on the “Options” button:
Advanced Options Explained
- Formats: In the top right of the Find and Replace function window there is now an option button for “Format”. This can be used if you want to only search for a particular format, or if you want to replace using a particular format. Examples of this might be changing certain text to a different colour or to a different font style, like italic or bold.
- Within: The drop down box next to “Within” allows you to change whether Excel looks at the active worksheet (as identified by “Sheet”) or you can also change this to “Workbook” if you want Excel to Find and Replace throughout the whole workbook.
- Search: This drop down box allows you to change the way Excel searches from “By Rows” to “By Columns”. It’s data dependent on what is best but usually you can leave this set to “By Rows” as Excel will still search the entire worksheet or workbook.
- Look in: This is always set to “Formulas” making it kind of redundant, it just means Excel will look in the formula as well as just text strings or numerical values when it completes the Find and Replace.
- Match case: If there are times where you need Excel to be case specific, i.e. only change “MARKETING” and not “Marketing” then check this box.
- Match Entire Cell Contents: Again this is another very specific option which tells Excel to only Find and Replace cells where the entire cell matches what it is trying to find. For example if you want to only find “Marketing” and not cases where the cell is “Marketing team” then you would check this box.
Summary
In summary, the Find and Replace function in Excel is a time-saving gem, particularly when you’re dealing with multiple changes or large datasets. Easily accessible from the ‘Home’ tab or with the shortcut CTRL+H, it transforms tedious manual searches into a swift and efficient process.
For basic updates, such as swapping one word for another, the initial view of the function offers a straightforward solution. Opt for ‘Replace All‘ to amend every instance simultaneously, or choose ‘Replace’ to review and modify occurrences one at a time.
When tackling more intricate tasks like searching for specific formats or exact matches, delve into the advanced settings of Find and Replace to fine-tune your search criteria. Remember, it’s always wise to perform these changes on a copy of your workbook first. This way, if any mistakes occur, you can easily revert to the original.
By mastering how to use Find and Replace in Excel, you unlock a powerful tool that can significantly streamline your data management tasks. It’s an essential skill for analysts and avid Excel users alike, enabling rapid modifications across your Excel files. And with the time you save, why not treat yourself to a well-deserved coffee break?
Keep Excelling,

No time for coffee? Why not use those extra minutes to expand your Excel expertise even further? Dive into our next guide, ‘How to Get Crypto Prices in Excel,’ and discover how to keep your finger on the pulse of the dynamic cryptocurrency market, all from the comfort of your Excel spreadsheet. It’s the perfect way to blend your love for data analysis with the exciting world of crypto. Click here and start mastering this valuable skill today!

