
Do you find yourself drowning in data, wondering how to make sense of it all? Excel, a powerful tool in your arsenal, can be your lifesaver, and mastering the IF formula in Excel is like learning to swim in this vast ocean of information.
Promising to guide you from confusion to clarity, I’ll introduce you to the world of IF formulas in Excel, a fundamental skill for any Excel user.
Together, we will explore not only what IF formulas are but also when and how to use them in various real-world scenarios.
By the end of this journey, you’ll not only be proficient with IF formulas in Excel but also equipped with additional tips to enhance them, ensuring you are ready to tackle any data challenge with confidence.
Table of Contents
- IF Formula, IF Statement or IF Function?
- What are IF Statements in Excel?
- When to Use IF Statements
- How to Use IF Statements
- How to Interpret Someone Else’s IF Statement
- 9 Tips For Using IF Statements
- Summary
IF Formula, IF Statement or IF Function?
When it comes to Excel, you might have heard different terms like “IF Formula in Excel”, “IF Statement,” or “IF Function.” Each of these terms points towards the same powerful feature in Excel, albeit with slight technical differences in meaning.

The term “IF function” is technically the most accurate – it’s what Excel officially calls this tool.
A function in Excel is a built-in operation that can perform specific calculations using given values in a set order. The IF function fits this description perfectly, as it evaluates a condition and returns one result if that condition is true, and another if it’s false.
However, it’s common to hear people refer to it as the “IF Formula in Excel” or even an “IF Statement in Excel”.
In everyday use, “IF Formula” is often used interchangeably with “IF Function,” especially since in Excel, a formula is any expression that calculates a value, and this can include functions like IF.
On the other hand, an “IF Statement” generally refers to a broader concept in programming.
In programming languages, an IF statement controls the flow of a program by executing different sections of code based on certain conditions.
While Excel’s IF Function can be used to create simple decision-making processes within your spreadsheet, it’s not as complex as IF Statements in traditional programming.
In our discussions and tutorials, when we refer to “IF Statements,” we’re often talking about the practical applications of the IF Function within Excel – essentially, the ways you can use the IF Function to make decisions with your data. It’s a more informal way of referring to scenarios where you implement the IF Function.
So, don’t worry too much about the terminology.
What’s most important is understanding how to use this feature effectively to make your work with Excel easier and more productive.
What are IF Statements in Excel?
At its core, an IF statement in Excel is a logical function used to make decisions. It tests a condition and returns one value if the condition is true and another value if it’s false.
This simple yet powerful tool is your gateway to data analysis, allowing Excel to act as a decision-maker based on the criteria you set.
An IF statement has three parts:
- Condition: A logical test that evaluates to TRUE or FALSE.
- Value_if_true: The outcome if the condition is TRUE.
- Value_if_false: The outcome if the condition is FALSE.
The basic syntax of an IF formula is:
=IF(condition, value_if_true, value_if_false)When to Use IF Statements
IF statements are a versatile and powerful feature in Excel that can be utilized in a wide range of scenarios.
Understanding when to employ them can significantly enhance your data management and analysis capabilities.
Data Categorization
- Purpose: To systematically organize data into different categories or groups.
- Benefit: Simplifies data analysis and visualization by segmenting data into more manageable and meaningful subsets.
- Application: Useful in scenarios like customer segmentation, inventory classification, and employee categorization based on predefined criteria.
Conditional Calculations
- Purpose: To execute calculations only under certain specified conditions.
- Benefit: Enhances the accuracy and relevance of your data analysis by incorporating conditional logic into your calculations.
- Application: Particularly valuable in financial modelling, performance analysis, and scenario planning where calculations depend on variable criteria.
Data Validation
- Purpose: To ensure the data entered in Excel meets specific rules or criteria.
- Benefit: Increases the reliability and integrity of your data, reducing errors and improving the quality of your analysis.
- Application: Essential in data entry forms, survey data compilation, and any situation where data consistency and accuracy are critical.
Creating Dynamic Reports
- Purpose: To tailor the content and display of reports based on certain conditions or user inputs.
- Benefit: Allows reports to adapt to new data or user preferences, making them more interactive and user-friendly.
- Application: Invaluable in dashboard creation, performance tracking, and any reporting scenario where real-time data customization is required.
How to Use IF Statements
Let’s dive into some practical examples.
Example 1: Simple IF Statement
Imagine you’re tracking your monthly expenses and want to categorize them as either “Within Budget” or “Over Budget“. Assume your monthly budget is $500.
In Excel, your data might look like this (with data starting in cell A1):
| Month | Expense ($) |
| January | 450 |
| February | 550 |
To categorize these expenses using an IF Formula in Excel, or IF Statement, you’d write:
=IF(B2 <= 500, "Within Budget", "Over Budget")
If the expense for January (B2) is less than or equal to $500, Excel will display “Within Budget“. If not, it will show “Over Budget“.
Drag this formula down so it applies to both January and February.
The results will show that January’s amount of $450 is within the $500 budget.
However, February is “Over Budget” as the amount, $550, is greater than the $500 budget.

Example 2: Nested IF Statements
Suppose you want to grade students based on their marks:
| Student | Marks |
| Alice | 85 |
| David | 70 |
You wish to assign their Grades based on the following criteria:
- 85 and above: A
- 70 to 84: B
- Below 70: C
The IF Formula, or IF Statement, you would write (assuming the data starts in cell A1) would be:
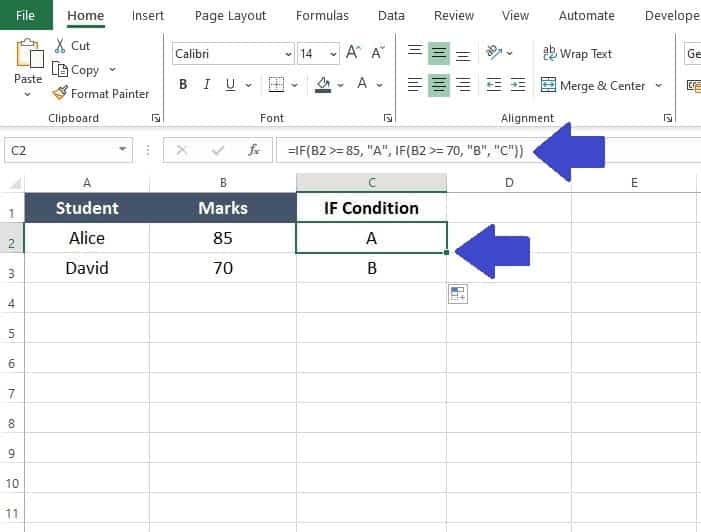
=IF(B2 >= 85, "A", IF(B2 >= 70, "B", "C"))
This is a nested IF statement.
If Alice’s score (B2) is 85 or more, she gets an A. If not, the next IF statement checks if it’s 70 or more, assigning a B. Otherwise, she gets a C.
You can drag this formula down so it applies to both Alice and David.
The results show that Alice has done awesome!
With a score of 85 she just meets the criteria to get an ‘A‘ (85 or more).
On the other hand David just scraped a ‘B‘ with his score of 70 just meeting the threshold (70 to 84).
Example 3: IF with AND/OR Functions
You’re now managing a project and need to assess if tasks are on schedule.
- A task is considered ‘On Track‘ if it’s less than 80% complete and within the first half of the allocated time.
- A task is also considered ‘On Track‘ if it’s more than 80% complete and within the second half of the time.
- If a task fails to meet either of those dual conditions then it will be considered ‘Off Track‘.
Here’s the data:
| Task | % Complete | Time Elapsed (%) |
| Task 1 | 50 | 40 |
| Task 2 | 90 | 60 |
| Task 3 | 30 | 80 |
In Excel, the IF Statement to apply (assuming the data starts in cell A1) is:
=IF(OR(AND(B2 < 80, C2 <= 50), AND(B2 >= 80, C2 > 50)), "On Track", "Off Track")
That’s quite an IF Statement! Let’s break it down to understand what is going on:
- AND(B2 < 80, C2 <= 50): This part checks if a task is less than 80% complete (B2 < 80) and within the first half of the allocated time (C2 <= 50). If both conditions are true, this AND function returns TRUE.
- AND(B2 >= 80, C2 > 50): This part checks if a task is more than or equal to 80% complete (B2 >= 80) and in the second half of the time (C2 > 50). Again, if both conditions are true, this AND function returns TRUE.
- OR(…): The OR function combines the two AND conditions. If either of the AND conditions is true, OR returns TRUE.
- IF(OR(…), “On Track“, “Off Track“): This is the final IF function. If the OR function returns TRUE (meaning either of the two sets of conditions is met), the task is labelled “On Track.” If the OR function returns FALSE (meaning neither set of conditions is met), the task is labelled “Off Track.”

The results in Excel show:
- Task 1 (50% Complete, 40% Time Elapsed): This task is less than 80% complete and within the first half of the allocated time, so it fits the first criteria. The formula returns “On Track.”
- Task 2 (90% Complete, 60% Time Elapsed): This task is more than 80% complete and in the second half of the allocated time, fitting the second criteria. The formula returns “On Track.”
- Task 3 (30% Complete, 80% Time Elapsed): This task does not meet either of the criteria as it’s less than 80% complete but not within the first half of the time. The formula returns “Off Track.”
Example 4: IFERROR with IF for Error Handling
When analysing data, it’s common to encounter situations where some cells might contain errors or invalid data. This could be due to various reasons, like division by zero errors or incorrect data entry.
In such cases, incorporating error handling using the IFERROR function is crucial to maintain the accuracy and integrity of your analysis.
Scenario
You’re tasked with calculating the commission for each salesperson. The commission is set at 10% of the sales amount.
However, the dataset you’re working with might have some inconsistencies, such as empty cells or cells with errors like #DIV/0!.
| Sales Person | Sales ($) |
| Peter | 2000 |
| Jane | #DIV/0! |
| Annalise | 1500 |
The IF Statement, that is nestled within an IFERROR function, would be (assuming data starts in cell A1):
=IFERROR(IF(B2 > 0, B2 * 0.1, 0), "Check Data")
Lets breakdown what the IF statement does:
Inner IF Function Section: (IF(B2 > 0, B2 * 0.1, 0))
- Condition: Checks if the sales figure in B2 is greater than 0.
- Value_if_true (B2 * 0.1): If the condition is true (meaning there’s a positive sales figure), it calculates the commission as 10% of the sales figure.
- Value_if_false (0): If the condition is false (meaning the sales figure is not positive), it returns 0, indicating no commission.
IFERROR Function Section: (IFERROR(…, “Check Data”))
- Value: This is the entire IF function described above.
- Value_if_error (“Check Data”): If the IF function results in an error (for example, if B2 contains #DIV/0! or any other error), instead of displaying a standard Excel error, it displays “Check Data“. This is a custom message indicating that the cell needs to be checked for correct data or formulas.
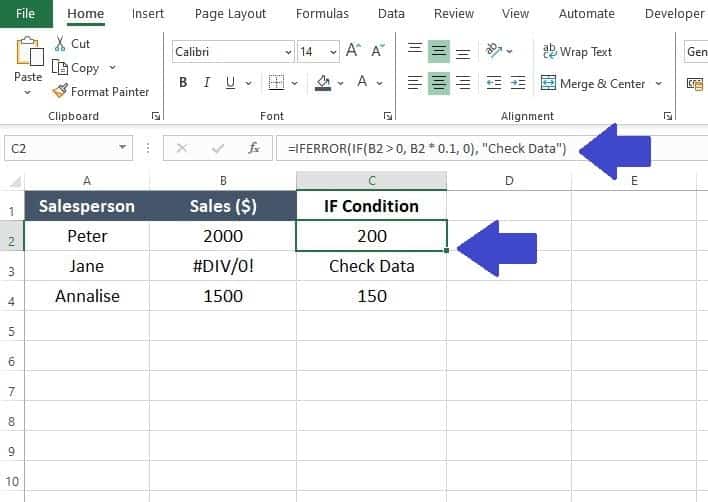
Applying the formula in Excel shows:
- For Peter (Sales = £2000): The formula calculates 10% of $2000, resulting in $200 commission.
- For Jane (Sales = #DIV/0!): The formula encounters an error and instead of showing #DIV/0!, it displays “Check Data“.
- For Annalise (Sales = £1500): The formula calculates 10% of $1500, resulting in $150 commission.
This approach ensures that your data remains clean and readable, even in the presence of errors.
It allows for a more professional presentation of data and easier identification of cells that require further attention or correction.
Example 5: Array Formulas and IF for Advanced Data Analysis
In advanced Excel tasks, combining array formulas with the IF function can be incredibly powerful.
This approach allows you to apply logical conditions across a range of data and perform calculations based on those conditions.
Why Combine IF with Array Formulas?
The IF function is typically used to perform logical tests and return different values based on whether the test is true or false.
When combined with array formulas, you can extend this logic across multiple data points simultaneously, making it perfect for complex, condition-based calculations.
Scenario
You’re analysing a dataset of a store’s sales, aiming to find the average sales amount for items that sold more than 50 units, but you want to avoid adding extra columns for intermediary calculations.
| Item | Units Sold | Sales ($) |
| Item A | 30 | 450 |
| Item B | 60 | 800 |
| Item C | 55 | 620 |
Using an Array Formula with IF in Excel enter the following formula:
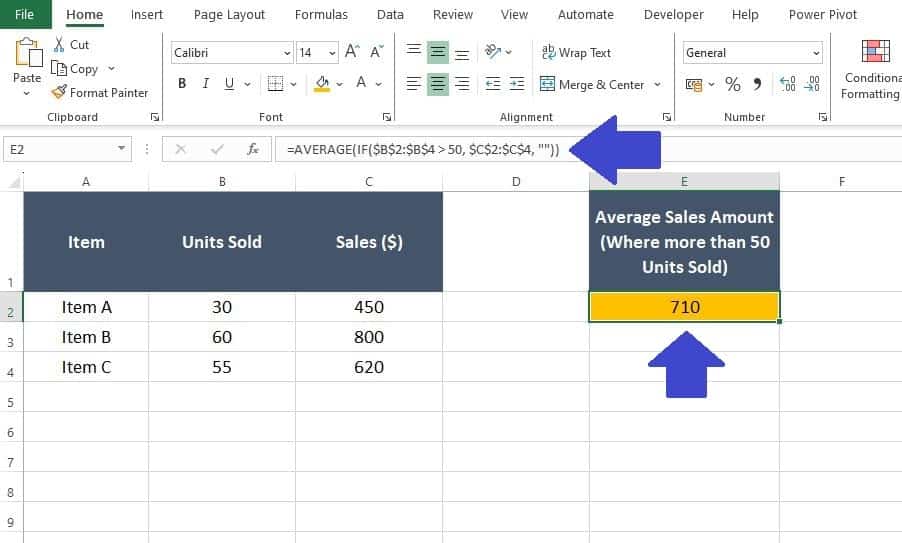
=AVERAGE(IF($B$2:$B$4 > 50, $C$2:$C$4, ""))
Entering the Formula as an Array
After typing this formula, instead of just pressing Enter, press CTRL + SHIFT + ENTER.
Excel will automatically place curly braces {} around the formula, indicating that it’s an array formula.
These curly braces are not typed by you; Excel adds them to signify that the formula is being processed as an array.
Breakdown of the Formula
IF Function Inside an Array (IF($B$2:$B$4 > 50, $C$2:$C$4, “”)):
- Logical_test ($B$2:$B$4 > 50): Checks each cell in B2 to B4 to see if the units sold are greater than 50.
- Value_if_true ($C$2:$C$4): Where the condition is true (units sold > 50), it takes the corresponding sales figures from C2 to C4.
- Value_if_false (“”): Where the condition is false (units sold ? 50), it returns a blank, excluding these figures from the average.
AVERAGE Function (AVERAGE(…)):
- Computes the average of all values returned by the IF function. The array formula ensures this calculation considers all appropriate data points simultaneously.
Applying the Formula
- The formula evaluates each row for the condition (units sold > 50).
- It includes only the sales amounts for Item B and Item C in the average calculation.
- The average is computed based on these amounts, providing a conditional average that’s dynamically responsive to the units sold criterion.
Using this combination of IF with an array formula allows you to perform sophisticated, condition-based calculations in a streamlined and efficient manner.
It’s a method that enhances the power of the IF function, enabling you to manipulate and analyse your data in more advanced ways.
How to Interpret Someone Else’s IF Statement
Encountering a complex IF statement in Excel can be daunting, especially for beginners.
However, there are systematic ways to break it down for better understanding.
Here’s a step-by-step approach to ensure you never struggle with IF statements again:
Identify Each Part of the IF Statement
Start by recognizing the basic structure of an IF statement: =IF(condition, value_if_true, value_if_false).
In more complex statements, these three parts might themselves contain additional functions or nested IFs.
Break Down Nested IFs
If the statement has nested IFs (an IF statement inside another IF statement), try to identify each nested IF and understand it individually.
Consider writing each nested IF on a separate line or using indentation for better visibility.
Analyse the Conditions
Look at the conditions being tested in each IF statement. These are logical expressions that Excel evaluates as TRUE or FALSE.
Understanding what each condition is checking will help you grasp the logic of the statement.
Understand the True/False Actions
For each IF statement, identify what action is taken if the condition is true, and what action is taken if it’s false.
These actions can be values displayed, calculations performed, or even other functions.
Use the Evaluate Formula Tool
Excel’s ‘Evaluate Formula’ tool is incredibly useful for breaking down complex formulas. It allows you to see the calculation step-by-step.
To use it, go to the Formulas tab and click on ‘Evaluate Formula’, then step through the formula to see how Excel evaluates each part.
Simplify with Temporary Columns
For very complex formulas, it might be helpful to break them down into simpler parts and use temporary columns in your worksheet for each part.
This way, you can see intermediate results and understand how the final result is computed.
Consult the Excel Documentation or Help
If there are functions within the IF statement that you’re not familiar with, refer to the Excel documentation or use the built-in Help feature to understand what those functions do.
Experiment and Test
Change the values in your worksheet that are used in the IF statement and see how the output changes.
This experimentation can give you insights into how the formula works.
Ask for Help
If you’re still struggling, don’t hesitate to ask a more experienced colleague or look for solutions online, like here at DedicatedExcel.com!

9 Tips for Using IF Statements in Excel
Mastering IF statements in Excel can significantly enhance your data analysis and decision-making capabilities. Here are some expert tips to elevate your proficiency with IF statements, offering new perspectives and advanced techniques:
Tip 1 – Combine IF with Other Logical Functions
Expand the power of IF statements by combining them with other logical functions like AND, OR, and NOT. This allows you to create more complex conditions.
For example, =IF(AND(A2 > 50, B2 < 100), “Within Range”, “Out of Range”) checks for two conditions simultaneously.
Tip 2 – Optimize for Readability with Named Ranges
To make your IF formulas more readable and manageable, use named ranges instead of cell references.
This approach makes your formulas easier to understand, especially when dealing with large spreadsheets.
Tip 3 – Utilize Conditional Formatting with IF
Enhance your data visualization by using IF statements in conditional formatting rules.
This can help you highlight specific data points that meet certain criteria, making your spreadsheets more visually intuitive.
Tip 4 – Debug Complex IF Statements
For complicated IF statements, break them down and test each part separately.
You can use ‘Evaluate Formula’ under the Formulas tab to see how Excel calculates each part of your formula, which is particularly useful for troubleshooting.
Tip 5 – Incorporate IF with Data Validation
Use IF statements within data validation rules to enforce specific criteria for data entry.
This can prevent errors and ensure the consistency of the data entered in your spreadsheet.
Tip 6 – Nest IF with Caution
While nested IFs are powerful, they can become hard to read and maintain.
Limit the number of nested IFs (generally no more than three levels deep) and consider using alternative functions like IFS or SWITCH for cleaner and more efficient formulas.
Tip 7 – Leverage IFERROR and IFNA
Use IFERROR and IFNA to handle errors and ‘Not Available’ responses gracefully in your IF statements.
These functions help in maintaining the cleanliness and accuracy of your data output.
Tip 8 – Experiment with Array Formulas
For advanced users, explore array formulas in combination with IF for bulk data analysis.
Remember, array formulas can handle multiple data points simultaneously, offering a powerful way to process large datasets.
Tip 9 – Keep Performance in Mind
Complex IF statements, especially those involving entire columns, can slow down your spreadsheet.
Be mindful of performance and optimize your formulas for efficiency, especially in larger workbooks.
Summary
As we wrap up this comprehensive guide on using IF statements, IF Functions and IF formulas in Excel, it’s clear that mastering this function can significantly elevate your data analysis and decision-making abilities.
From the basics of understanding the IF function’s structure to exploring advanced applications like combining it with array formulas and other logical functions, we’ve journeyed through a landscape where data becomes not just numbers but stories waiting to be told.
The IF function is more than just a formula; it’s a tool for problem-solving, data categorization, conditional calculations, and creating dynamic, responsive data models.
By employing the tips and techniques discussed, such as optimizing for readability, using conditional formatting, and being mindful of performance, you’re not just learning a function – you’re cultivating a skillset that will make you a more proficient, efficient, and insightful Excel user.
Keep Excelling,

Intrigued by our exploration of array formulas with IF statements? The adventure doesn’t end there. Dive deeper into the world of Excel with our upcoming post, “Learn to Master Excel VBA Arrays“. VBA takes arrays in Excel to an advanced level, offering unparalleled capabilities in data manipulation and automation.
Get ready to unlock powerful techniques that will elevate your Excel skills beyond the spreadsheet.