
Do you need a simple way to communicate with users of your Excel macros? An Excel VBA Message Box is an effective tool for this, allowing you to display custom messages, warnings, and even gather user inputs through simple dialog boxes.
In this guide, I’ll walk you through everything you need to know about using Excel VBA Message Boxes, from the basic structure to creating messages with line separations and different warning signs.
Whether you’re just getting started with Excel VBA or looking to refine your skills, understanding how to leverage the Excel VBA Message Box can significantly enhance your Excel applications.
Table of Contents
Introduction
The Excel VBA Message Box, or MsgBox, is a function in Excel VBA (Visual Basic for Applications) that displays a dialog box with a message to the user. It can contain text, buttons, and symbols to interact with the user.
Using MsgBox is an excellent way to communicate with users by displaying information, asking for inputs, or showing warnings. In this post you will learn everything you need to know about deploying and customizing message boxes for a variety of scenarios.
Benefits of Learning the Topic
Learning how to use the VBA Message Box effectively can greatly improve the usability of your Excel macros. It can:
- Provide clear communication and instructions to the users.
- Collect user responses to guide the flow of your macros.
- Alert users to errors, warnings, or important information.
- Make your Excel applications more user-friendly and interactive.
Let’s not waste any time and jump right into learning everything you need to know about the Excel VBA Message Box.
Excel VBA Message Box Structure
The basic syntax for an Excel VBA Message Box is as follows:
MsgBox Prompt, Buttons, Title
This is where:
- Prompt: This is the message text displayed in the box.
- Buttons: This section specifies the type of buttons and icon displayed in the message box, it’s an optional command.
- Title: This part specifies the title of the message box window and is also an optional command.
Excel VBA Message Box Text
To get started let’s look at some different ways we can include text in an Excel VBA Message Box.
Example 1: Basic Message Box
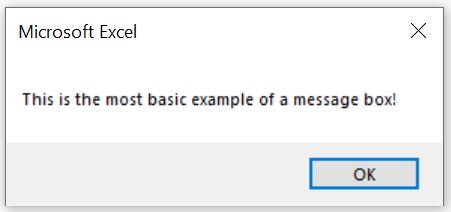
At its most basic level you can write a simple Excel VBA Message Box, without using any of the optional sections.
To do so use the MsgBox syntax to tell Excel VBA this is a message box and then enter the message text within quotation (“ “) marks.
MsgBox "This is the most basic example of a message box!"
Example 2: Message Box with Two Lines
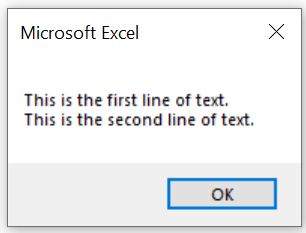
If your message is lengthy or you need to convey several points, it’s a good practice to divide the text across two or more lines for better readability. In Excel VBA, you can achieve this by using the vbNewLine character to insert line breaks into your message.
To incorporate vbNewLine into your message, you should concatenate it with your text using the concatenation operator (&), and make sure each portion of your text is enclosed in quotation marks.
MsgBox "This is the first line of text." & vbNewLine & "This is the second line of text."
Example 3: Message Box with Line Spacing
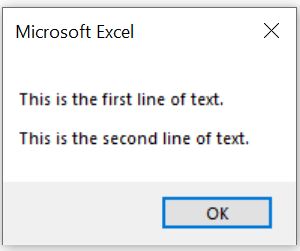
When your message box includes multiple lines of text, adding an extra line space between sentences can significantly improve its appearance and readability.
In Excel VBA, you can introduce additional line spacing by using the vbNewLine character twice in succession.
This method creates a blank line between your text lines, effectively spacing them out more pleasantly to the users.
MsgBox "This is the first line of text." & vbNewLine & vbNewLine & "This is the second line of text."
Excel VBA Message Box Buttons
Moving forward in our journey through Excel VBA Message Boxes, an essential skill to acquire is the ability to customize the buttons within message boxes.
VBA offers a variety of button configurations, each serving different interactive needs and complexities.
Let’s dive into the available options to better understand how they can enhance your message boxes.
Example 4: OK Only Button

By default, a message box displays a single “OK” button, as demonstrated in our earlier examples.
This default behavior occurs when no specific button option is provided. However, you can explicitly set this by using the vbOKOnly option.
Simply include a comma after your message text in the code, followed by the button option vbOKOnly to specify this button configuration.
MsgBox "Operation has completed successfully.", vbOKOnly
Example 5: OK or Cancel Buttons
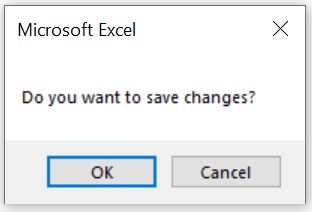
To offer users a choice, such as saving a workbook or cancelling the save, you can utilize the vbOKCancel buttons in the message box.
This introduces an additional step because you must instruct Excel on the actions to take based on whether the user clicks “OK” or “Cancel“.
Achieving this requires enclosing the message box in an If statement to clearly define the different procedures for each user response.
If MsgBox("Do you want to save changes?", vbOKCancel) = vbOK Then
    ' Save changes here
    ActiveWorkbook.Save
Else
    ' Do not save changes, i.e. do nothing
End If
Example 6: Yes or No Buttons
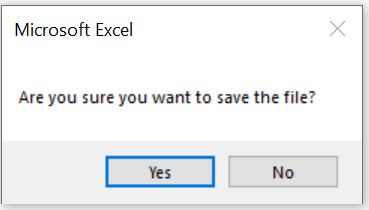
Following the approach of the previous example, you can present users with a “Yes” or “No” choice using the message box.
This approach offers a straightforward binary decision, enabling users to select either “Yes” or “No“, instead of providing an option to cancel the procedure.
To ensure Excel executes the correct actions based on the user’s choice, you will need to encapsulate the message box within an If statement.
This setup allows Excel to determine the specific procedure to follow, whether the user selects “Yes” or “No“.
If MsgBox("Are you sure you want to save the file?", vbYesNo) = vbYes Then
    ActiveWorkbook.Save
End If
Example 7: Abort, Retry or Ignore Buttons
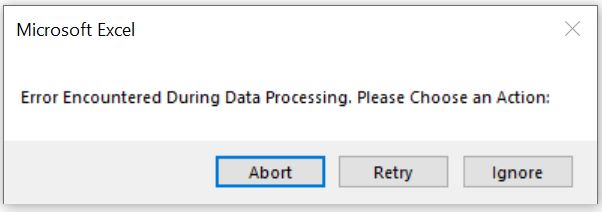
When you’re working with Excel VBA, especially on tasks that involve getting data from external sources like Amazon AWS or an Oracle server, things might not always go as planned.
Your code might encounter errors during these data import and processing tasks.
But don’t worry, VBA provides a helpful way to deal with such situations by letting you ask users how they want to proceed, using three simple options: Abort, Retry, or Ignore.
What Do these Options Mean?
- Abort: Stop the current process immediately.
- Retry: Attempt the same process again, hoping it works this time.
- Ignore: Skip the error and move on with the rest of the code.
How to Use these Options
To give users these choices, you use a special kind of message box within your VBA code.
If an error happens, this message box pops up, asking the user to choose one of the three options.
Here’s a basic way to set this up using a Select Case statement, which is like a fork in the road, directing your code based on the user’s decision:
Select Case MsgBox("Error Encountered During Data Processing. Please Choose an Action:", vbAbortRetryIgnore)
    Case vbAbort
        ' Here, you put the code that should run if the user chooses to Abort.
    Case vbRetry
        ' Here, you put the code to try the process again if the user chooses Retry.
    Case vbIgnore
        ' And here, you put what should happen if the user decides to Ignore the error.
End Select
Example 8: Yes, No or Cancel Buttons
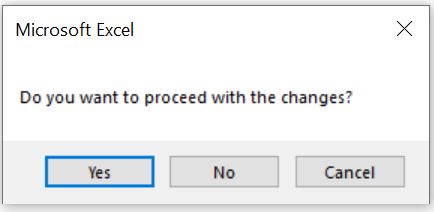
Imagine you’re working on an Excel project that involves some sort of decision-making process, like updating a dataset, cleaning up data, or running a series of calculations.
Sometimes, you’ll want to double-check with the user before taking a significant action, offering them a clear choice on how to proceed.
This is where the “Yes, No, Cancel” options come into play in VBA, providing a straightforward way to interact with users.
What Each Option Represents
- Yes: Go ahead with the operation or action.
- No: Do not proceed with the operation.
- Cancel: Exit the operation, possibly leaving the decision pending or returning to a previous state.
Implementing These Options
To incorporate these choices into your VBA project, you’ll use a special message box that pops up and asks the user a question. Depending on the user’s answer, your code can take different paths.
This is typically done using a Select Case statement, which directs the flow of your code based on the user’s selection.
Select Case MsgBox("Do you want to proceed with the changes?", vbYesNoCancel)
    Case vbYes
        ' Code to execute if the user clicks "Yes"
    Case vbNo
        ' Code to execute if the user clicks "No"
    Case vbCancel
        ' Code to execute if the user clicks "Cancel"
End Select
Example 9: Retry or Cancel Buttons
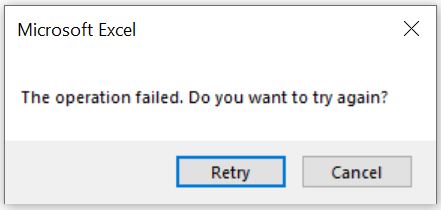
When you’re automating tasks in Excel with VBA, sometimes operations don’t go as planned.
Perhaps you’re trying to connect to a database, access a file on the network, or execute a time-sensitive operation, and it fails. Instead of letting the script crash or stop abruptly, you can give users the power to try the operation again or cancel it, using the “Retry or Cancel” message box.
The Two Choices Explained
Retry: Attempts the operation again, hoping for success this time.
Cancel: Stops the attempt and possibly exits the operation, allowing users to take alternative actions or simply acknowledge the issue.
How to Implement “Retry or Cancel”
To incorporate this functionality into your VBA scripts, you use a message box that appears when an operation fails, asking the user if they want to retry the operation or cancel it.
Here’s how you can structure this using a Select Case statement to handle the user’s response.
Select Case MsgBox("The operation failed. Do you want to try again?", vbRetryCancel)
    Case vbRetry
        ' Code to retry the operation
    Case vbCancel
        ' Code to handle cancellation, like cleanup or exit
End Select
Excel VBA Message Box Icons
In our previous examples, we didn’t highlight the use of message box icons, which play a crucial role in visually conveying the nature of the message to the user.
Excel VBA provides three primary icon options: Information, Exclamation, Question and Critical
To include an icon, insert the relevant VBA code immediately after the message text, separated by a comma, and before specifying any button options.
When you specify any button options it is done by using the plus ( + ) sign.
Example 10: Information Icon

To show an Information Icon in a message box, along with an “OK” button, you can use the vbInformation constant. This icon is ideal for conveying success messages or general information.
Here’s how you incorporate it:
MsgBox "Your operation was completed successfully.", vbInformation + vbOKOnly
Example 11: Exclamation Icon
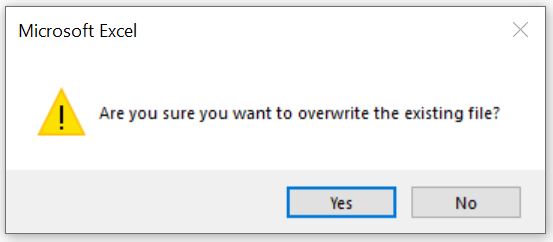
To alert users with an exclamation mark icon in a message box, signaling caution or highlighting important information, use the vbExclamation constant.
This icon, combined with vbYesNo options, effectively prompts users for confirmation on critical actions.
Here’s the structured way to implement it:
If MsgBox("Are you sure you want to overwrite the existing file?", vbExclamation + vbYesNo) = vbYes Then
    ' Code to overwrite the file
End If
Example 12: Question Icon
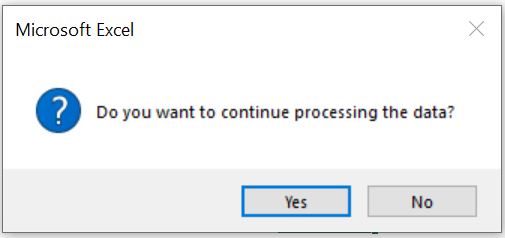
To use a question mark icon in a message box, which is ideal for queries or when seeking user confirmation, you can utilize the vbQuestion constant.
This icon, paired with vbYesNo options, poses a clear question to the user, requiring a decision to proceed.
Here is how you can apply it in your Excel VBA code:
If MsgBox("Do you want to continue processing the data?", vbQuestion + vbYesNo) = vbYes Then
    ' Insert code here to continue with data processing
Else
    ' Insert code here to halt data processing
End If
Example 13: Critical Icon
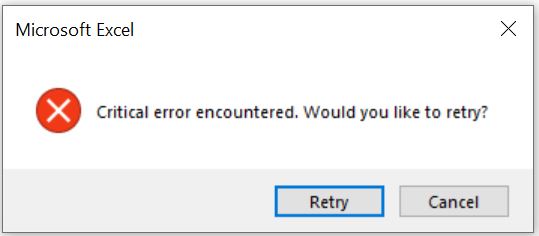
When you need to convey urgency or draw attention to a significant error or critical situation, you can use the vbCritical constant to add a critical icon (commonly represented by a red “X” or similar symbol) in your message box.
This icon, combined with appropriate button options, effectively communicates the severity of the situation to the user.
Here’s an example of how to implement it:
Do
    If MsgBox("Critical error encountered. Would you like to retry?", vbCritical + vbRetryCancel) = vbRetry Then
        ' Attempt the operation again
    Else
        ' Exit the loop and possibly terminate the operation
        Exit Do
    End If
Loop
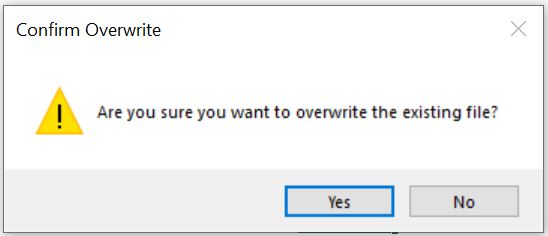
Excel VBA Message Box Titles
The last section in this guide on learning how to use Excel VBA Message Boxes is changing the standard message box title. You’ll be please to read that this is a simple task.
To change the message box from the standard “Microsoft Excel” title you see all you do is add your title text in quotations at the end of the message box statement, after any icon and button selections and seprated by a comma.
For example to change the above title to “Confirm Overwrite” the code would look like:
If MsgBox("Are you sure you want to overwrite the existing file?", vbExclamation + vbYesNo, "Confirm Overwrite") = vbYes Then
    ' Code to overwrite the file
End If
Summary
That concludes our journey through Excel VBA Message Boxes.
From the crafting of message text to the strategic deployment of buttons, icons, and titles, we’ve covered all the essentials that make message boxes a powerful tool for enhancing user interaction.
Whether for informing users, capturing inputs, or elegantly managing errors, Excel VBA message boxes are invaluable for creating more engaging and intuitive Excel applications. In essence, mastering message boxes opens up new avenues for communicating within your VBA projects, ensuring your applications are not just functional but also user-centric and responsive.
Keep Excelling,

Eager to elevate your Excel VBA skills even further? Don’t stop at mastering message boxes. Dive into our next post, How to Insert Formulas Using VBA, and unlock the power of automating complex calculations with ease. Transform your spreadsheets into dynamic tools that work smarter, not harder.