
We all know that Microsoft Excel is an incredible tool, and for many of us, it’s where we keep some pretty important data. But like any other place where we store our precious information, we want to ensure it’s safe and sound. Whether you’re a seasoned Excel expert or just starting your spreadsheet journey, we’ve got some straightforward tips to help you keep your data protected. Let’s dive in with 7 ways to protect your data in Excel.
1. Save with a Password
You’ve worked hard on that data; now let’s ensure only the right people can access it.
- Open your Excel file.
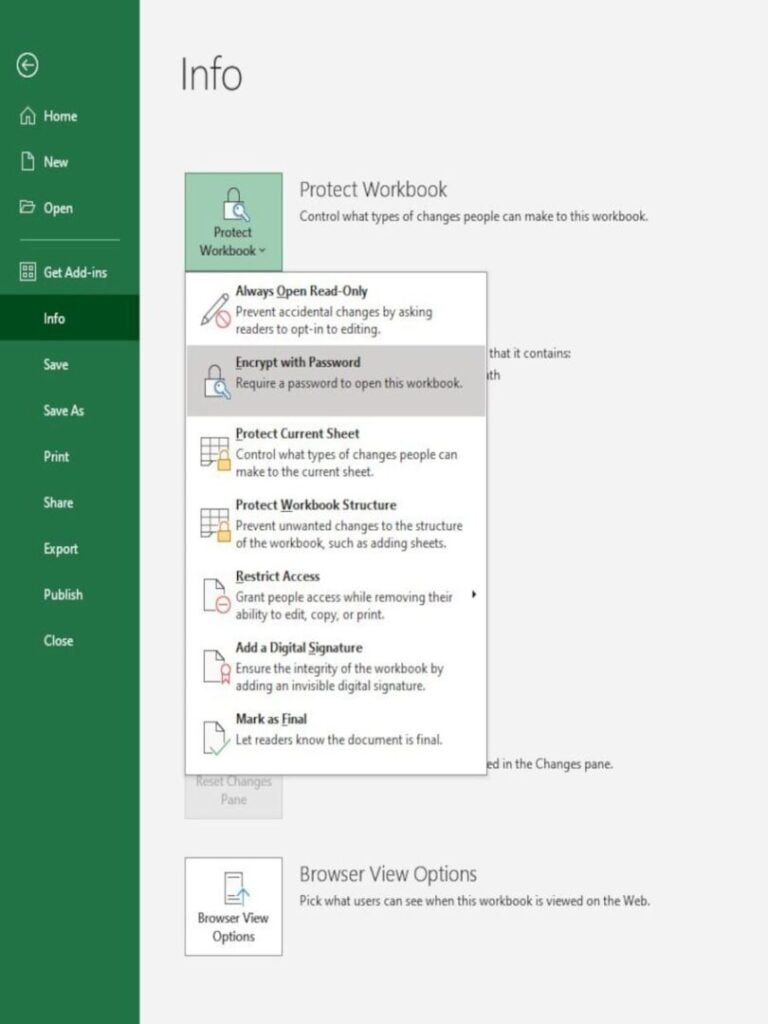
- Click on the ‘File’ tab, then ‘Protect Workbook’.
- Select ‘Encrypt with Password’.
- Enter a strong password (mix of letters, numbers, symbols).
- Click ‘OK’, and then confirm your password.
Remember: Don’t lose this password, or you’ll be locked out!
2. Protect Specific Cells
Sometimes, only parts of your spreadsheet are top-secret. Here’s how you can guard those select cells.
- Click the cells you want to protect.
- Go to the ‘Review’ tab and click ‘Protect Sheet’.
- Enter a password and make sure ‘Protect worksheet and contents of locked cells’ is checked.
Now, only those cells will be protected from editing!
3. Hide Sensitive Data
For those sneaky bits of info that you’d rather keep under wraps – here’s a little magic trick.
- Select the cells you want to hide.
- Right-click and choose ‘Format Cells’.
- Go to the ‘Number’ tab and select ‘Custom’.
- Type ‘;;;’, and voila! Those cells will now appear blank to the unsuspecting eye.
4. Backup, Backup, Backup
Our data is precious. Let’s create some safety nets, so we always have a backup plan.
- Always save a backup of your important Excel files in a separate location, whether it’s on an external hard drive, cloud storage, or even a USB drive.
- Remember, it’s better to have it and not need it than to need it and not have it!
5. Use Data Validation
We all make mistakes! For number five in our article, 7 Ways to Protect Your Data in Excel, here’s a nifty way to ensure only the right info gets into your spreadsheet.
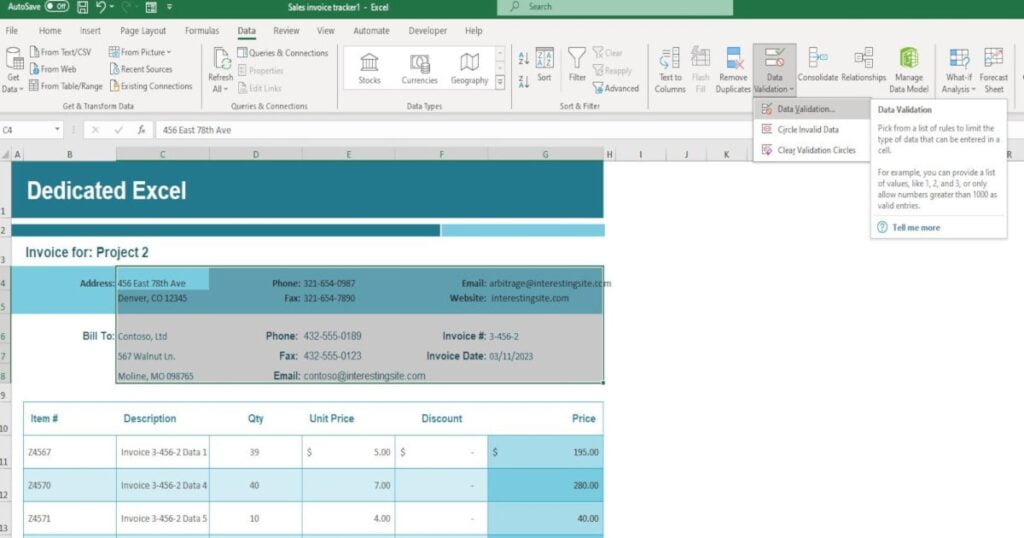
- To prevent unwanted data entries, select the cells where you want restrictions.
- Click on the ‘Data’ tab, then ‘Data Validation’.
- Choose your validation criteria (like a dropdown list of acceptable answers). This way, you’ll ensure only the right type of data gets entered!
6. Turn on Workbook Protection
Think of this as a security guard for your entire workbook, ensuring everything stays just the way you want it.
- Go to the ‘Review’ tab.
- Click ‘Protect Workbook’.
- Enter a password (ideally a mix of letters, numbers, symbols).
- Make a note of the password in a safe place!
This stops others from adding, deleting, hiding, or renaming worksheets.
7. Be Wary of Macros
Macros are like those surprise mystery boxes; they can be exciting but sometimes bring unwanted surprises.
- Macros can be powerful, but they can also be a source of security threats.
- Always ensure macros come from trustworthy sources.
- If you’re prompted to enable macros and you’re unsure of the source, it’s best to decline.
There you have it, 7 Ways to Protect Your Data in Excel. Excel is an amazing tool, but like any tool, it’s best used with care and understanding. So go forth, create, calculate, and keep that data safe!
Keep Excelling,

Curious about Excel file sizes? If you’ve secured your data with our ‘7 Ways to Protect Your Data in Excel’, discover next why your spreadsheet might be unusually large. Unravel this mystery in our detailed guide, ‘Why is my Excel Spreadsheet So Large?’ and optimize your Excel efficiency!