
In our increasingly digital landscape, the ability to transform documents from one format to another has become a fundamental skill. Among these, turning Excel spreadsheets into PDFs is particularly useful. This guide will walk you through the process of converting Excel to PDF, ensuring that your data is presented in a universally accessible format.
In this post we cover:
- Introduction
- Organizing Data for Excel to PDF Conversion
- Saving as a PDF File
- PDF Option Settings Explained
- Tips for Excel to PDF Conversion
- Summary
Introduction
If you are looking for a way to share your Excel spreadsheets, without worrying about formatting issues or compatibility problems, then converting your Excel files to PDF is the perfect solution. Not only does it maintain your data’s layout and formatting, but it also makes your documents accessible to anyone with a PDF reader.
In Excel it is possible to convert a selected data range, a table, a worksheet or an entire workbook to PDF and in this post we’ll explore the steps to making this process simple. Including a breakdown of all the PDF options to ensure you achieve a perfect Excel to PDF conversion every time.
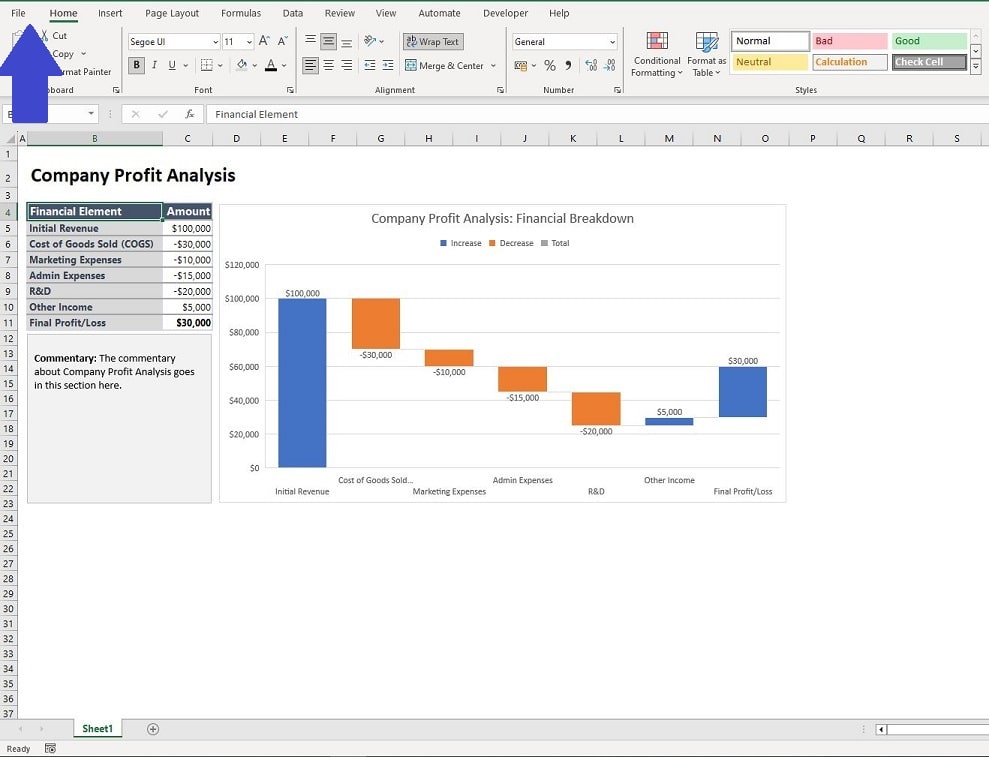
Step One – Organize the Data
Before you convert your Excel workbook to a PDF, organizing your data is crucial. A well-organized Excel file ensures that your PDF looks professional and is easy to read. Here are some tips to prepare your Excel to PDF conversion (if you have already prepared your Excel workbook feel free to skip this section):
- Consistent Formatting: Apply a consistent format to your cells. Ensure that fonts, sizes, and colors are uniform across your data. This consistency will translate well in the PDF and make your document more readable.
- Adjust Column and Row Sizes: Make sure all your data is visible by adjusting the column widths and row heights. Text or data cut off in the Excel file will also be cut off in the PDF.
- Use Headers and Footers: Headers and footers are useful for including information like page numbers, document title, or the date on every page of your PDF. They provide context and make navigation easier when viewing the PDF.
- Check Print Preview: Before converting your Excel to PDF, use the ‘Print Preview’ feature to see how your document will look when printed or converted to PDF. This step helps identify and rectify any issues with how the data will appear on the page.
- Freeze Panes for Large Sheets: If your sheet contains a lot of data, consider freezing panes. This feature keeps specific rows or columns visible when scrolling through your document. While this doesn’t affect the PDF directly, it helps in reviewing your data before conversion.
- Remove Unnecessary Data: If there are parts of your workbook that you don’t need in your PDF (like raw data behind summaries or charts), consider hiding or removing those sections.
- Use Data Validation and Filters Wisely: If your sheet includes filters or data validation, ensure they are set correctly before conversion, as these features won’t be interactive in the PDF.
By following these steps, your Excel to PDF conversion will yield a document that is not only visually appealing but also well-structured and easy to navigate. Remember, the time spent organizing your Excel file is an investment in the quality of your final PDF document.
Step Two – Save as PDF
With an organized Excel workbook the next step is to begin the ‘Save as PDF’ process. This is a simple procedure to follow:
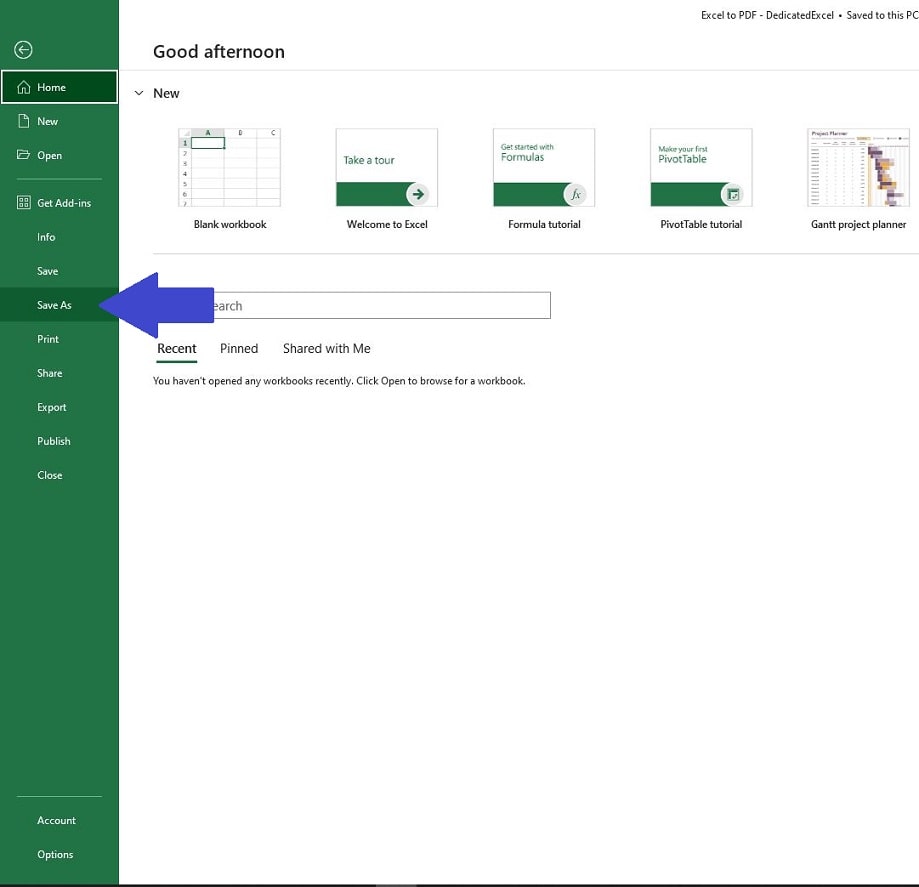
- Access the ‘File’ menu by clicking on the ‘File‘ tab in the top left-corner of the Excel worksheet.
- Choose ‘Save As’: In the ‘File‘ menu, select ‘Save As‘ to open the save options.
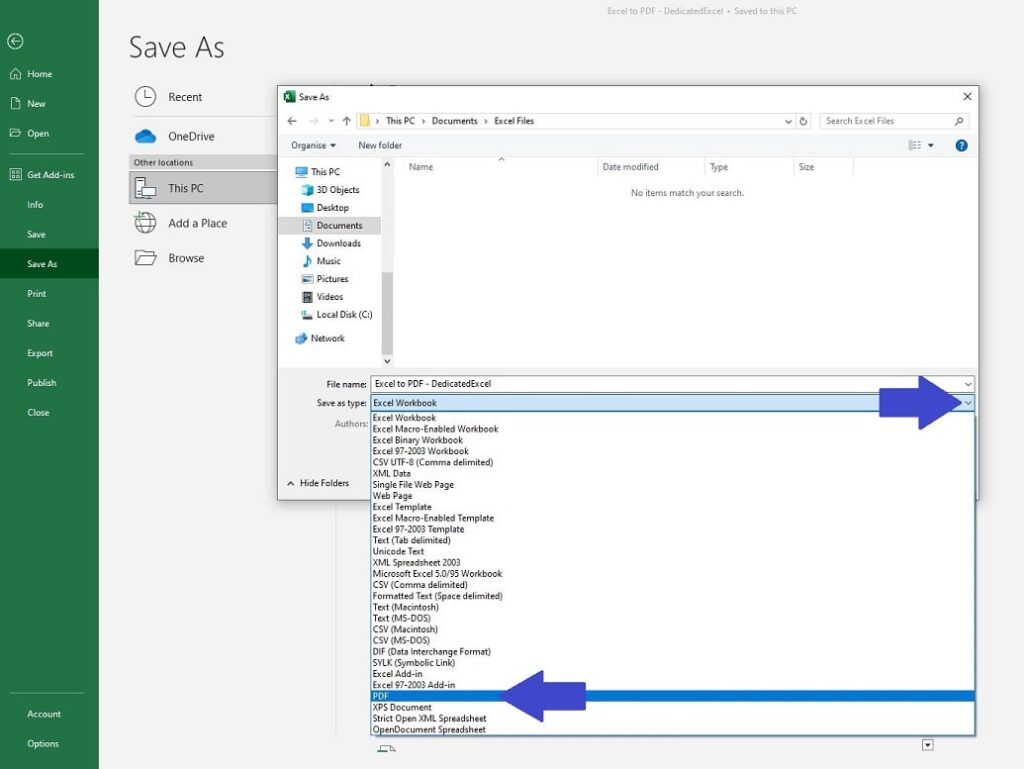
- Select the Save Location: Decide where on your computer or network you want to save the PDF.
- Choose PDF Format: In the ‘Save as type‘ drop-down, select ‘PDF‘. This step is crucial for converting your Excel to PDF.
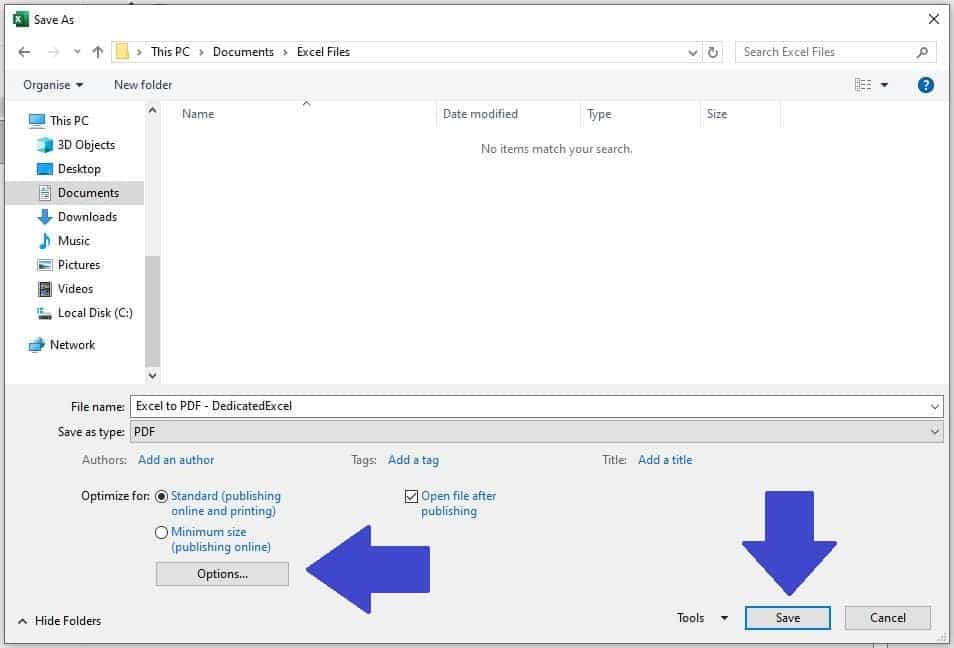
- Set Your Options: If needed, click on ‘Options’ to specify which parts of the workbook you want to convert. You can choose the entire workbook, the current sheet, or a specific range. See the next section for a complete guide on setting the correct options.
- Finalize and Save: Click ‘Save‘ to convert your Excel file to a PDF document.
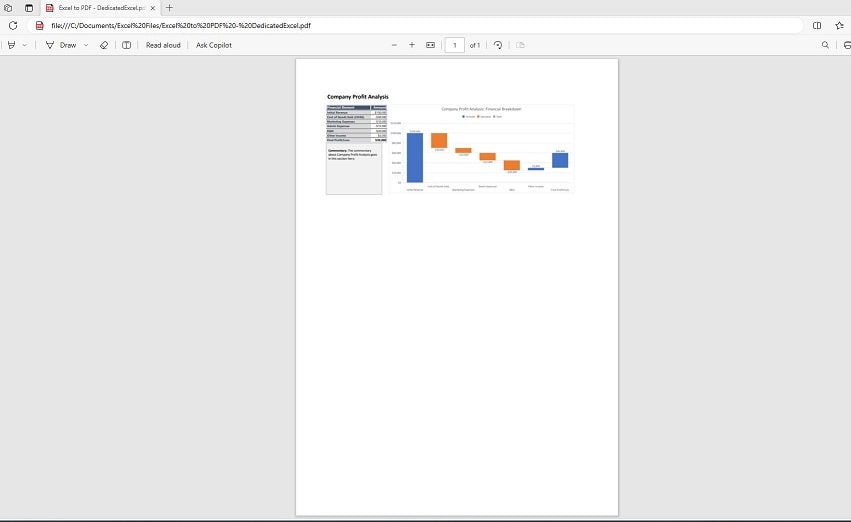
- Navigate to the saved location in Windows Explorer to locate the newly produced PDF file. The process is of converting Excel to PDF is complete.
PDF Save Options Explained
When converting an Excel file to PDF there are numerous options you can select. Learning how to utilize and set these options effectively will help you to produce perfect Excel to PDF conversions every time.
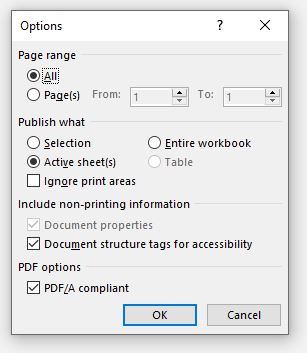
Page Range
This option allows you to specify which pages of your Excel workbook you want to include in the PDF. This is particularly useful if your workbook contains multiple sheets or if a single sheet spans over several pages, and you only need to convert a specific part of it to PDF.
- All: This will include all the pages in your workbook in the PDF. If your workbook has multiple sheets, each sheet that is set to print will be included.
- Custom Range: Here, you can specify the exact page numbers you want to include. For example, if your worksheet spans pages 1 to 10 and you only want pages 3 to 5, you can enter that range.
Publish What
The “Publish What” section in Excel’s PDF export options allows you to specify exactly what part of your workbook you want to convert into a PDF. This feature is particularly useful for tailoring your PDF output to include only the relevant data.
- Selection: Converts only the currently selected cells or area in the Excel sheet. This option is useful if you want to create a PDF of only a specific part of your worksheet.
- Active Sheet(s): Converts the currently active sheet, or multiple sheets if they are selected. This option is ideal for converting the sheet you are currently working on, or a group of sheets if you have selected more than one.
- Entire Workbook: Converts every sheet in the workbook into a single PDF. This is a great option if you need to share the entire contents of your workbook.
- Table: If you have tables in your Excel worksheet, this option allows you to convert only the table data into a PDF. This is particularly useful for sharing or printing tabular data without the rest of the worksheet content.
- Ignore Print Area: Normally, Excel will only convert the areas set as the ‘Print Area‘ in each sheet to PDF. By choosing to ignore the print area, Excel will convert the entire content of the sheets or selection, disregarding any set print areas. This option is useful when you want to include everything in your sheets, not just the parts you’ve designated for printing.
Each of these options under “Publish What” offers a different level of control over what content from your Excel workbook gets included in the final PDF, allowing you to create a document that best suits your specific needs.
Include Non-Printing Information
This option allows you to include elements in your PDF that are typically not printed when you print an Excel sheet. These can include items like cell comments, hyperlinks, or other elements that are part of the Excel workbook but not usually visible in a printout.
- Document Properties: When this option is checked, the PDF will include metadata from the Excel file, such as the author’s name, subject, and keywords. This information is often useful for document management and searchability, especially in larger archives or databases.
- Document Structure Tags for Accessibility: Selecting this option will include tags in the PDF that improve accessibility. These tags define the structure of the document (like headings, lists, tables, etc.) and are especially helpful for users with disabilities, such as those who rely on screen readers. The tags make it easier for assistive technologies to interpret and navigate the document.
PDF Options
PDF/A is a version of the PDF format designed for long-term preservation of electronic documents. PDF/A differs from the standard PDF format in that it avoids features not suited to long-term archiving, such as font linking (instead of embedding) and encryption.
When you create a PDF/A compliant document, you’re ensuring that the file is self-contained (all necessary information like fonts and colour profiles are embedded), reliable over time, and can be opened with the same visual appearance on any system in the future. This option is particularly important for documents that need to be preserved in a long-term archive, like legal documents, government records, and other important paperwork.
Its worth noting that checking this option can result in a slight increase in file size. This is due to the additional metadata and font-embedding that is included in the file. While the increase in file size might be a concern for distribution or storage in some scenarios, it’s a trade-off for the PDF/A format’s benefits in terms of long-term readability, preservation, and self-containment.

Additional Tips for Excel to PDF Conversions
Converting your Excel files to PDFs can be a seamless process with the right preparation. Here’s how you can elevate the quality of your Excel to PDF conversions:
- Detailed Review: Prior to conversion, scrutinize your Excel file for any inaccuracies or formatting inconsistencies. This ensures that the final PDF reflects only the highest quality of your work.
- Mind the Layout: The arrangement of your Excel document is crucial. Adjust columns, rows, and the overall design for a clear, professional look in your PDF. A well-organized layout translates to better readability in the final document.
- Print Preview for Perfection: Don’t overlook Excel’s ‘Print Preview’ feature. It’s an invaluable tool for previewing how your document will appear in PDF format, allowing you to make necessary adjustments for optimal presentation.
- Consistency is Key: Ensure uniformity in fonts, cell sizes, and styles throughout your Excel document. Consistent formatting leads to a cohesive and polished PDF output.
By adhering to these practices, your Excel to PDF conversions will not only be more efficient but will also yield documents of superior quality. Whether it’s for professional presentations or personal record-keeping, taking these extra steps can make a significant difference in how your PDFs are perceived and utilized.
Summary
In this comprehensive guide, we’ve explored the nuances of converting Excel to PDF, a process that enhances both the accessibility and professionalism of your documents. From the initial steps of organizing your data in Excel to navigating through various PDF save options, we’ve covered everything you need to know to perform this conversion with ease and precision.
- The Art of Organization: Organizing your data is the foundation of a successful Excel to PDF conversion. A well-structured Excel file is key to creating a PDF that is both visually appealing and easy to navigate.
- Seamless Conversion Process: We delved into the simple yet effective steps to save your Excel file as a PDF, ensuring that even those new to Excel can follow along without any hassle.
- Understanding PDF Options: Clarifying the PDF save options demystifies the process, allowing you to tailor your PDF to your specific needs, whether it’s for archiving, professional presentation, or sharing information.
- Valuable Tips and Tricks: Our additional tips provide you with the insights to refine your Excel to PDF conversions. From detailed reviews to leveraging the Print Preview feature, these tips are designed to elevate the quality of your final document.
Whether you’re preparing financial reports, project plans, or data analyses, the Excel to PDF conversion method ensures that your documents are presented in the best possible light. The key to a successful conversion lies in careful preparation and meticulous attention to detail.
By following the guidelines we’ve laid out, you can transform your Excel files into professional, easily shareable PDFs that stand the test of time.
Keep Excelling,

Congratulations on mastering the art of converting Excel files to PDFs! But wait, there’s more to Excel wizardry than just conversion. Are you aware that your data might be at risk right now? Click here to discover the ‘7 Ways to Protect Your Data in Excel‘ and ensure your spreadsheets are not just professional, but also perfectly protected. Don’t let your hard work fall prey to common pitfalls. Learn how to safeguard your data like a pro!