
Learning how to use Data Validation in Excel properly is a valuable skill for all Excel users, from beginners to advanced users. This feature is a powerhouse for ensuring data integrity and accuracy within your spreadsheets.
By the end of this guide, you’ll not only understand the importance of data validation but also how to apply it effectively using different techniques
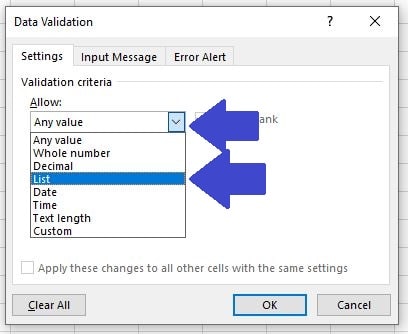
Table of Contents
- Introduction
- Benefits of Learning Data Validation
- Example 1: Restricting Input to a List of Values
- Example 2: Setting Up Date Restrictions
- Example 3: Enforcing Numeric Ranges
- Example 4: Validating Text Length
- Example 5: Requiring Unique Entries
- Example 6: Creating Input Messages and Error Alerts
- Example 7: Removing Data Validation from Cells
- Summary
Introduction
Data validation in Excel is a function that allows you to control the type of data or the values that users enter into a cell. Think of it as a gatekeeper that ensures data entered into your spreadsheet meets specific rules or criteria, thus preventing errors and promoting data consistency.
Whether you’re managing inventories, schedules, or budgets, mastering data validation can significantly elevate your Excel game.
Benefits of Learning Data Validation
Learning how to use Data Validation in Excel offers several benefits:
- Improves Data Integrity: Ensures that the data entered into your Excel sheets is accurate, consistent, and reliable.
- Reduces Errors: Minimizes the chance of errors by restricting the type of data that can be inputted.
- Saves Time: By preventing incorrect data entries, it reduces the time spent on correcting errors.
- Enhances User Experience: Provides a more guided and controlled environment for users, making your spreadsheets user-friendly.
Let’s look at a some examples of how to implement Data Validation in Excel. By the end of these examples you will have learned a variety of techniques that can significantly enhance your Excel spreadsheets.
Example 1: Restricting Input to a List of Values
One of the more common uses of Data Validation in Excel is to use it for restricting the cell inputs to specific values.
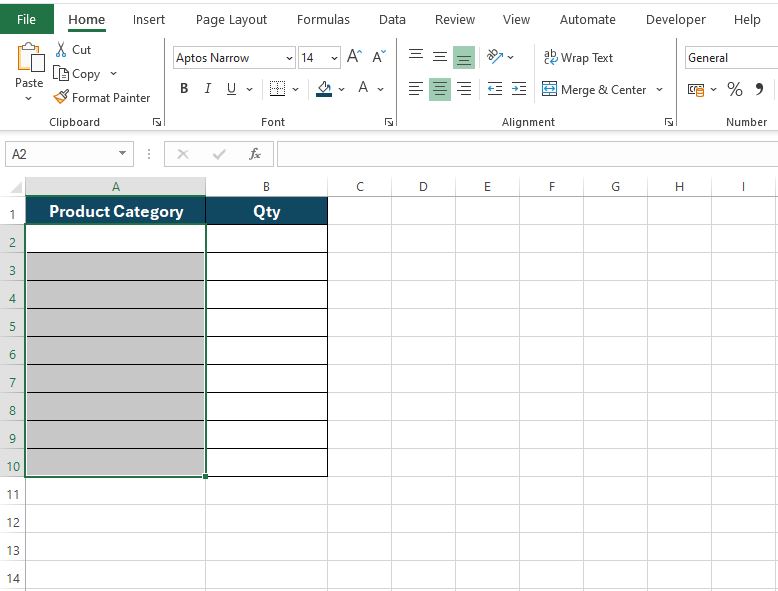
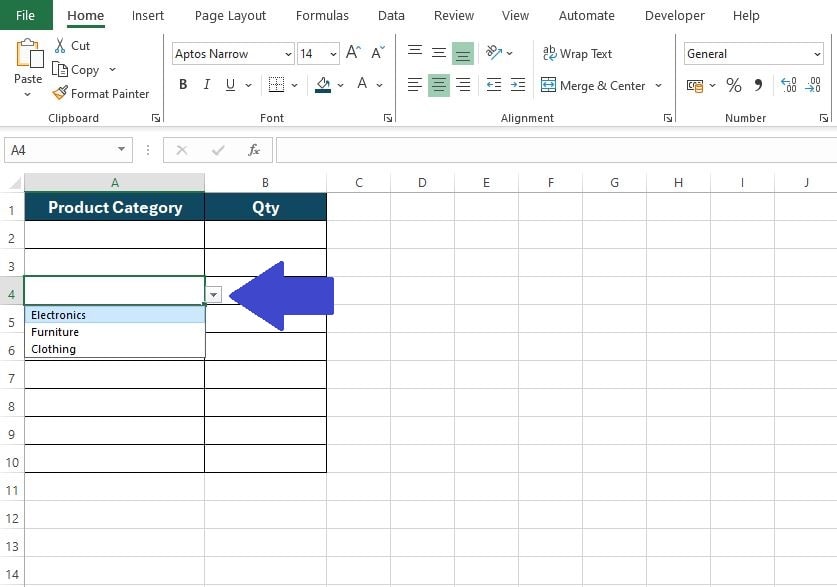
For example, imagine you’re managing an inventory and want to categorize items. You can restrict the category cell to a dropdown list of predefined categories, ‘Electronics‘, ‘Furniture‘ and ‘Clothing‘.
First select the cells where you want to apply the dropdown list, for this example we’ll select cells A2 to A10.
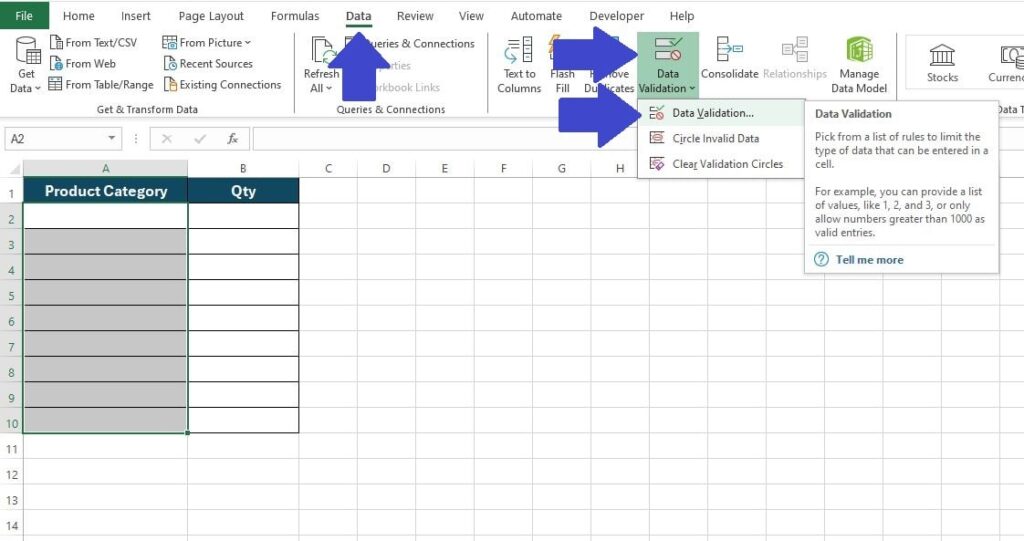
Next, select the ‘Data‘ tab on the Excel Ribbon and then select ‘Data Validation‘ and ‘Data Validation‘ again from the pop-out menu.
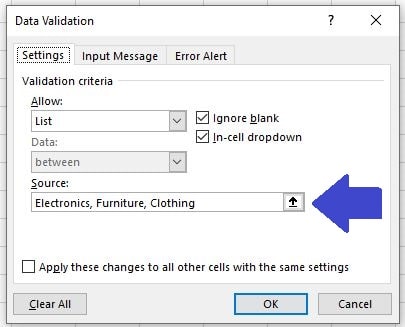
In the ‘Data Validation‘ input box select ‘List‘ from the ‘Allow‘ menu, using the dropdown.
Then in the ‘Source‘ box we can enter the list of allowed items. Type ‘Electronics‘, ‘Furniture‘, ‘Clothing‘, remembering to include a comma between each value to separate them. Then click ‘OK‘.
Now, the selected cells (A2 to A10) will have a dropdown list from which users can select.
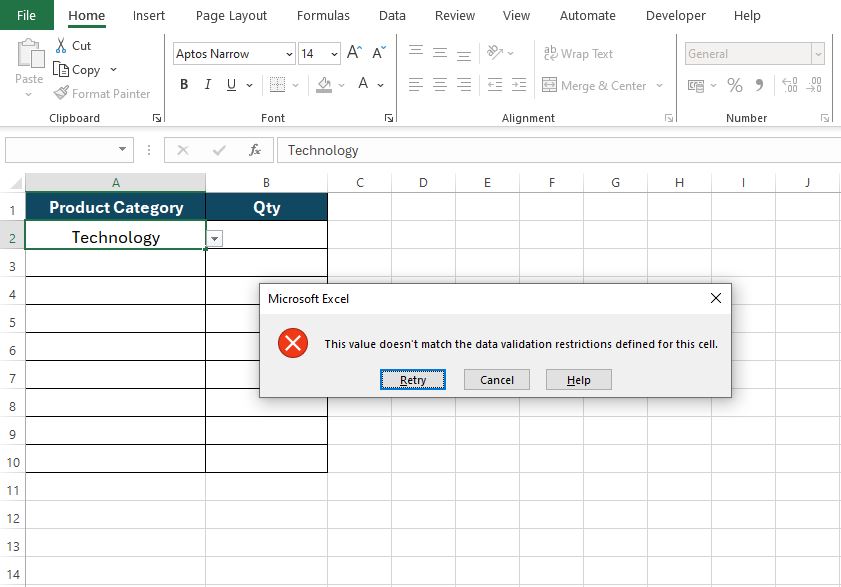
If you try to enter a value that is not included on the allowed list, for example ‘Technology‘ Excel will prevent it. The user will be shown an error message with an option to ‘Retry‘ or ‘Cancel‘ their data entry.
Example 2: Setting Up Date Restrictions
Another useful example of using Data Validation in Excel is to setup Date Restrictions.
For instance, consider you’re outlining a timeline for constructing and launching a website. You intend to assign a start date to each task, making sure these dates span from the project’s inception to its conclusion, fitting within a predetermined timeframe.
First select the cells where you want to apply the date restrictions, for this example we’ll select cells B2 to B8. Then from the Excel Ribbon select ‘Data‘ > ‘Data Validation‘ > ‘Data Validation‘ to bring up the Data Validation Input box.
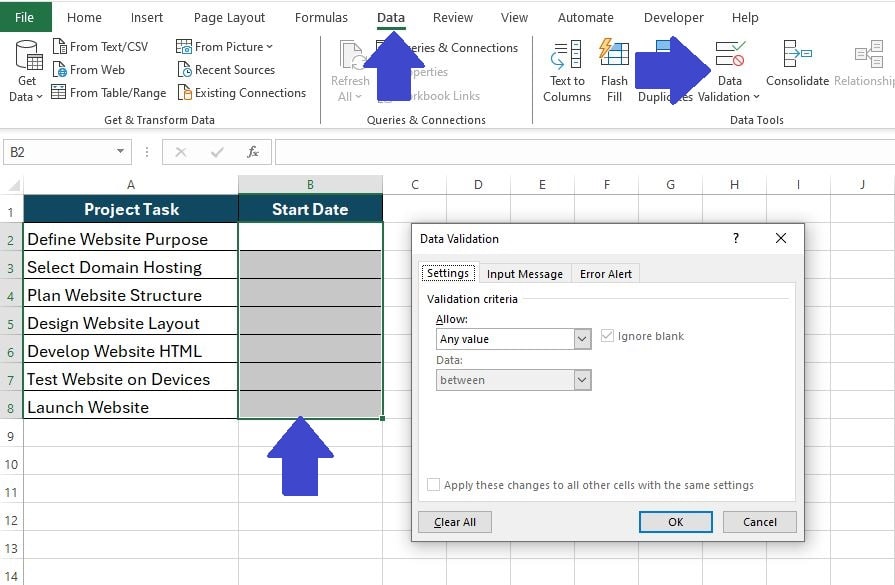
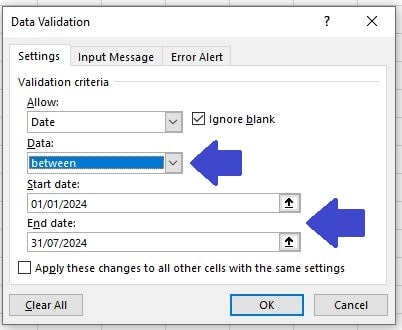
In the ‘Data Validation‘ input box select ‘Date‘ from the ‘Allow‘ menu, using the dropdown.
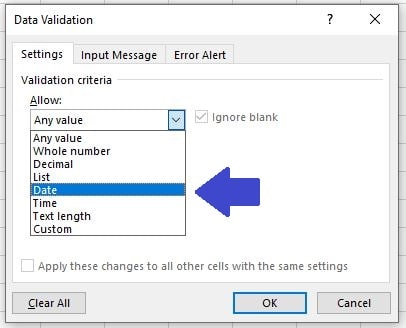
Next ensure that the ‘Data‘ box is set to ‘Between‘ and complete the ‘Start Date‘ and ‘End Date‘ options in the ‘Data Validation‘ input box. For this example we’ll set the Start Date to ‘01/01/2024‘ and the End Date to ‘31/07/2024‘. Then click ‘OK‘ to apply the settings to our cells.
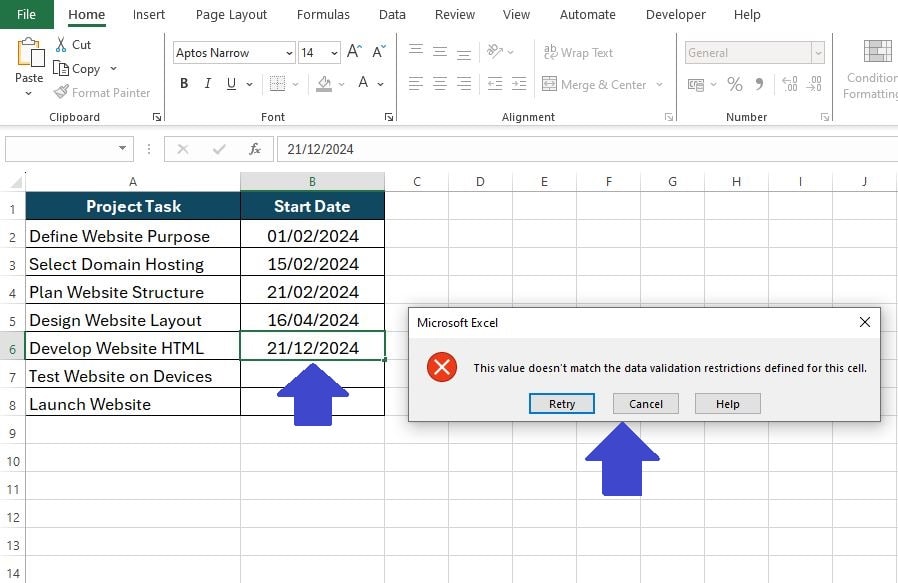
Now our selected cells (B2 to B8) will only accept a date between our start and end dates, otherwise an error message will be shown asking you to ‘Retry’ or ‘Cancel’ your data entry.
For example in the image below you can see the dates in cells B2 to B5 all fall within our Start and End Date range, however as soon as we enter a date outside our set date range the error message will show, preventing you from entering the date.
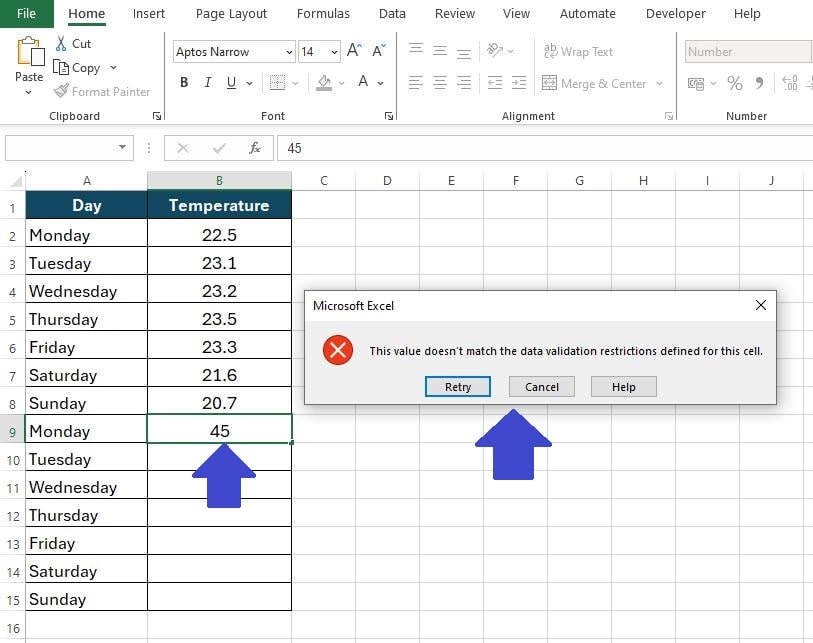
Example 3: Enforcing Numeric Ranges
Sometimes you might want to use Data Validation in Excel to ensure users only enter numbers/values within a specific range.
For example, imagine you’re involved in a climate study project where daily temperature readings (in degrees Celsius) are recorded.
To maintain data integrity, you want to ensure that all temperature entries are within a realistic range for your study area, say between -10°C and 40°C, which is a common range for many inhabited regions of the world.
First select the cells where you want to apply the value restrictions, for this example we’ll select cells B2 to B15. Then from the Excel Ribbon select ‘Data‘ > ‘Data Validation‘ > ‘Data Validation‘ to bring up the Data Validation Input box.
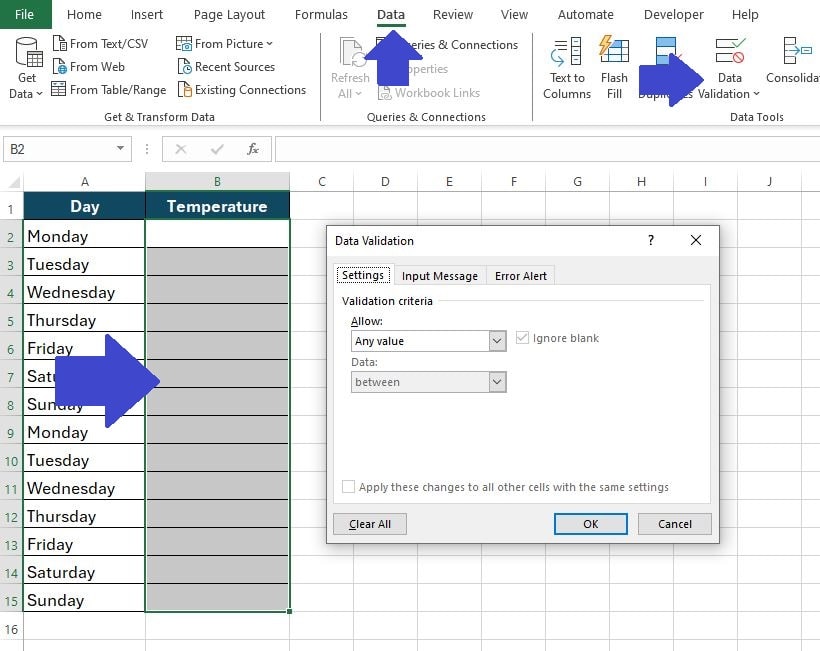
In the ‘Data Validation‘ input box select ‘Decimal‘ from the ‘Allow‘ menu, using the dropdown. This is because our temperatures can have a decimal value.
Then, while stll in the ‘Data Validation‘ input box, ensure that the ‘Data‘ box is set to ‘Between‘ and complete the ‘Minimum‘ and ‘Maximum‘ values of -10 and 40. Finally, select ‘OK‘ to apply these settings to our cell range (B2 to B15).
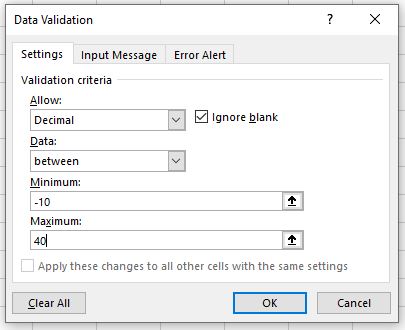
Now our selected cells (B2 to B15) will only accept a value between our ‘Minimum‘ and ‘Maximum‘ values of -10 and 40. Anything outside this range will trigger the error message asking you to ‘Retry’ or ‘Cancel’ your data entry.
Example 4: Validating Text Length
Another great way to use Data Validation in Excel is for validating text lengths.
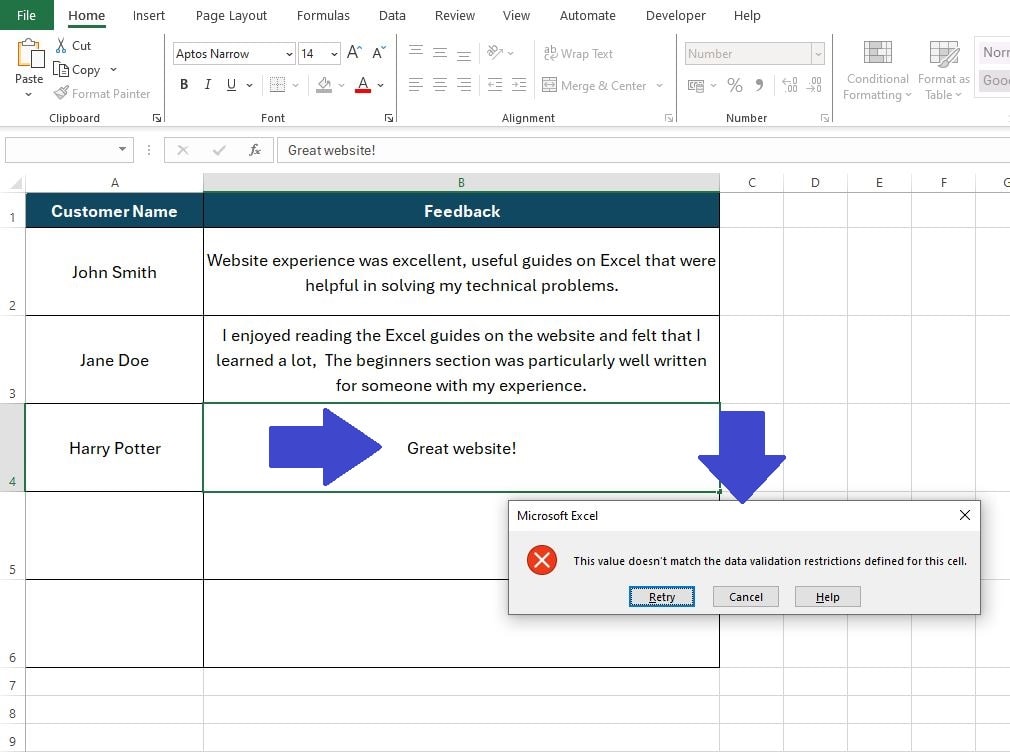
For example, if we are managing an Excel database of customer feedback we might want to ensure that each feedback entry is between 50 and 200 characters in length. That way we can ensure the feedback contains enough detail to be useful but not too much to be long-winded and abstract.
First select the cells where you want to apply the text length restrictions, for this example we’ll select cells B2 to B6. Then from the Excel Ribbon select ‘Data‘ > ‘Data Validation‘ > ‘Data Validation‘ to bring up the Data Validation Input box.
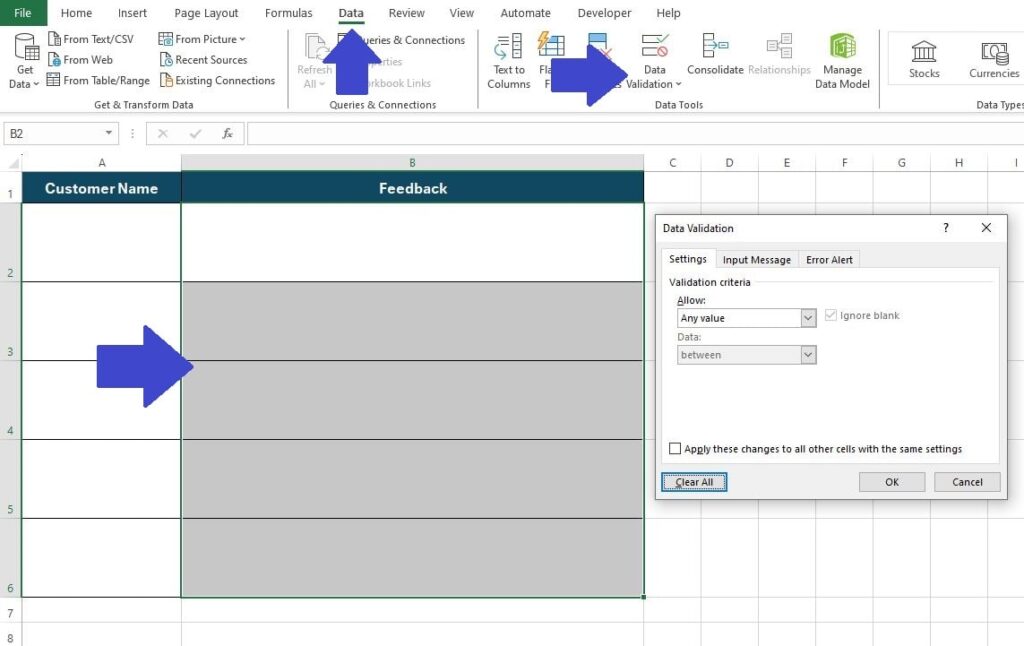
In the ‘Data Validation‘ input box select ‘Text Length‘ from the ‘Allow‘ menu, using the dropdown.
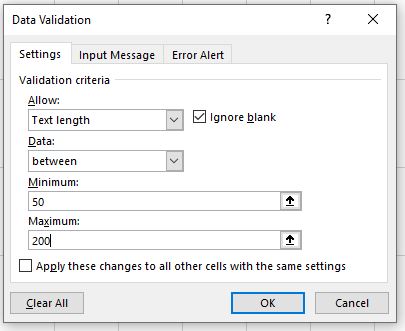
Then, while stll in the ‘Data Validation‘ input box, ensure that the ‘Data‘ box is set to ‘Between‘ and complete the ‘Minimum‘ and ‘Maximum‘ values of 50 and 200. Finally, select ‘OK‘ to apply these settings to our cell range (B2 to B6).
Now our selected cells (B2 to B6) will only accept a text string between our ‘Minimum‘ and ‘Maximum‘ values of 50 and 200. Anything typed or entered outside this range will trigger the error message asking you to ‘Retry’ or ‘Cancel’ your data entry.
Example 5: Requiring Unique Entries
One of the lesser known uses of Data Validation in Excel is utilizing Data Validation to ensure only unique entries are used.
For example, imagine you are creating a sign-up sheet for new customers of your product and need to ensure that each customer’s ID number is unique.
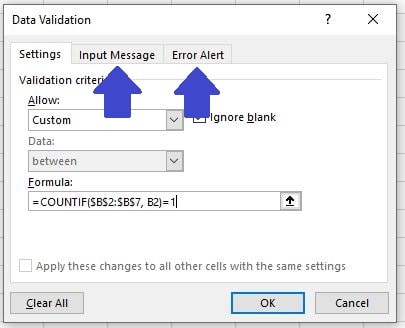
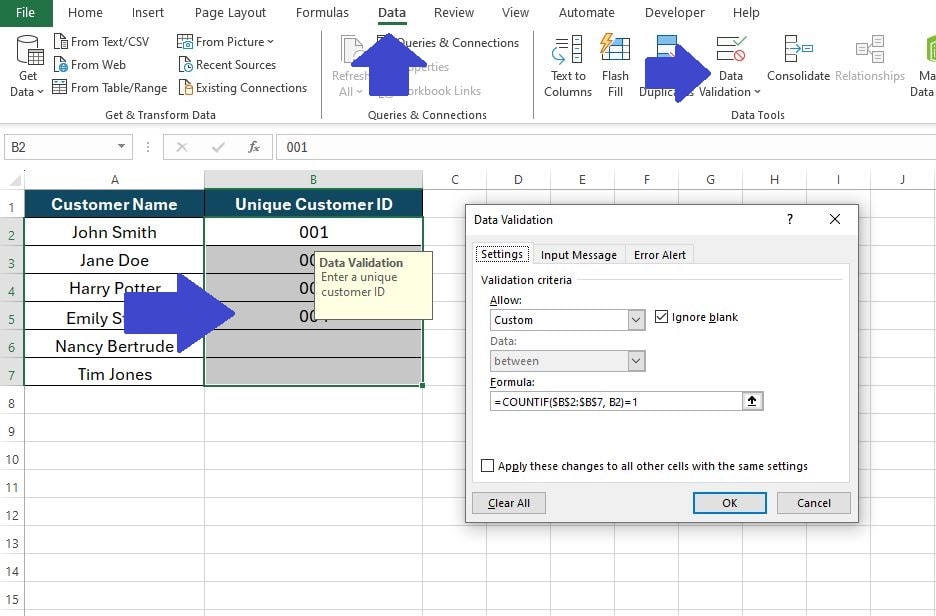
To get started select the cells where you want to apply the unique customer ID criteria, for this example we’ll select cells B2 to B7. Then from the Excel Ribbon select ‘Data‘ > ‘Data Validation‘ > ‘Data Validation‘ to bring up the Data Validation Input box.
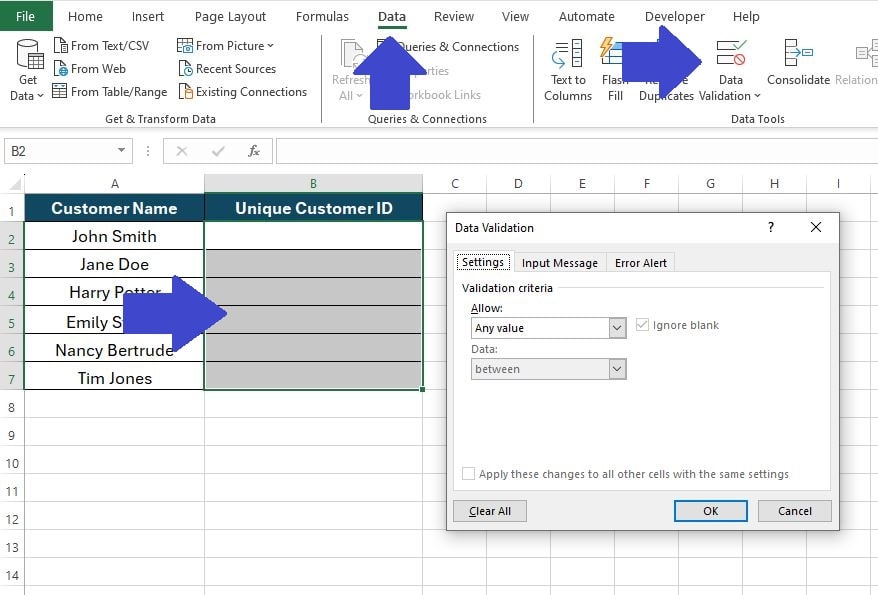
In the ‘Data Validation‘ input box select ‘Custom‘ from the ‘Allow‘ menu, using the dropdown.
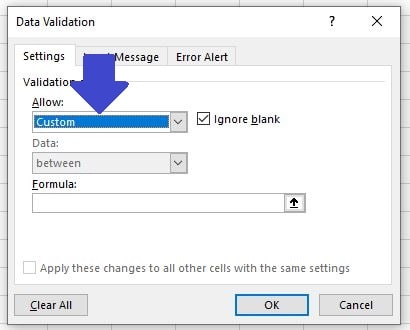
Notice that after selecting ‘Custom‘ from the ‘Allow‘ dropdown menu a ‘Formula‘ box is displayed within the ‘Data Validation‘ input box.
This ‘Formula‘ option allows us to enter a custom formula to our range of cells (B2 to B7).
In the ‘Formula‘ box enter the formula =COUNTIF($B$2:$B$7, B2)=1, then click ‘OK’ to apply the Data Validation criteria.
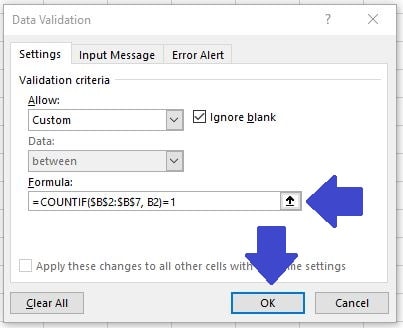
Let’s break down the formula we have used, =COUNTIF($B$2:$B$7, B2)=1.
- COUNTIF Function: This function counts the number of times a specific value appears within a specified range.
- Range ($B$2:$B$7): The range within which we’re checking for uniqueness. The $ symbols fix the range, so it remains constant regardless of where Excel is applying the validation rule.
- Criteria (B2): The cell reference without $ symbols means Excel adjusts this reference relative to each cell where the validation rule is applied. For each cell in B2:B7, Excel checks its value against the entire range.
- Equality Check (=1): After counting occurrences, the formula checks if the count equals 1. A count of 1 means the value in the cell is unique within the specified range; more than 1 would indicate a duplicate.
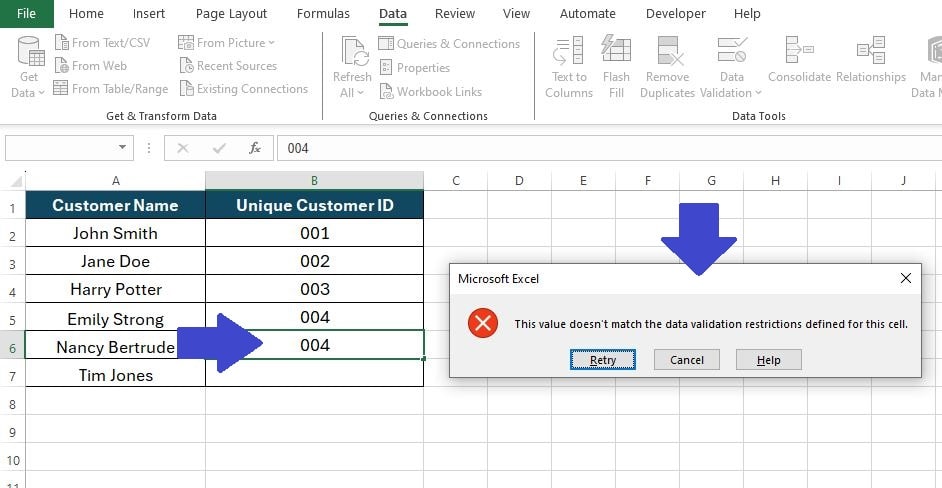
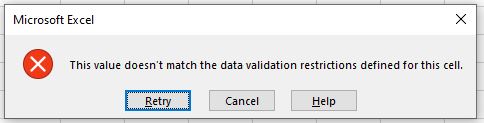
Now if we enter a Customer ID that has already been used we’ll be presented with an error message asking us to ‘Retry’ or ‘Cancel’ the data entry, this ensures we keep all the Customer ID’s unique.
Example 6: Creating Input Messages and Error Alerts
In applying Data Validation for your cells, it’s highly beneficial to incorporate an Input Message and a tailor-made Error Alert. The generic Error Alert is useful, but not exactly informing in regards to what you have done wrong.
This approach serves as an effective prompt, clearly indicating the allowed or expected values for each cell. It’s especially advantageous for instances where the workbook hasn’t been accessed for some time, or when it’s being used by individuals unfamiliar with the Data Validation rules you have created.
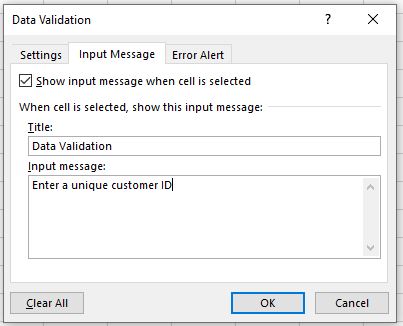
Let’s go back to our previous example of applying Data Validation to ensure Customer ID’s are unique. You’ll notice that when you select the ‘Data Validation‘ input box there are two other tabs, one for ‘Input Message‘ and another for ‘Error Alert‘.
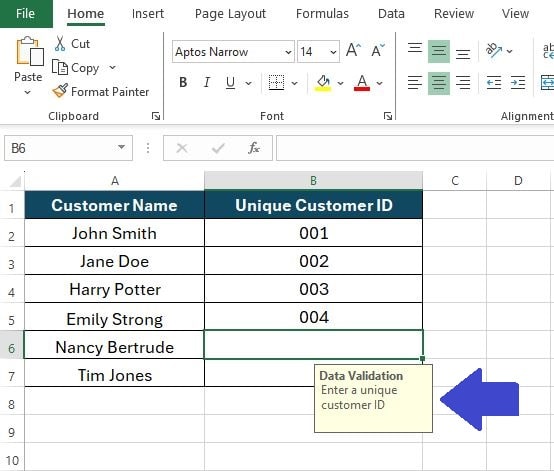
To start with we select the ‘Input Message‘ tab. In this tab we can enter a ‘Title‘ for our input message and a custom ‘Input Message‘ that is descriptive.
Let’s set the ‘Title‘ to “Data Validation” and the ‘Input Message‘ to “Enter a unique customer ID”.
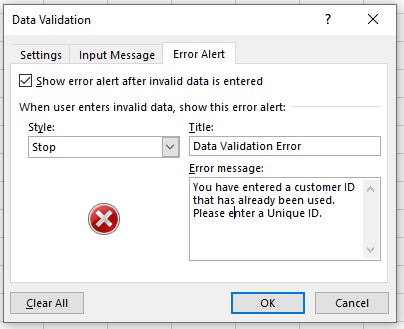
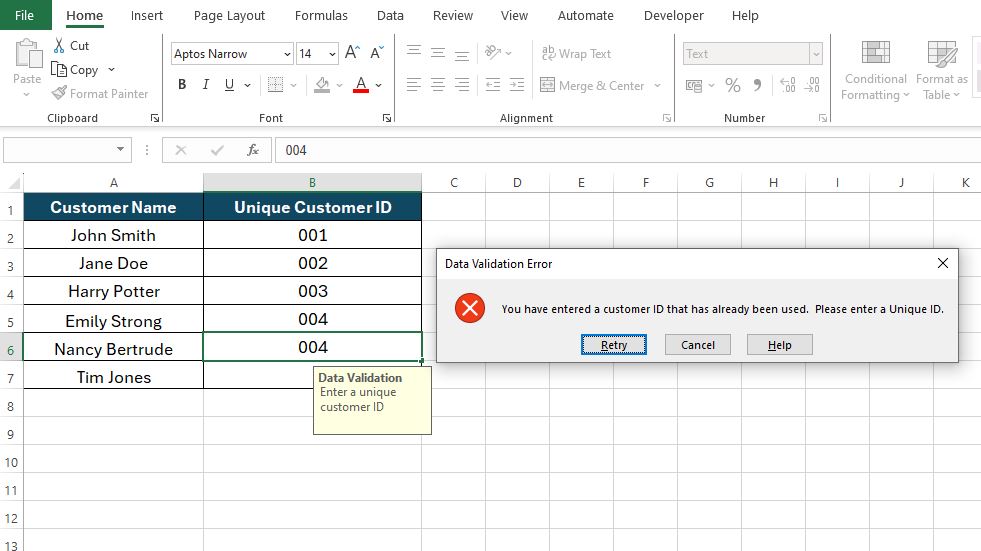
Next select the ‘Error Alert‘ tab. In this tab we can enter a ‘Title‘ for our Error Alert, along with a custom ‘Error Message‘.
For this example we’ll set the ‘Title‘ to “Data Validation Error” and the ‘Error Message‘ to “You have entered a customer ID that has already been used. Please enter a Unique ID.” Then click ‘OK‘ to apply the changes.
Now you will see that if you click on one of the worksheet cells with Data Validation applied you’ll see the input message informing you what is expected.
Equally, if you make an error you will see the customized Error Alert which we have made more descriptive and user-friendly.
Example 7: Removing Data Validation from Cells
Finally there might be occassions where you want to remove the Data Validation rules from some, or all, of the the cells it has been applied on.
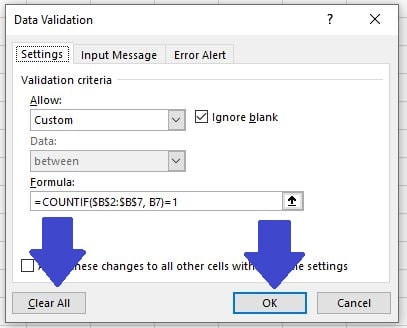
Thankfully this is a simple procedure. Simply select the cell, or cells, that you want to remove the Data Valudation rules from, then from the Excel Ribbon select ‘Data‘ > ‘Data Validation‘ > ‘Data Validation‘ to bring up the Data Validation Input box.
The, in the ‘Data Validation‘ input box click on the ‘Clear All‘ button in the bottom left corner, followed by ‘OK‘. This will clear all the Data Validation rules from the selected cells.
Summary
Data validation in Excel is a critical skill for anyone looking to manage data efficiently and accurately. By applying the techniques shown in the examples above, you can ensure that your spreadsheets are both robust and user-friendly.
Remember, the key to mastering Excel lies in understanding and effectively applying its vast array of features, and data validation is undoubtedly one of the most powerful among them.
Keep Excelling,

Now that you’ve mastered Data Validation in Excel why not download and have a play with one of our free Excel tools, the Excel Bollinger Bands Calculator. This tool is perfect for anyone interested in trading stocks and crypto, better yet it is setup to be simple for anyone to use. Try it out!