
In the fast-paced world of digital data, safeguarding your information is more crucial than ever. This is particularly true when you’re juggling sensitive data in Excel spreadsheets.
Worry not, data defenders! Our latest post is your secret weapon in the realm of Excel security.
Learn how to password protect Excel files effectively – your ultimate strategy to outsmart unauthorized access.
Introduction
There are numerous scenarios where you might need to password protect your Excel file.
In a business context, it’s wise to secure sensitive documents that are being shared through the cloud or over email servers.
Similarly, from a personal standpoint, using Excel’s password protect feature is essential to keep your private financial accounts and budgets safe, particularly in the unfortunate event that your device gets lost or stolen.
This guide is your roadmap to understanding why and how to password protect Excel files, ensuring your data’s security, whether for professional vigilance or personal confidentiality.
How to Password Protect Excel Files
Excel makes it easy to password protect a file, all you need to do is follow a few simple steps.
As always if you are doing this for the first time it would be wise to test using a blank Excel file or make a backup copy of the Excel file you intend to protect first.
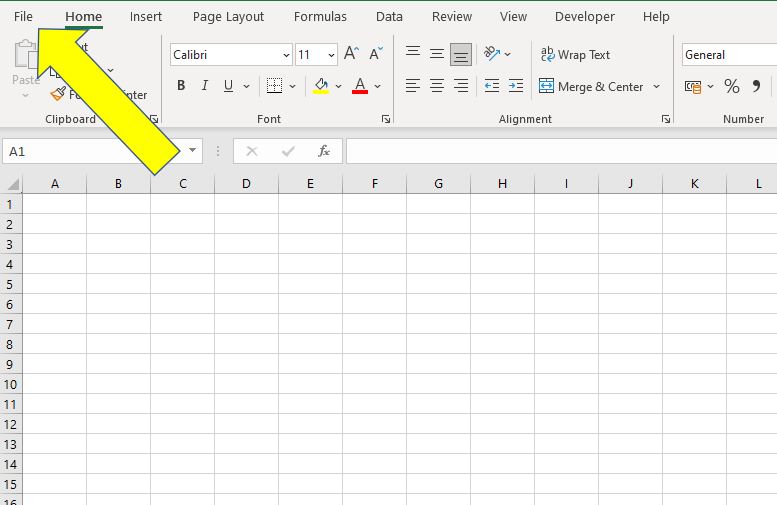
- To start with click on the ‘File’ tab, found on the top left corner of the Excel ribbon.
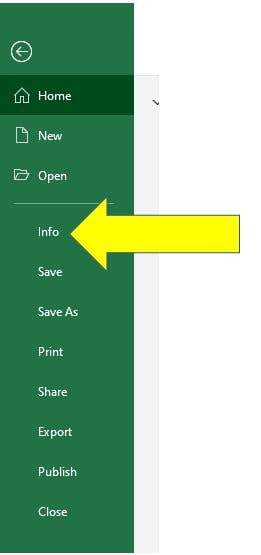
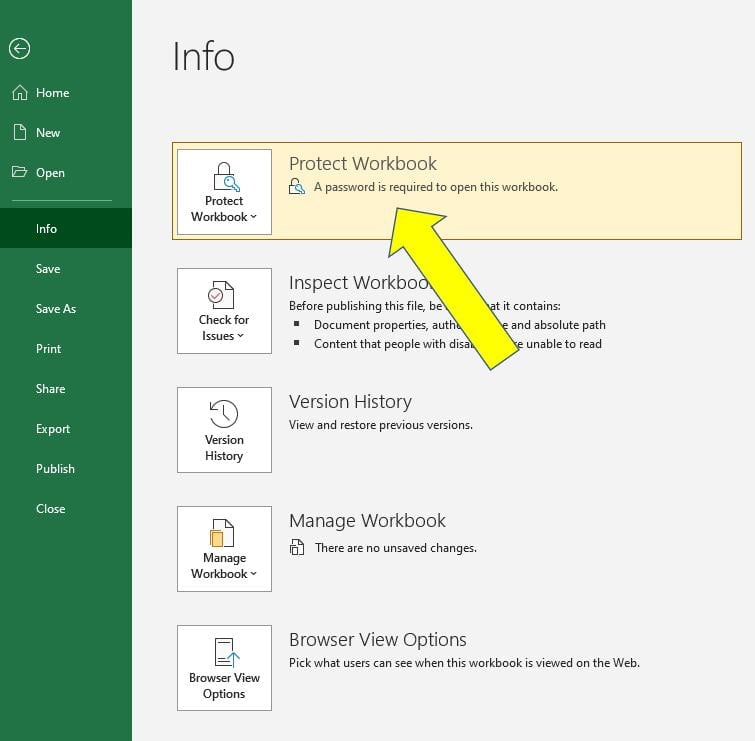
- On the menu, found to the left of the window, select ‘Info.
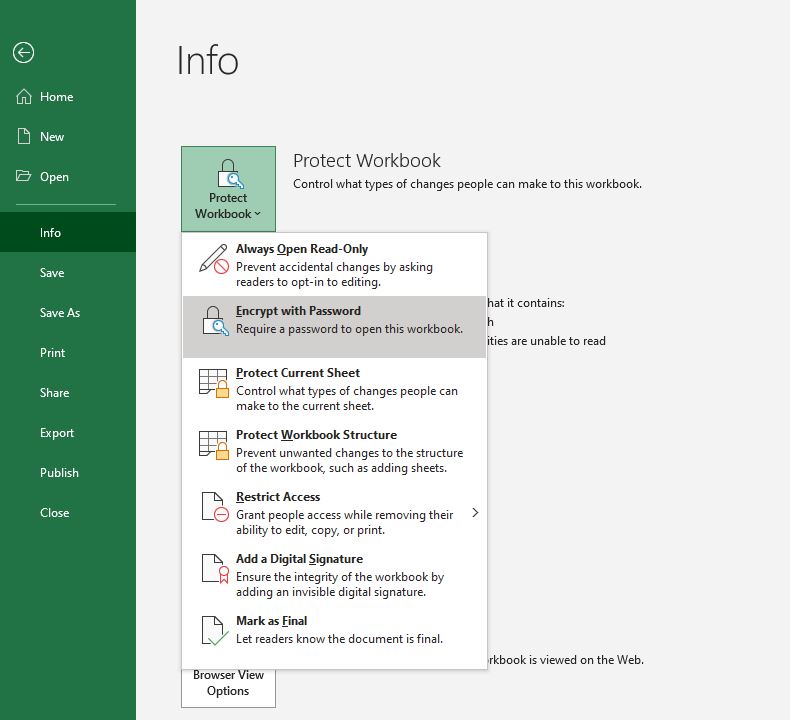
- Within the Info window click on the ‘Protect Workbook’ icon at the top. A drop down will appear and from that select the ‘Encrypt with Password‘ option:
Selecting Your Password
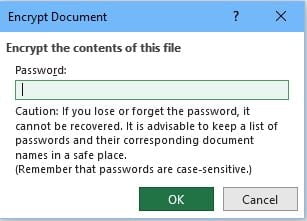
After selecting the ‘Encrypt with Password’ option the ‘Encrypt Document’ box will appear.
- Enter your password (case-sensitive) and click ‘OK‘.
- Excel will ask you to confirm your password, enter the password again and click ‘OK‘.
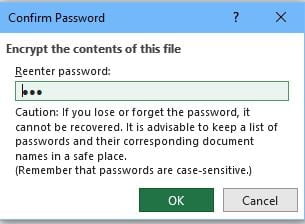
Confirming the Password Process
Almost there!
The Excel file now has a password set, you can confirm this as the Info window should now display the message ‘A password is required to open this workbook.’
If the confirmation is there the last step is to save the workbook, this ensures the password is now required whenever the file is opened next.
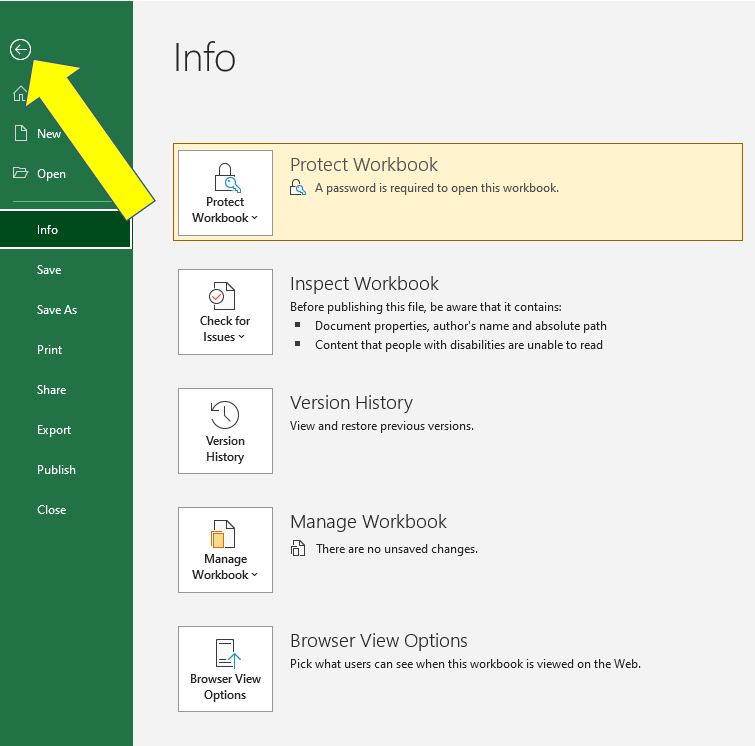
You can then navigate back to your Excel worksheet by clicking on the back icon in the top left corner of the window.
Removing the Excel password
To remove a password from the Excel file complete the same process as detailed above but this time set the password to blank.
This is achieved by removing all the existing characters (they show as black dots) in the Encrypt Document window.
The exact steps are:
- Open Your Excel File: First, open the Excel file from which you want to remove the password.
You will need to enter the existing password if the file is currently protected. - Access the Password Settings:
- Click on the ‘File‘ tab in the ribbon at the top of the Excel window.
- In the menu on the left, select ‘Info‘.
- Under the ‘Protect Workbook‘ click on the option that shows ‘Encrypt with Password‘ or a similar phrase.
- Click on the ‘File‘ tab in the ribbon at the top of the Excel window.
- Remove the Existing Password: In the ‘Encrypt Document‘ window that pops up, you’ll see the password field filled with black dots (representing the current password).
- Clear out all the black dots. Simply click into the password field and use the backspace or delete key to remove all the characters.
- Once the password field is empty, click ‘OK‘ to close the window.
- Clear out all the black dots. Simply click into the password field and use the backspace or delete key to remove all the characters.
The password has now been removed, all that is left to do is save your Excel workbook to ensure the changes are retained.
Factors to Consider When Password Protecting Excel Files
When you password protect Excel files there are some factors worth considering:
- Password Length and Complexity: There’s no minimum password length enforced by Excel, but for better security, it’s recommended to use a password that is at least 8 characters long and includes a mix of uppercase and lowercase letters, numbers, and special characters.
- Character Limit: Excel passwords can be up to 255 characters in length. However, extremely long passwords might be cumbersome to enter and remember.
- Case Sensitivity: Excel passwords are case-sensitive.
This means that “Password” and “password” would be recognized as two different passwords. - Special Characters: Excel supports the use of special characters in passwords. Using them can enhance the strength of the password.
- No Built-in Recovery: If you forget your Excel file’s password, there isn’t a built-in recovery method provided by Excel.
Therefore, it’s crucial to remember your password or keep it stored securely. - Version Compatibility: The strength of Excel’s password protection varies depending on the version of Excel. Newer versions generally offer stronger encryption than older ones.
- No Password Strength Checker: Excel does not have a built-in feature to check the strength of your chosen password, so it’s up to you to ensure that it’s strong enough.
- Vulnerability to Brute-Force Attacks: Simple or short passwords are vulnerable to brute-force attacks, where software is used to try a large number of possible passwords.
Remember, the effectiveness of a password in protecting your Excel file greatly depends on the strength and complexity of the password you choose.
Can Excel Passwords be Compromised or Hacked?
The straightforward answer is yes. Virtually any password, not just those in Excel, can potentially be bypassed with the right combination of tools and expertise.
However, for most applications, Excel’s password encryption offers a robust layer of security.
That said, if your Excel files contain ultra-sensitive or highly confidential information, relying solely on Excel’s built-in password protection might not be sufficient.
In these cases, consider implementing additional security measures, such as specialized encryption software, to fortify your data’s defence.
For those employed in larger organizations or businesses where Excel is used to manage confidential data, there’s often an extra layer of security protocols in place. It’s crucial to liaise with your IT department to understand and adhere to these enhanced security measures.
They typically have access to advanced tools and strategies to protect sensitive information, ensuring that your data remains secure under the company’s tailored security framework.
Conclusion
In summary, learning how to password protect Excel files is a crucial skill for anyone handling sensitive data in spreadsheets.
While this method provides a significant layer of security, it’s essential to remember its limitations and complement it with strong password practices and, when necessary, additional security measures.
For those in larger organizations, adhering to your IT department’s guidelines will further enhance the safety of your data.
As we’ve explored in this post, to password protect Excel files effectively, you should not only focus on setting robust passwords but also be mindful of the broader context of data security.
By combining Excel’s password protection with a thorough understanding of security best practices, you can ensure that your data remains safe yet accessible to authorized users.
Stay proactive, stay informed, and keep your Excel files secure.
Keep Excelling,

Now that you’re savvy about how to password protect Excel files, why stop there? Elevate your data security skills to the next level with our essential guide: ‘7 Ways to Protect Your Data in Excel‘.
Discover more insider tips and tricks to ensure your Excel data is ironclad against threats. Become an Excel security pro today!