Today, I’m diving into the world of spell check in Excel. Have you ever meticulously crafted an Excel spreadsheet, only to find later that it’s peppered with spelling errors? It happens to the best of us.
As someone who’s been there, I understand the frustration and the desire for a solution.
That’s why today, I’m diving into the world of spell check in Excel. This feature, often overlooked, can be a game changer in maintaining the professionalism of your work.
Table of Contents
- Introduction to Spell Check in Excel
- Benefits of using Spell Check in Excel
- How to Use Spell Check in Excel
- Understanding Limitations
- Additional Tips when Using Spell Check in Excel
- Summary
Introduction to Spell Check in Excel
Excel, primarily known for its numerical data management, also includes a handy tool for spell checking. This tool is crucial for anyone who inputs or manages large amounts of text data in Excel.
In this post, I’ll guide you through the nuances of using Excel’s spell check function, an essential skill for beginners and a useful refresher for seasoned users.
Benefits of Using Spell Check in Excel
Learning how to use spell check in Excel has several benefits. Firstly, it ensures accuracy in your spreadsheets, which is vital when they contain text descriptions, comments, or reports.
Secondly, it saves time. Rather than manually proofreading cell after cell, Excel can scan your entire sheet in moments.
Lastly, it enhances your professionalism. Error-free documents reflect well on you and your work, especially in environments where attention to detail is key.
How to Use Spell Check in Excel
In this section, I’ll walk you through a series of practical steps, accompanied by real-world examples, starting with how to access the spell check feature in Excel.
Accessing Spell Check
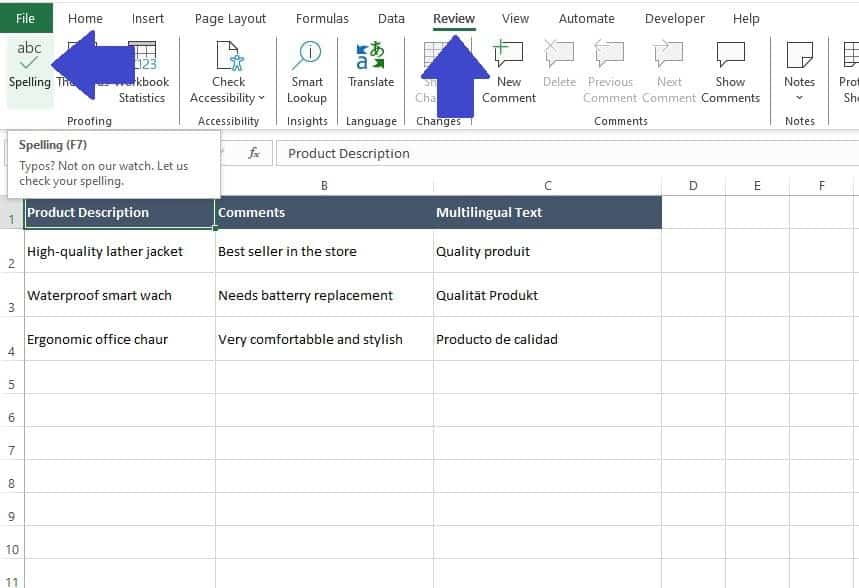
To start a spell check in Excel, simply go to the ‘Review’ tab on the ribbon and click on ‘Spelling’, or use the shortcut ‘F7’.
This opens the spell check dialog box.
Navigating the Spell Check Dialog Box
When the spell check dialog box opens it will automatically highlight the first misspelled word found, assuming there are any.
In our example the Spell Check Dialog Box highlights we have incorrectly used the word ‘leaather‘ in cell A2. It correctly suggests changing that to ‘leather‘.
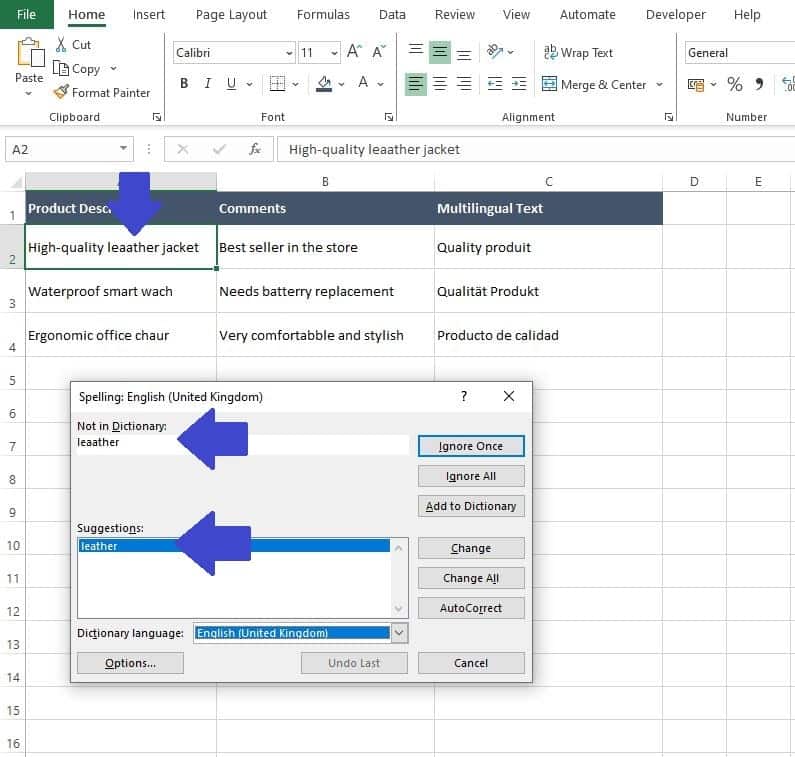
The Spell Check Dialog Box then provides a range of options for you:
- Ignore Once: This option allows you to skip the current spelling suggestion without making any changes. Excel will not correct the word for this instance but will flag it again in future spell checks.
- Ignore All: If you choose this, Excel will ignore all occurrences of the flagged word in the document during the current spell check session. It’s useful when Excel incorrectly flags a word (like a proper noun or acronym) that appears multiple times.
- Add to Dictionary: By selecting this, you add the word to Excel’s custom dictionary. It’s helpful for words you frequently use that are not in the standard dictionary, like specific technical terms or brand names. Once added, Excel won’t flag this word as a mistake in future spell checks
. - Change: This option will replace the currently flagged word with the selected suggestion from Excel. It only changes this specific instance of the word.
- Change All: If you choose this, Excel will replace all instances of the flagged word in the document with the suggested correction. It’s a time-saver if the same mistake is made multiple times.
- AutoCorrect: This feature not only corrects the current word but also adds the correction to Excel’s AutoCorrect list. In the future, if you type the same misspelled word, Excel will automatically correct it.
- Dictionary Language: By default this will be set to your computers system language, however there are times you might want to change the language and you can do so by selecting a new dictionary language using this drop-down.
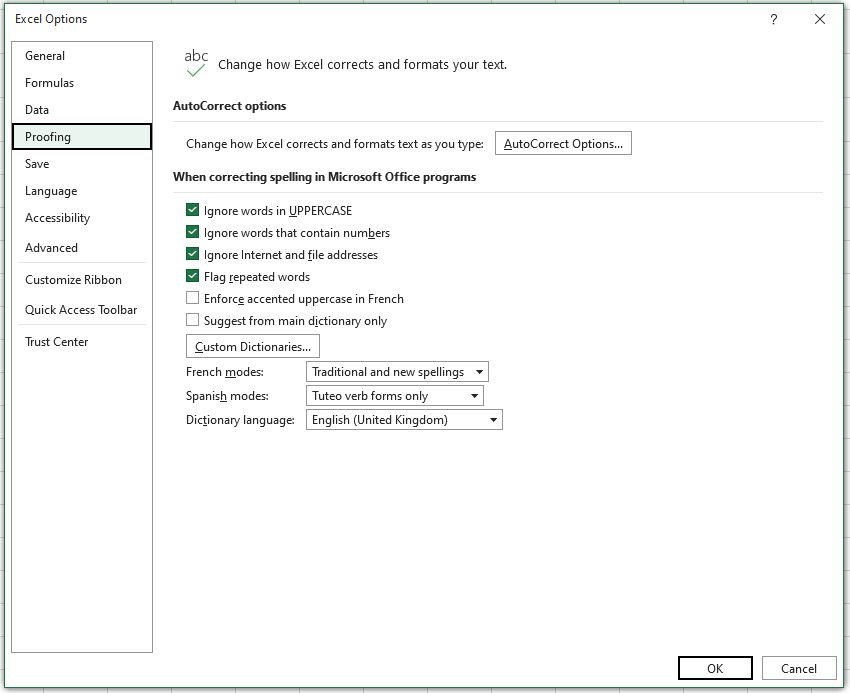
- Options: The Options button opens a dialog where you can customize how Excel’s spell check works. Here, you can decide whether Excel should ignore words with numbers or uppercase letters, and manage other settings related to spell checking.
Checking Specific Parts of Your Spreadsheet
Excel’s spell check can be customized to focus on specific areas of your worksheet.
While it doesn’t allow for checking across multiple sheets at once, you can certainly select specific cells, rows, or columns within a single sheet.
This feature is particularly useful when you want to concentrate on certain parts of your data.
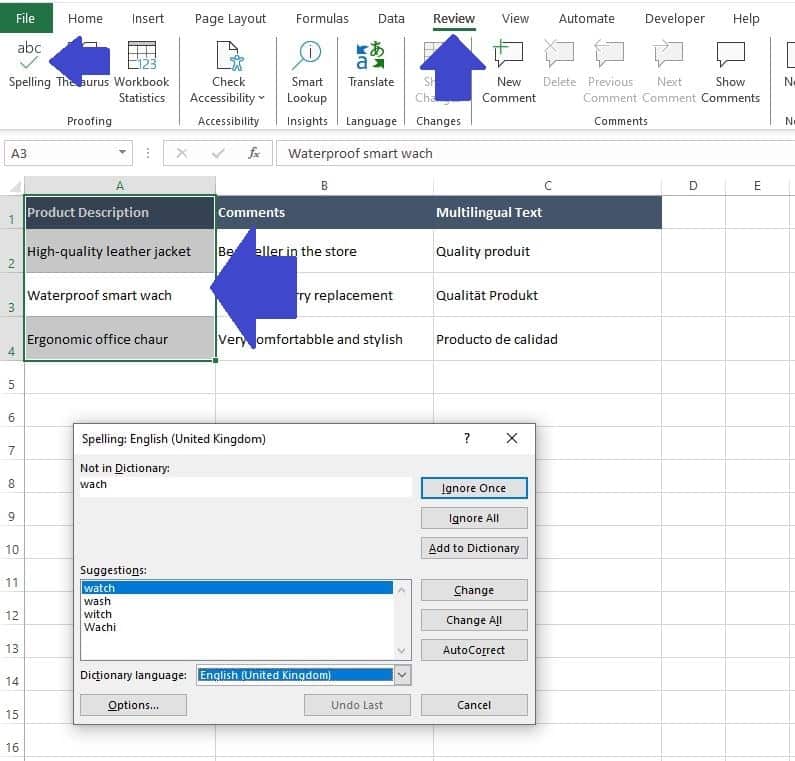
For example, if you’re working on a product list, you might want to specifically check the spelling in the ‘Product Description‘ column to ensure accuracy where it matters most.
This selective approach helps in targeting areas that are text-heavy or more prone to errors.
- Select your data to highlight it.
- Navigate to the ‘Review‘ tab on the Excel Ribbon. Then click ‘Spelling‘ (alternatively press ‘F7‘ to use the shortcut command).
- The Spell Check will be performed just on the highlighted cells.
Dealing with Multiple Languages
If your spreadsheet contains multiple languages you might find some unusual results from the spell check.
When your Excel is set to English, it will likely flag words from other languages as misspelled.
For example, ‘Quality produit‘ (French) or ‘Qualität Produkt‘ (German) would get flagged as incorrect on the current setup:
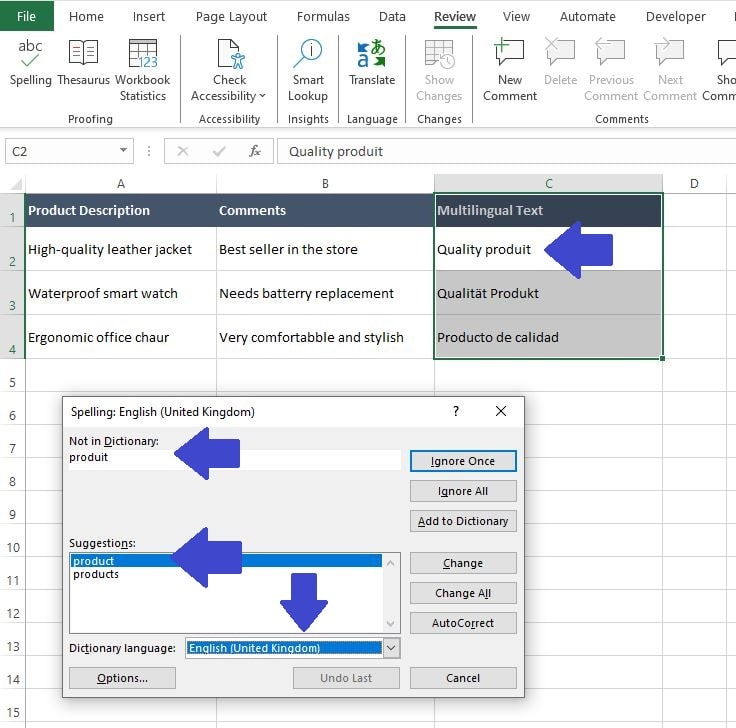
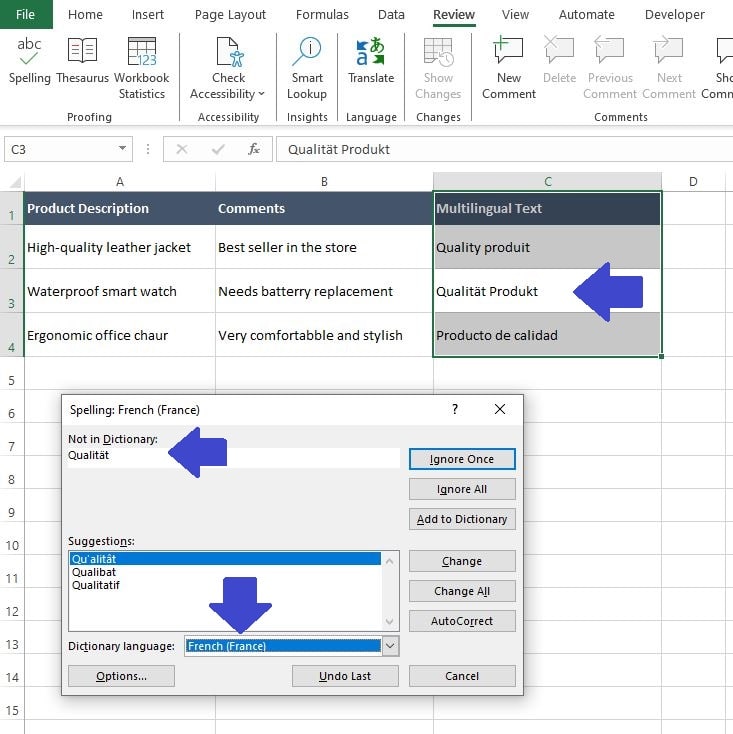
However, when the Dictionary Language is changed to “French (France)” Excel would ignore the ‘Quality produit‘ (French) in cell C2.
It would instead recommend changing the German language ‘Qualität Produkt‘ used in cell C3:
Dealing with spreadsheets that contain multiple languages can be somewhat time-consuming, as it requires running the Excel spell check separately for each language.
However, this situation is generally uncommon for most Excel users.
Understanding Limitations
Excel’s spell check is a useful tool, but it’s important to be aware of its limitations for effective use.
Words in Formulas
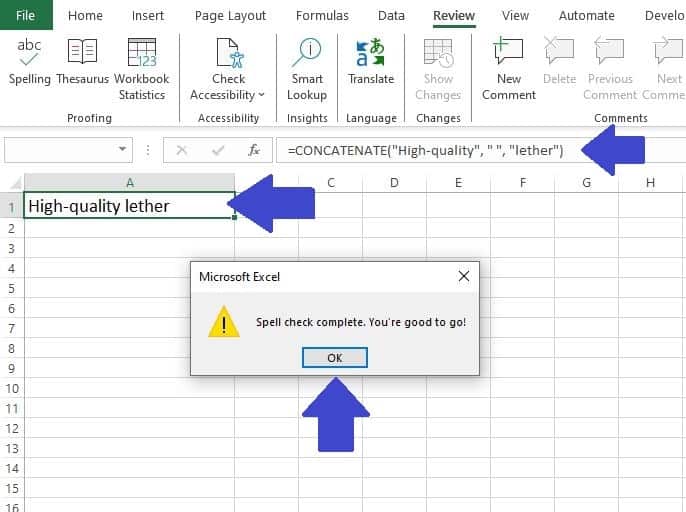
If a cell contains a formula, Excel’s spell check will not check the text within that formula.
For instance, if we have a formula like =CONCATENATE(“High-quality”, ” “, “lether”), where “lether” is a misspelling of “leather“, the spell check won’t flag this error because it’s part of a formula.
Text as Part of Cell Formatting
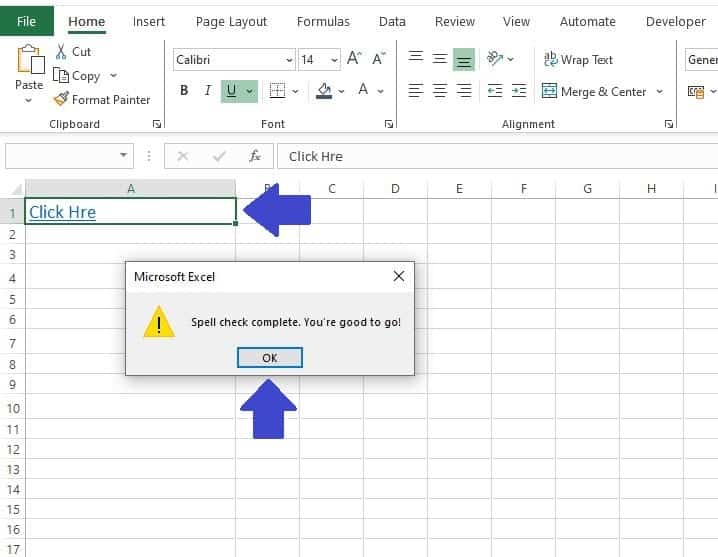
Excel’s spell check might overlook text that is part of certain cell formats.
For example, if you have a cell formatted as a hyperlink containing a typo in the displayed text (like “Click Hre” instead of “Click Here“), Excel might not flag this error during spell check.
This is because the cell is recognized primarily for its hyperlink format, not the text content.
Capitalized Words and Words with Numbers
Excel’s spell check may not effectively identify errors in words that are fully capitalized or contain numbers.
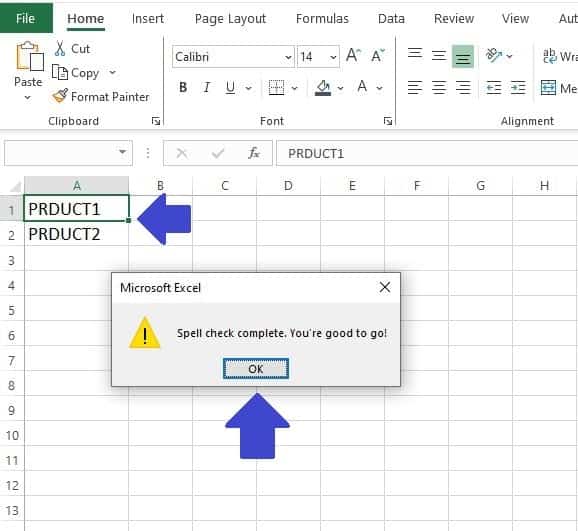
For instance, product codes or acronyms that are typically in uppercase (like “PRDUCT1” instead of “PRODUCT1“) might not be flagged as misspelled.
This is because spell check often assumes capitalized words are either acronyms or proper nouns, which may not follow standard spelling rules.
Additional Tips when Using Spell Check in Excel
Excel’s spell check is a vital tool in your arsenal for maintaining accuracy and professionalism in your spreadsheets. To help you get the most out of this feature, I’ve compiled five additional tips.
These insights will not only enhance your spell checking process but also contribute to a more efficient and effective overall use of Excel.
- Embrace Regular Checks as Part of Your Routine: Incorporating spell check into your regular workflow can significantly enhance the quality of your spreadsheets. Before you consider a spreadsheet final, make running the spell check a mandatory step.
This habit ensures that you catch those sneaky typos and errors that can easily go unnoticed during data entry or editing. Think of it as the final polish that elevates your work from good to great. - Tailor Your Dictionary with Custom Terms: Every industry has its jargon, and Excel allows you to embrace this uniqueness through its custom dictionary feature. By adding industry-specific terms that you frequently use to Excel’s dictionary, you streamline the spell check process for future projects.
This customization not only saves time but also reduces the frustration of repeatedly encountering the same ‘errors’ that aren’t actually mistakes in your field. - The Art of Manual Proofreading: There’s an undeniable value in the human touch when it comes to proofreading. Spell check in Excel is a powerful tool, but it doesn’t understand context or nuances. Always take the time to manually review your spreadsheets, especially for context-based errors or subtle nuances in language that an automated tool might miss.
This careful scrutiny can make all the difference in maintaining the integrity and accuracy of your data. - Shortcut Keys – Your Secret Efficiency Booster: Familiarize yourself with the ‘F7’ shortcut key. This small step can significantly speed up your workflow.
Instead of navigating through menus every time you need to run a spell check, ‘F7’ offers a quick and easy alternative, keeping you efficient and focused on the task at hand. - Stay Updated for the Best Features: Technology is always advancing, and so is Excel. Ensure you’re working with the latest version of the software to take advantage of improved spell check features and other enhancements.
Regular updates often include better error detection algorithms, expanded dictionaries, and overall improvements that can make spell checking more efficient and reliable.
By incorporating these tips into your Excel use, you can ensure your spreadsheets are not only error-free but also refined and professional. Remember, attention to detail can significantly impact the perception and effectiveness of your work.
Summary
Mastering the spell check function in Excel is a simple yet impactful way to enhance the accuracy and professionalism of your spreadsheets.
Whether you’re a beginner or an Excel veteran, paying attention to this detail can make a significant difference in your work. Remember, in a tool as powerful as Excel, it’s not just the numbers that count – the words matter too.
With this guide, I hope you feel confident in using spell check to its full potential, ensuring your spreadsheets are as error-free as possible.
Keep Excelling,

Having mastered the art of spell checking in Excel, you’re well on your way to becoming an Excel pro. But there’s more to learn! A common challenge Excel users face is dealing with duplicate data. Whether it’s a list of contacts, product inventory, or any dataset, duplicates can be a hassle, leading to inaccuracies and inefficiencies.
That’s why I’ve prepared another essential guide for you: How to Find and Remove Duplicates in Excel. In this next post, I’ll walk you through the steps to easily identify and eliminate duplicate entries, ensuring your data is clean and reliable. This skill is crucial for maintaining data integrity and making informed decisions based on your datasets.


