
In this Excel VBA guide, we’re diving into how you can send emails using VBA, making your workflow not just easier, but also more efficient.
Have you ever found yourself in a situation where you need to send out a bunch of emails based on the data in your Excel file? Maybe you’re looking to share reports, updates, or just a friendly reminder to a list of contacts. Well, there’s a powerful tool right at your fingertips that can make this task a breeze: Excel VBA.
Whether you’re tied to Microsoft Outlook or prefer using a Google Gmail account, this post has you covered. Sending emails directly from Excel can save you a ton of time, especially when dealing with a large volume of messages. So, let’s break it down into simple steps, ensuring you can automate this task regardless of the email service you use.
Stick around to learn how to make your Excel sheets do more than just number crunching.
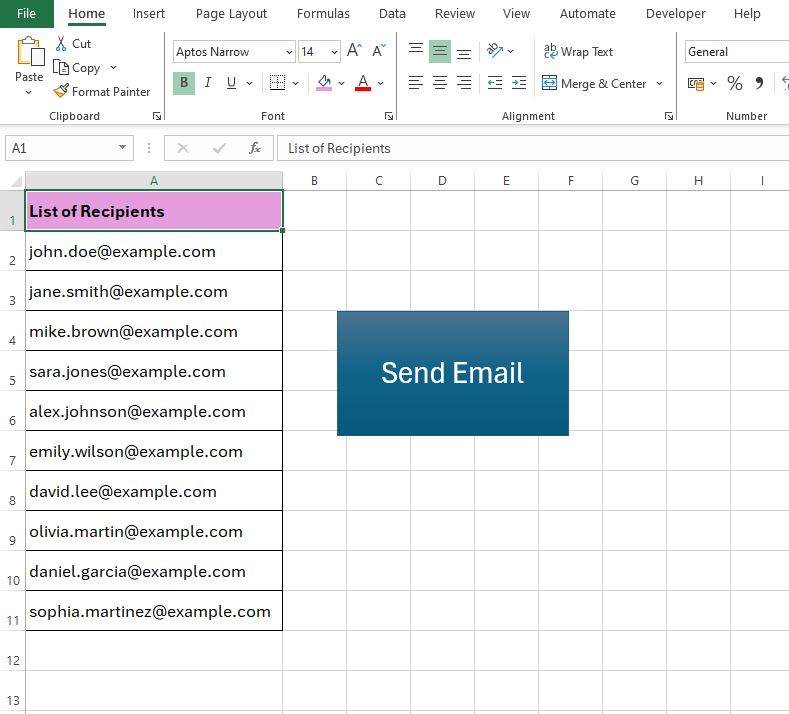
Table of Contents
Introduction
Excel goes beyond being a robust platform for data analysis and reporting, venturing into automating day-to-day tasks that make life easier.
Among its versatile features is the capacity to send emails using VBA, a game-changer for anyone looking to streamline their workflow. This functionality isn’t just about convenience; it’s about leveraging Excel’s power to send emails directly from your workbook.
Whether it’s dispatching bulk emails, detailed reports, or timely notifications, doing so directly from Excel using VBA ensures your communications are both timely and relevant to the data you’re working with.
Benefits of Learning the Topic
Mastering the skill to send emails using VBA in Excel isn’t just about adding another tool to your toolkit; it’s about transforming how you handle communication and data sharing in your professional environment.
This ability automates what are often seen as tedious email tasks, directly taps into the rich data within your Excel files for accuracy, and ultimately, saves a considerable amount of time.
For those tasked with managing either a handful of team members or overseeing operations across large departments, understanding how to send emails using VBA can dramatically enhance your efficiency in communication and data reporting, making your workflow smoother and more integrated.
How to Send Emails Using VBA
Let’s begin our journey of learning how to send emails using VBA.
Starting Out
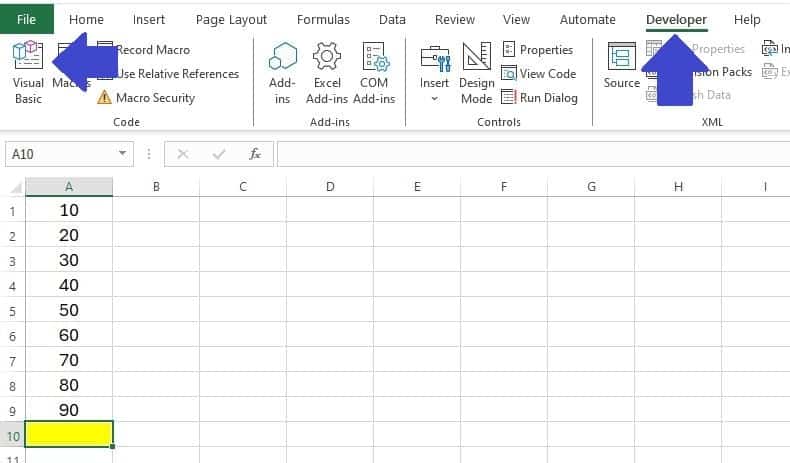
Before diving into the coding part, ensure that you have access to the Developer tab in Excel. If it’s not visible, you can enable it by going to File > Options > Customize Ribbon and then checking the Developer option. If you need more help with this check out the post on How to Add the Developer Tab to Excel.
To Send Emails Using VBA in Excel you need to write your VBA Code in the VBA Editor.
Access the VBA Editor by clicking on the Developer Tab in the Excel Ribbon, then select Visual Basic. Alternatively you can press ‘Alt + F11‘ which is the shortcut command to open the VBA Editor.
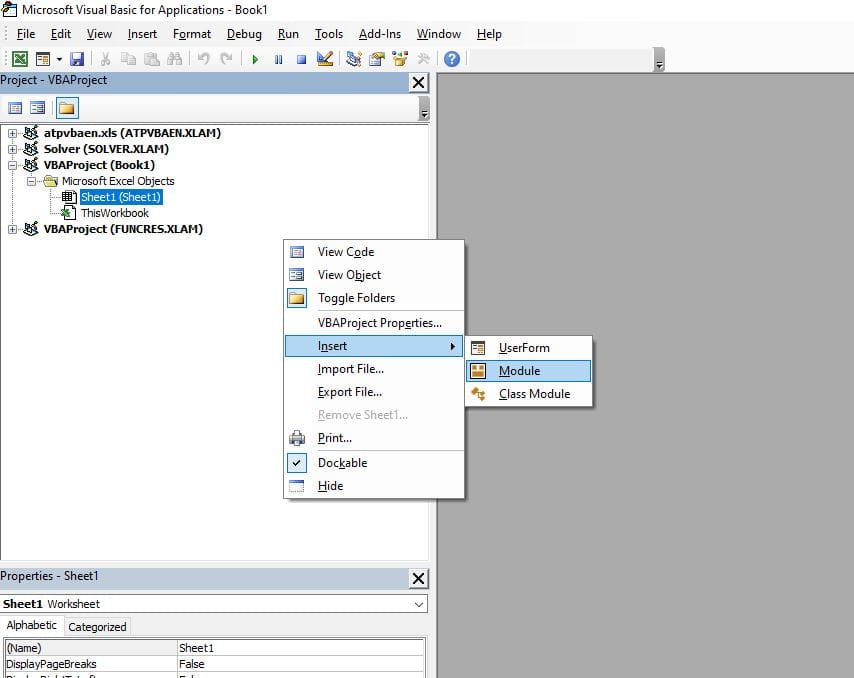
In the VBA Editor, right-click on any of the objects in the Project window, choose Insert, and then Module. This creates a new module where you’ll paste or write your VBA code.
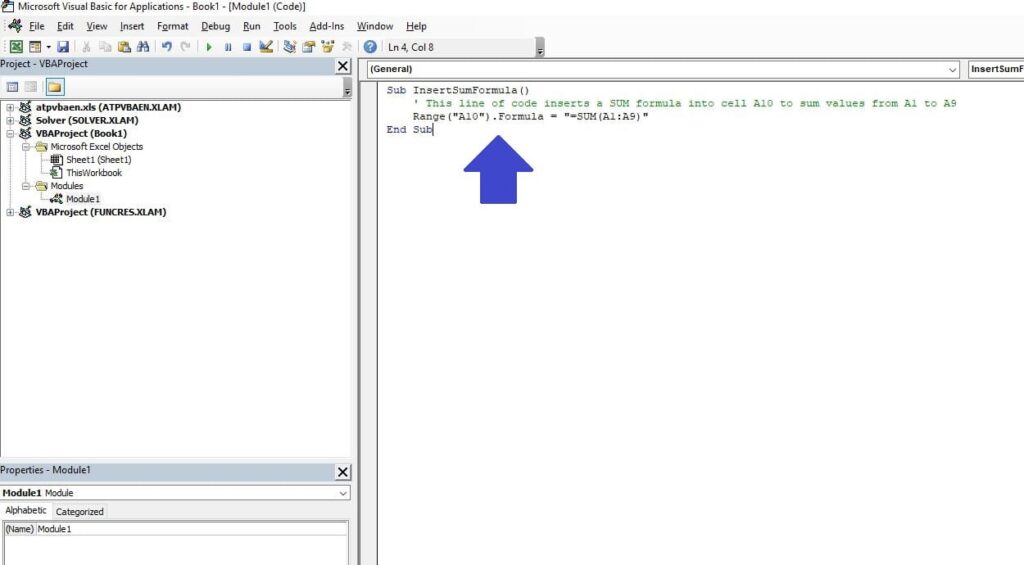
Your VBA code can be written, or copy and pasted, in the Module you have created.
Send the Current Workbook as an Email
One of the most common tasks is to send the current Excel workbook as an email using VBA.
Let’s look at the VBA code to achieve this:
Sub SendCurrentWorkbook()
    Dim OutlookApp As Object
    Dim MItem As Object
    Dim workbookPath As String

    workbookPath = ThisWorkbook.FullName

    Set OutlookApp = CreateObject("Outlook.Application")
    Set MItem = OutlookApp.CreateItem(0)

    With MItem
        .Subject = "Here's the Current Workbook"
        .To = "recipient@example.com"
        .Body = "Attached is the workbook."
        .Attachments.Add workbookPath
        .Display ' Use .Send to automatically send the email
    End With
End Sub
Lets break each section of the VBA code down to give you a better understanding.
Breaking down each section clarifies the email-sending process via VBA, making it easier to customize the code for your needs.
Sub SendCurrentWorkbook()
This line starts the definition of a VBA subroutine called SendCurrentWorkbook. A subroutine is a piece of code that performs a specific task.
    Dim OutlookApp As Object
    Dim MItem As Object
    Dim workbookPath As String
These lines declare three variables. OutlookApp will be used to control Outlook, MItem will represent the email message we’re going to send, and workbookPath will store the path to the workbook you want to send.
workbookPath = ThisWorkbook.FullName
This line assigns the full file path of the current workbook to the workbookPath variable. ThisWorkbook refers to the workbook that’s running this VBA code, and FullName includes both the file path and the file name.
Set OutlookApp = CreateObject("Outlook.Application")
Here, we create a new instance of the Outlook application and assign it to the OutlookApp variable. This step is necessary to control Outlook and send emails through it.
Set MItem = OutlookApp.CreateItem(0)
This line creates a new email item (a message) in Outlook and assigns it to the MItem variable. The 0 indicates that the item is a MailItem, which is the type of object used for emails.
With MItem
With MItem begins a section where we’re setting various properties of the email message we’re creating. This is a neat way to set multiple properties on the same object without repeating the object name each time.
        .Subject = "Here's the Current Workbook"
        .To = "recipient@example.com"
        .Body = "Attached is the workbook."
These lines set the subject line, recipient, and body text of the email. You can customize these strings to suit your needs.
.Attachments.Add workbookPath
This line attaches the workbook to the email. It uses the workbookPath variable, which contains the path to the current workbook.
.Display ' Use .Send to automatically send the email
Finally, .Display shows the email in Outlook so you can review it before sending.
If you prefer to send it automatically without reviewing, you could use .Send instead of .Display, however be cautious with applying this option, at least until you have fully tested your VBA code.
    End With
End Sub
These lines mark the end of the With block and the subroutine. At this point, the email is ready and displayed in Outlook (or sent if you used .Send).
This code provides a straightforward way to automate sending the current workbook via email, making it a handy tool for sharing reports or data with colleagues directly from Excel.
Send a Specific Workbook as an Email
If you want to send a specific workbook, whether it’s closed or located in a different folder, you can specify the path directly in your VBA script. This method is perfect for sending reports or files that are regularly updated at a known location.
Sub SendSpecificWorkbook()
    Dim OutlookApp As Object
    Dim MItem As Object
    Dim specificWorkbookPath As String

    specificWorkbookPath = "C:\Path\To\Your\Workbook.xlsx"

    Set OutlookApp = CreateObject("Outlook.Application")
    Set MItem = OutlookApp.CreateItem(0)

    With MItem
        .Subject = "Subject: Specific Workbook"
        .To = "recipient@example.com"
        .Body = "Find the specific workbook attached."
        .Attachments.Add specificWorkbookPath
        .Display ' Use .Send to send the email automatically
    End With
End Sub
Ensure that the path to your workbook is correctly specified in the specificWorkbookPath variable.
Send Specific Files as an Email
Sending a specific file follows a similar pattern to sending a workbook.
This capability is incredibly versatile, allowing you to send documents, PDFs, images, or any other file type directly from Excel VBA. Here’s how:
Sub SendSpecificFile()
    Dim OutlookApp As Object
    Dim MItem As Object
    Dim filePath As String

    filePath = "C:\Path\To\Your\File.pdf"

    Set OutlookApp = CreateObject("Outlook.Application")
    Set MItem = OutlookApp.CreateItem(0)

    With MItem
        .Subject = "Subject: Specific File"
        .To = "recipient@example.com"
        .Body = "Attached is the file you requested."
        .Attachments.Add filePath
        .Display ' Use .Send to automatically send the email
    End With
End Sub
Don’t forget to replace the filePath with the path to the specific file you intend to send.
This method can be modified to send multiple files by calling the .Attachments.Add method for each file you want to include.
For example, if you want to include a PDF file, an Excel Workbook and a Word Document as attachments in the email you would use the following code.
Sub SendMultipleFiles()
    Dim OutlookApp As Object
    Dim MItem As Object
    Dim pdfFilePath As String
    Dim excelFilePath As String
    Dim wordFilePath As String

    ' Specify the path to each file
    pdfFilePath = "C:\Path\To\Your\File.pdf"
    excelFilePath = "C:\Path\To\Your\File.xlsx"
    wordFilePath = "C:\Path\To\Your\File.docx"

    ' Create a new Outlook application instance
    Set OutlookApp = CreateObject("Outlook.Application")

    ' Create a new mail item
    Set MItem = OutlookApp.CreateItem(0)

    With MItem
        .Subject = "Subject: Multiple Specific Files"
        .To = "recipient@example.com"
        .Body = "Attached are the files you requested."

        ' Add each file as an attachment
        .Attachments.Add pdfFilePath
        .Attachments.Add excelFilePath
        .Attachments.Add wordFilePath

        .Display ' Use .Send to automatically send the email
    End With
End Sub
The key changes to note here are:
- Additional Variables: pdfFilePath, excelFilePath, and wordFilePath variables are defined to store the paths to the PDF, Excel, and Word files, respectively.
- Attaching Multiple Files: The .Attachments.Add method is called three times, once for each file, adding them as attachments to the email.
Send a File to a List of Recipients
Expanding on our journey through the automation capabilities of Excel VBA, an often sought-after feature is the ability to send a specific file to a list of recipients.
This feature becomes invaluable when you need to distribute reports, updates, or any documents to a group, such as a project team, a list of stakeholders, or your clientele.
Let’s explore how you can accomplish this by using Excel VBA to read a list of email addresses from a worksheet and then send a specific file to each of those addresses.
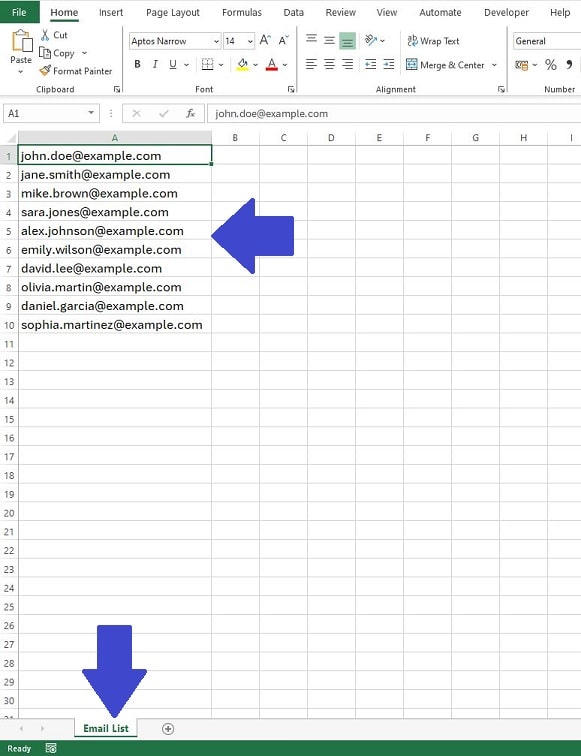
Preparing Your Excel Sheet
First, ensure you have your list of recipients ready in an Excel worksheet named “Email List“. Place each email address in its own cell, starting from A1 to A10.
Of course, you can change the worksheet name and adjust the cell range according to the actual number of your recipients and where they are located.
Writing the VBA Code
Here is how you can write a VBA script that reads each email address from the “Email List” worksheet and sends a specific file to each one.
We’ll assume you want to send a PDF, but you can modify the file path to match the document you need to send.
Sub SendFileToListOfRecipients()
    Dim OutlookApp As Object
    Dim MItem As Object
    Dim cell As Range
    Dim emailRange As Range
    Dim filePath As String

    Set OutlookApp = CreateObject("Outlook.Application")
    filePath = "C:\Path\To\Your\File.pdf"

    ' Define the range of cells containing the email addresses
    Set emailRange = Sheets("Email List").Range("A1:A10")

    For Each cell In emailRange
        If cell.Value <> "" Then ' Ensure the cell is not empty
            Set MItem = OutlookApp.CreateItem(0)

            With MItem
                .Subject = "Important Document"
                .To = cell.Value
                .Body = "Please find the attached document."
                .Attachments.Add filePath
                .Display ' Use .Send to send the email automatically
            End With
        End If
    Next cell
End Sub
Send a File using Google Gmail
To send an email through Google Gmail using Excel VBA, you can use the CDO (Collaboration Data Objects) method.
CDO allows for sending emails from a server that supports SMTP (Simple Mail Transfer Protocol), which Gmail, along with many other mail providers do.
Here’s a basic overview of how you can set this up:
- Enable Less Secure Apps: For your Gmail account, you might need to enable access for less secure apps or set up an App Password, especially if you’re using 2-Step Verification. This is because Google considers email clients that use SMTP to be less secure than modern methods.
- Use CDO to Send Email: You would use VBA to create a script that defines your Gmail SMTP server settings and sends the email.
- Security Considerations: When using Gmail to send emails via VBA, consider the security implications of storing your email credentials in plaintext within your VBA script. Also, keep in mind Google’s policies regarding less secure apps and consider using App Passwords or exploring more secure methods for automating email sending.
Here’s an example of what the VBA code would look like:
Sub SendEmailViaGmailWithAttachment()
    Dim CDO_Mail As Object
    Dim CDO_Config As Object
    Dim SMTP_Config As Variant
    Set CDO_Mail = CreateObject("CDO.Message")
    On Error GoTo Error_Handler

    Set CDO_Config = CreateObject("CDO.Configuration")
    CDO_Config.Load -1

    Set SMTP_Config = CDO_Config.Fields

    With SMTP_Config
        .Item("http://schemas.microsoft.com/cdo/configuration/sendusing") = 2
        .Item("http://schemas.microsoft.com/cdo/configuration/smtpserver") = "smtp.gmail.com"
        .Item("http://schemas.microsoft.com/cdo/configuration/smtpserverport") = 587
        .Item("http://schemas.microsoft.com/cdo/configuration/smtpusessl") = True
        .Item("http://schemas.microsoft.com/cdo/configuration/smtpauthenticate") = 1
        .Item("http://schemas.microsoft.com/cdo/configuration/sendusername") = "yourgmail@gmail.com"
        .Item("http://schemas.microsoft.com/cdo/configuration/sendpassword") = "yourpassword"
        .Update
    End With

    With CDO_Mail
        Set .Configuration = CDO_Config
        .To = "recipient@example.com"
        .CC = ""
        .BCC = ""
        .From = "yourgmail@gmail.com"
        .Subject = "The Subject of Your Email"
        .TextBody = "This is the body of your email."

        ' Add your file attachment here
        .AddAttachment "C:\Path\To\Your\File.pdf"

        .Send
    End With

Error_Handler:
    If Err.Description <> "" Then MsgBox Err.Description
End Sub
Replace “yourgmail@gmail.com” and “yourpassword” with your actual Gmail address and password (or App Password if you’re using 2-Step Verification).
While sending emails via Gmail using Excel VBA is entirely possible, it requires careful consideration of security practices and might involve additional steps compared to the Outlook method.
Additional Tips
When automating email tasks with Excel VBA, especially when sending emails through services like Gmail, there are several best practices and additional tips to keep in mind to ensure a smooth and secure process.
Here are some key points that can help you enhance your scripts and make your automated emailing more effective:
- Choose Between .Display and .Send Wisely: .Display shows the email in your email client before sending, allowing you to review and edit the email. It’s great for double-checking the email’s content or for when manual final approval is needed.
.Send sends the email automatically without any manual intervention. Use this for fully automated processes where you’re confident in the accuracy of your email’s content. - Security Considerations with Gmail: If your script uses your Gmail credentials, be cautious about where and how you store these credentials. Hardcoding them into your script is not recommended for security reasons.
Google may require you to enable access for less secure apps or set up an App Password, especially if 2-Step Verification is enabled for your account. Follow Google’s security recommendations to maintain account security. - Test Before Sending: Always test your email sending script in a controlled environment first. Use a test email account as the sender and recipient to ensure everything works as expected, including attachments being correctly included and the email content formatting properly.
- Consider Encryption for Sensitive Information: If you’re sending sensitive data, consider encrypting the file before attaching it to your email. Encryption protects the data, ensuring that only authorized recipients can access it.
- Monitor Your Email Quota: Be aware of any sending limits imposed by your email provider. Sending a large volume of emails in a short period might lead to your account being temporarily suspended for exceeding quota limits.
- Use Meaningful Subject Lines and Content: Craft your email subject lines and content thoughtfully to ensure they are clear and convey the necessary information. This not only helps in getting your message across but also in avoiding spam filters.
- Maintain a List of Recipients in Excel: For tasks that involve sending emails to multiple recipients, maintain and regularly update a list of recipients within Excel. This makes managing your contacts easier and ensures that your emails reach the intended audience.
- Error Handling: Implement error handling in your VBA scripts to manage any unexpected issues gracefully. This could include logging errors or sending notifications if the email fails to send.
By keeping these additional tips in mind, you can make your use of Excel VBA for sending emails not only more efficient and effective but also secure and reliable.
Remember, the goal is to streamline your workflow while maintaining high standards of data protection and communication clarity.
Summary
In this post, we’ve explored how to send emails using VBA. This process helps you to automate sending emails, whether through Microsoft Outlook or Gmail.
We started by learning to send different types of files, from the current workbook to specific PDF, Excel, and Word documents. We then delved into sending emails to a list of recipients, showing the power of Excel VBA for mass communication.
Along the way, we covered essential tips, including choosing between .Display and .Send, ensuring the security of your Gmail credentials, and the importance of testing your scripts before full deployment. We also touched on encrypting sensitive attachments for added security.
These skills not only save time but also open up new possibilities for efficient and secure data communication directly from your Excel workspace.
Keep Excelling,

Ready to clean up your data with the same ease you’ve mastered sending emails through Excel VBA? Dive into our next guide: How to Find and Remove Duplicates in Excel. Discover the secrets to maintaining pristine datasets, ensuring your analyses are as accurate as they are efficient.